Safety and legal recommendations
All rights reserved. This publication may not be reproduced, copied or stored on a memory device. Furthermore, this publication may not be used for any purpose other than as the instructions for the use of the MESI THERMO MODULE (part of MESI mTABLET THERMO). This publication may not be translated into other languages or converted into other formats in any way without the prior written permission of MESI Ltd.
The contents of the instructions for use may be altered without notice. The latest version of the instructions for use is available at www.mesimedical.com/support/mesi-mtablet/instructions-for-use/.
NOTE: This document can be provided in paper form at no additional cost upon request.
To avoid personal injury and/or damaging the device or accessories, follow the safety recommendations given below.
1.2.1 SETUP AND TECHNICAL PERSONNEL
The device must be set up by authorised personnel with adequate professional training and experience who are aware of all the dangers in relation to the setup of the device and its use and who will take adequate risk prevention measures for themselves, users, other personnel and devices.
1.2.2 ACCESS TO THE DEVICE
Only authorized persons may be given access.
1.2.3 SAFETY MEASURES
Local safety requirements must comply with any and all applicable regulations. In addition to local safety regulations, the safety instructions in this document must also be complied with. In case of any conflict between the safety recommendations in this document and the recommendations stipulated by local regulations, the local regulations prevail.
If a serious incident occurs in connection with the use of the MESI mTABLET THERMO, the user and/or patient must immediately report the incident to MESI, Ltd., and to the competent authority of their respective country of residence. A serious incident includes any malfunction, failure, or deterioration of the device that directly or indirectly results in death or severe deterioration of health.
The device does not contain medicinal products, tissues and cells of human and animal origin, substances intended to be introduced into human body/absorbed/locally dispersed, nor CMR or endocrine-disrupting substances.
Product description
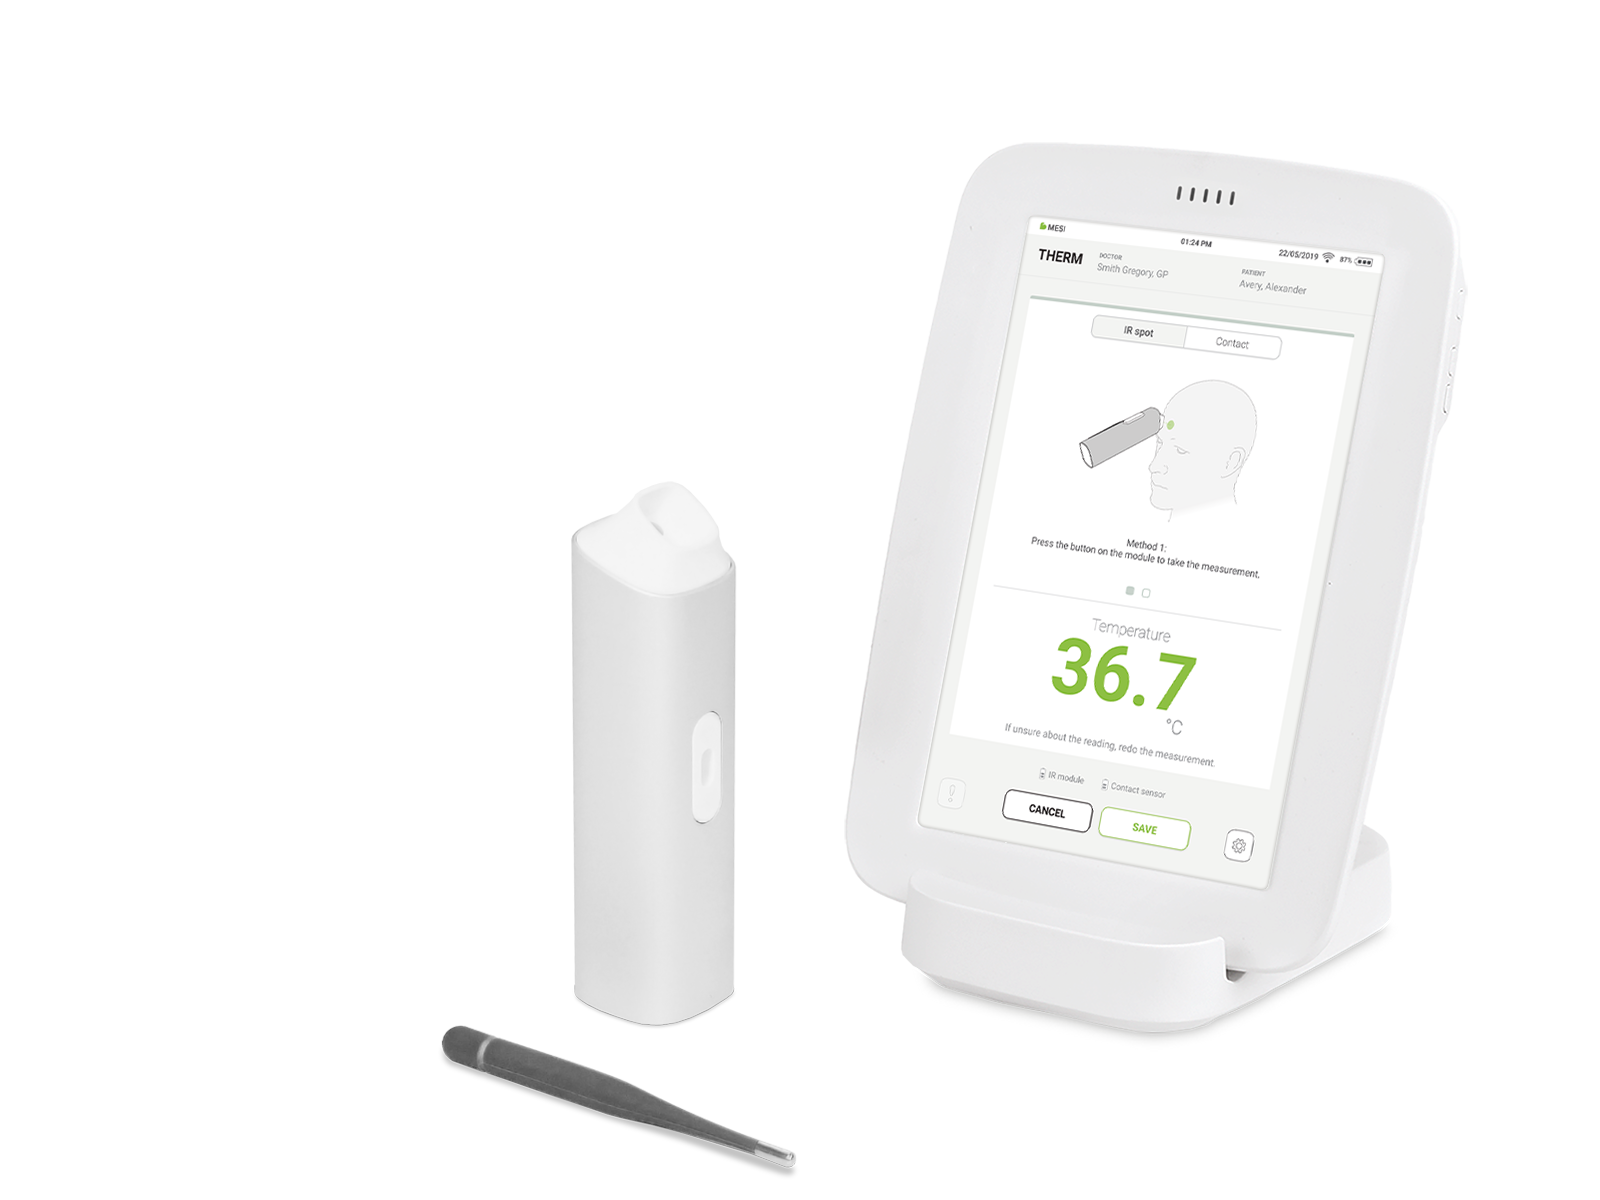
The MESI THERMO MODULE is a wireless temperature module, designed for the MESI mTABLET THERMO system. It is intended to measure human body temperature with an infrared or contact probe. The measured temperature is simultaneously displayed on the MESI mTABLET.
2.1 WHAT IS IN THE PACKAGE
MESI THERMOMETER UNIT (THERMOMD), which consists of:
- MESI mTABLET INFRARED PROBE (IRTMD)
- MESI mTABLET CONTACT PROBE (CTMD)
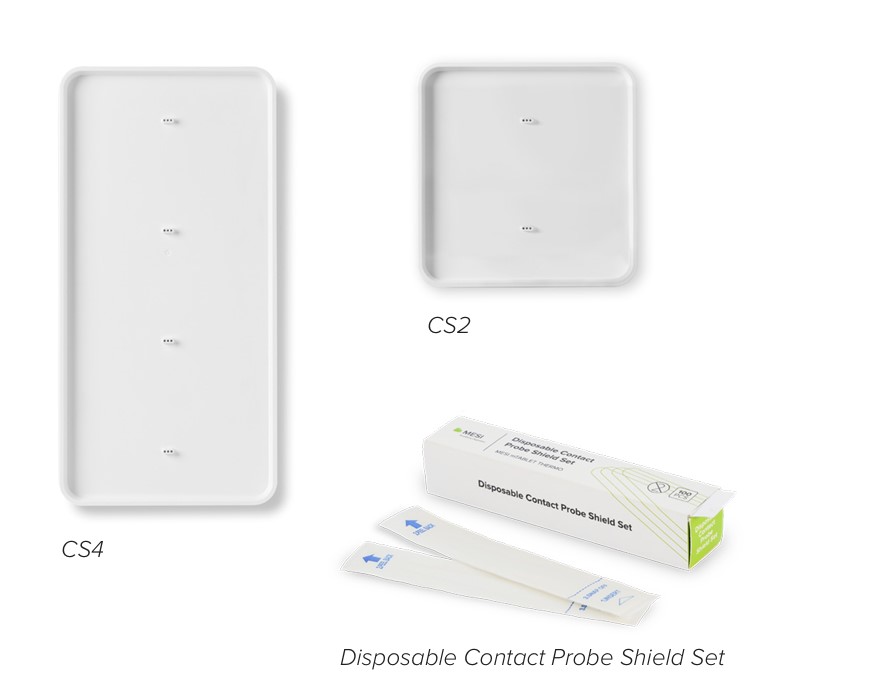
MESI disposable contact probe shield set (100 pieces)
Quick guide
Wireless medical tablet system (MTABSYSW) (separate packaging), which consists of:
- MESI mTABLET UNIT (MTABMD)
- MESI mTABLET WI-FI DOCKING UNIT (MTABDSW)
4-port charging station (CS4SYS) or 2-port charging station (CS2SYS) module
Calibration report, Declaration of conformity
2.1.1 ACCESSORIES
NOTE: Contact your local distributor for more information on accessories.
⚠️Use only accessories and other parts recommended or supplied by MESI. Use of other than recommended or supplied parts may result in injury, inaccurate information and/ or damage to the unit. Follow the instructions that are provided with the specific accessory.
2.2 INTENDED PURPOSE
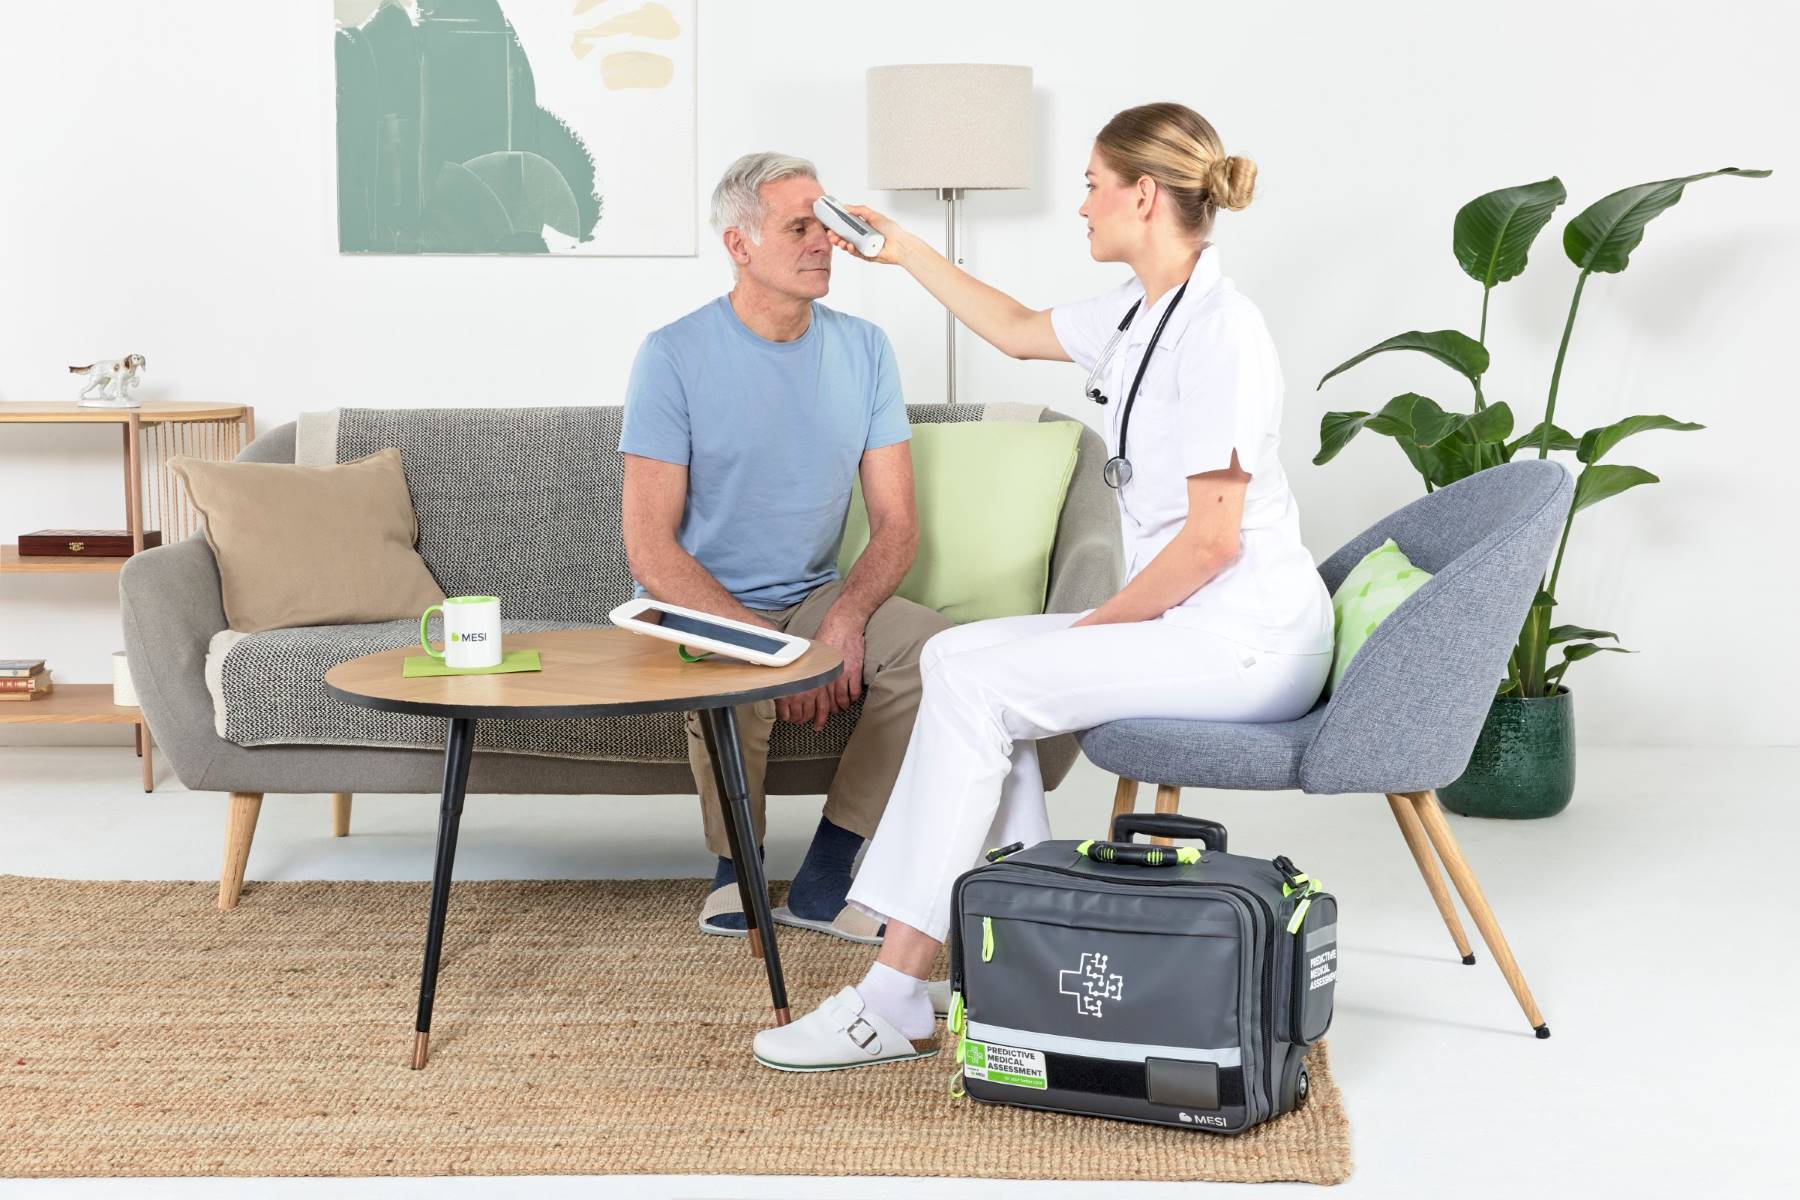
The MESI mTABLET THERMO is a wireless digital thermometer designed to measure body temperature in both adult and paediatric patients. The system is comprised of a wireless medical-grade tablet, temperature diagnostic module, and charging station.
The device features two types of probes: infrared and contact. The infrared probe allows for quick temperature measurements, while the contact probe can provide more accurate readings. The infrared probe of the MESI mTABLET THERMO operates in adjusted mode. It provides a forehead temperature reading, adjusted to represent axillary temperature. The contact probe operates in directed mode, with no adjustments applied to the measurement.
The device is recharged through the AC/DC power supply, however, the MESI mTABLET THERMO module is not intended to be used while connected to mains electricity.
The MESI mTABLET THERMO module is intended for use exclusively by healthcare professionals in clinical and home settings.
NOTE: Only the MESI THERMOMETER UNIT and MESI mTABLET UNIT are suitable for use in a home environment as they have sufficient IP ratings. To avoid any inconvenience, make sure they are fully charged. Other system components, including the 4-port charging station, 2-port charging station, and MESI mTABLET WI-FI DOCKING UNIT, do not meet the required IP rating and should not be used in a home setting.
2.2.1 INTENDED MEDICAL INDICATIONS AND CONTRAINDICATIONS
The MESI mTABLET THERMO system's medical indications include the detection of pyrexia and hypothermia.
The contraindications for using the infrared and contact thermometer on different measurement sites are listed below.
Measuring temperature using the infrared thermometer:
Skin conditions: not suitable for individuals with skin conditions on the forehead or measurement area, as this may cause inaccurate readings.
Recent physical activity: exercise or sweating can affect temperature accuracy.
Environmental factors: direct sunlight or cold exposure may impact measurement precision.
Skin variability: differences in skin color and moisture levels can influence accuracy.
Patient movement: movement during measurement may lead to errors.
Operator experience: accuracy may depend on the operator’s experience and training.
Measuring axillary temperature using the contact thermometer:
Skin conditions: rashes, burns, or infections in the armpit may cause inaccurate readings.
Recent physical activity: increased skin temperature can lead to misleading results.
Excessive sweat: high perspiration levels may affect measurement accuracy.
Obesity: excess body fat can interfere with accurate readings.
Measuring oral temperature using the contact thermometer:
Mouth conditions: oral infections, sores, or recent dental work can impact accuracy.
Recent food or drink intake: hot or cold food and beverages can temporarily alter oral temperature readings.
Mouth breathing: breathing through the mouth may affect measurement accuracy.
Age considerations: young children may struggle to hold the thermometer correctly, leading to errors.
Measuring rectal temperature using the contact thermometer:
Rectal conditions: hemorrhoids, rectal surgery, or anal fissures may cause discomfort or contraindicate use.
Patient discomfort: some individuals may find rectal thermometry invasive and resist its use.
Age considerations: generally not recommended for older children or adults unless medically necessary.
2.2.2 CLINICAL BENEFITS
The key clinical benefits of using the MESI mTABLET THERMO system include:
Early fever detection: precise temperature readings enable the early identification of fever, a key symptom of infections and illnesses, allowing timely medical intervention.
Improved patient care: accurate thermometry supports healthcare professionals in diagnosing, managing conditions, and assessing treatment responses.
Enhanced diagnostic accuracy: reliable temperature measurements aid in diagnosing conditions linked to body temperature changes, ensuring informed treatment decisions.
Disease transmission prevention: in healthcare settings, precise temperature monitoring helps identify febrile individuals, reducing the risk of spreading infections.
Critical patient monitoring: for critically ill patients, continuous temperature tracking is vital for detecting health fluctuations that may signal deterioration or recovery.
Public health surveillance: during outbreaks, accurate thermometry assists in fever screening, enabling early detection, containment, and response to epidemics.
Research & data analysis: reliable temperature data supports medical research, helping analyse body temperature variations across populations, age groups, and clinical conditions.
Technical specifications
The technical information regarding the MESI THERMO MODULE, its measurements and accessories are provided below.
3.1 MESI THERMOMETER UNIT (THERMOMD)
3.1.1 Infra-red probe
3.1.1.1 Dimensions
Width: 40 mm (1.57 inches)
Depth: 41.6 mm (1.57 inches)
Height: 153 mm (7,05 inches)
Weight: 213 g
3.1.1.2 Power & Battery
Power & Battery| Column A | Column B |
|---|
| Battery type | Rechargeable Lithium-Polymer battery |
| Capacity | 2x620 mAh |
| AC/DC adaptor | NEO030.0-I-X-05 |
| Input | 100-240 V AC / 50-60 Hz / 600-300 mA |
| Output | 5V DC / 5.0 A |
| Number of measurements per battery charge | >2500 |
| Continuous use | 19h |
| Charge time for depleted battery | approx. 2h |
| Number of discharge cycles or years after which a rechargeable battery needs to be replaced | 500 cycles |
3.1.2.1 Dimensions
Contact probe - Dimensions| Column A | Column B |
|---|
| Fi | 10 mm (0.39 inches) X 9 mm (0.35 inches) |
| Length | 118 mm (4.65 inches) |
| Weight | 7.5 g |
3.1.2.2 Power & Battery
Contact probe - Power and battery| Column A | Column B |
|---|
| Battery type | Rechargeable Lithium-Polymer battery |
| Capacity | 15 mAh |
| Wireless charging from IRT | |
| Number of measurements per battery charge | >120 |
| Continuous use | 2h |
| Charge time for depleted battery | approx. 2h |
| Number of discharge cycles or years after which a rechargeable battery needs to be replaced | 500 cycles |
⚠️To prevent electric shock hazards due to current leakage, only use AC/DC power supplies that are compliant with the technical specifications of the device. The AC/DC power supply must be connected to an easily accessible socket (the AC/ DC power supply also serves as galvanic isolation).
3.2 DEVICE SPECIFICATIONS
3.2.1 CLASSIFICATION
Classification| Column A | Column B |
|---|
| Protection against electric shock | Class II |
| Medical device classification | Class IIa |
| Applied parts | Type BF Applied part |
| Software classification | Class B |
| RF emissions (CIPSR 11) | Group 1. Class A |
3.2.2 OPERATING CONDITIONS
⚠️Thermometers have a specific temperature range set by the manufacturer. Using them outside this range can cause inaccurate readings.
3.2.2.1 Infra-red probe
OPERATING CONDITIONS - Infra-red probe| Column A | Column B |
|---|
| Operating temperature | 15° to 40°C |
| Relative humidity | 15 to 90% (no condensation) |
| Pressure during operation | 700 to 1060 hPa |
| Ingress protection rating | IP42 |
NOTE: The probe is protected against the ingress of solid objects larger than 1 mm and against vertically falling water drops when the enclosure is tilted up to 15 degrees.
OPERATING CONDITIONS - Contact probe| Column A | Column B |
|---|
| Operating temperature | 10 to 40 °C |
| Relative humidity | 15 to 90% (no condensation) |
| Pressure during operation | 700 to 1060 hPa |
| Ingress protection rating | IP66 |
NOTE: The probe is dust-tight and protected against powerful water jets.
⚠️If the device is used or stored outside the specified environmental parameters, the accuracy specified within the technical specifications of the device is not guaranteed.
3.2.2 MEASUREMENT SPECIFICATIONS
3.2.3.1 Infra-red probe
Measurement specifications - Infra-red probe| Column A | Column B |
|---|
| Distance from measuring point | 3 cm |
| Measurement range | Surface temperature: 34 to 42 °C
Body temperature: 36,4 to 43,8 °C |
| Extended measurement range | Surface temperature: 28,6 to 41,2 °C
Body temperature: 32 to 43 °C |
| Accuracy for measurement range | ± 0,3 °C |
| Accuracy for extended measurement range | ± 0,4 °C |
Measurement specifications - Contact probe| Column A | Column B |
|---|
| Measurement range | Surface/body temperature: 34 to 42 °C |
| Extended measurement range | Surface/body temperature: 32 to 43 °C |
| Accuracy for measurement range | ± 0,1 °C |
| Accuracy for extended measurement range | ± 0,1 °C |
3.2.4 CONNECTIVITY
3.2.4.1 Infra-red probe
Data connectivity with MTABMD (Bluetooth 2.1 + EDR)
Connectivity - Infra-red probe| Receiving section | Column B |
|---|
| Frequency range | 2402 MHz – 2480 MHz |
| Bandwidth | 1 MHz |
Connectivity - Infra-red probe| Transmitter | Column B |
|---|
| Output power | 0 dBm |
| Frequency range | 2402 MHz – 2480 MHz |
| Modulation | GFSK |
Contact probe BT low energy| Column A | Column B |
|---|
| Frequency range | 2402 MHz – 2480 MHz |
| 2402 MHz – 2480 MHz | 1 MHz |
1 MHz | Column A | Column B |
|---|
| Output power | 0 – 8 dBm |
| Frequency range | 2402 MHz – 2480 MHz |
| Modulation | GFSK |
3.3 CALIBRATION AND CALIBRATION CHECK
The calibration of the MESI mTABLET THERMO module shall be performed yearly by the manufacturer or certified personnel.
Instructions for use
Before using the device for the first time, read the instructions carefully and follow all their recommendations and suggestions. This chapter contains all the information required for safe, correct and accurate measurement with the MESI mTABLET THERMO. It includes a detailed description of all features, the safety instructions, and all information required to understand the operation of the device.
4.1 DEVICE EXPLANATION
The MESI mTABLET THERMO module has two probes:
NOTE: The device does not contain any medicinal product, tissues and cells of human or animal origin, substances intended to be introduced into human body, absorbed or locally dispersed, nor does it contain any CMR or endocrine – disrupting substances.
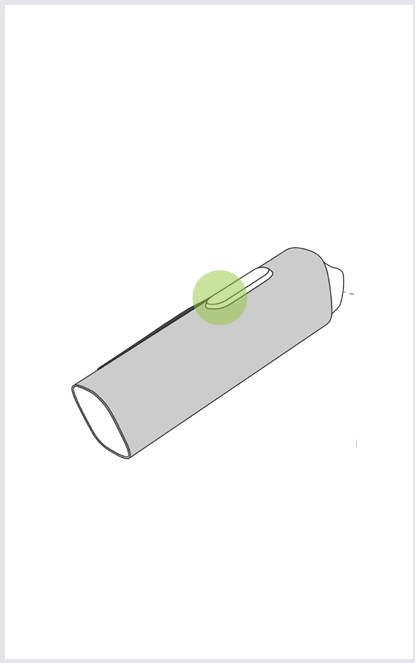
4.1.1 IR PROBE
The IR probe has:
An IR sensor
A distance sensor
A measurement button
Light distance indicators / Measurement interpretation indicators
A MESI button for turning the device ON, resetting it, and connecting it via Bluetooth
A contact probe docking station
A connection for the docking station
The contact probe has:
NOTE: The contact probe includes a stainless steel front cap and a silicone rear cap, both secured with medical-grade adhesive. In the unlikely event that either cap becomes loose, there is a risk of choking. Keep out of reach of children and patients unable to safely use the device.
4.2 FIRST-TIME USE
4.2.1 BASIC FUNCTIONALITIES
The MESI mTABLET THERMO is a wireless system intended for performing thermometry measurements. It is comprised of a MESI mTABLET UNIT, a MESI LARGE CHARGING PLATE (CS4SYS) or a MESI SMALL CHARGING PLATE (CS2SYS) and a MESI THERMO UNIT.
4.2.2 AC/DC POWER SUPPLY AND BATTERY
The MESI THERMO UNIT uses two power sources: the mains electricity (using an AC/DC power supply for charging) and battery power (while performing measurements).
Connect the AC/DC power supply to a wall socket with a mains voltage of 100-240 V at 50-60 Hz and to the connector at the back of the device.
The battery of the device is now charging. During this process, the light on the module flashes orange. When the device is fully charged, it starts flashing green. For more information, see chapter 4.7.1 – LED indicators.
4.2.3 ACTIVATION
When setting up the MESI THERMO UNIT for the first time, it needs to be activated out of the shipping mode. The device will not respond until it is placed on the MESI LARGE CHARGING PLATE (CS4SYS) or MESI SMALL CHARGING PLATE (CS2SYS), and a multifunctional button illuminates. It is recommended that the MESI THERMO UNIT is fully charged before initial use.
NOTE: The battery inside a completely new device is probably not completely empty and can provide enough power to start up the device. Nevertheless, connect the device to the mains electricity using the AC/DC power supply before its first use.
4.2.4 BATTERY STATUS
The MESI THERMO UNIT comes with an internal battery. Press the button at the top of the MESI THERMO UNIT to wake up the module. If the green light flashes, the module is ready for the next step. If you need more information about battery charging, see chapter 5.1 – Charging the battery.
NOTE: When the battery needs to be replaced, the MESI mTABLET UNIT will display a battery warning. For more information, see chapter 7 – Errors.
4.2.5 PAIRING
Before any measurements can be performed, the MESI THERMO UNIT needs to be paired to the MESI mTABLET UNIT. Take the MESI mTABLET UNIT and open Doctor’s profile (for more information about user accounts, see MESI mTABLET Instructions for Use, chapter 9 – “Managing users”.
Step 1
Go to User Profile > Settings > Modules > +Add Module.

Step 2
Press the button at the top of the MESI THERMO UNIT.
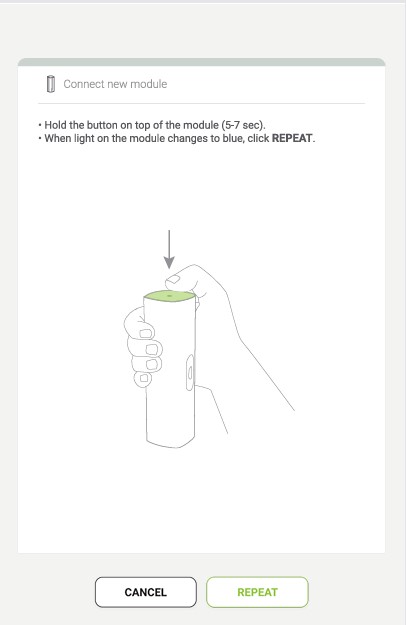
Step 3
When the MESI mTABLET UNIT establishes a connection with the MESI THERMO unit, the light at the top of the module will change. Confirm the pairing process by pressing that button again.
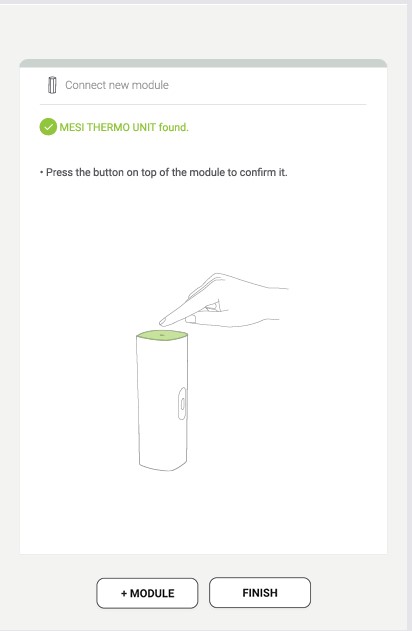
Step 4
The final screen shows a successful connection between the MESI mTABLET UNIT and the MESI THERMO UNIT. You can access all technical information about the connected modules in User profile > Settings > Modules.
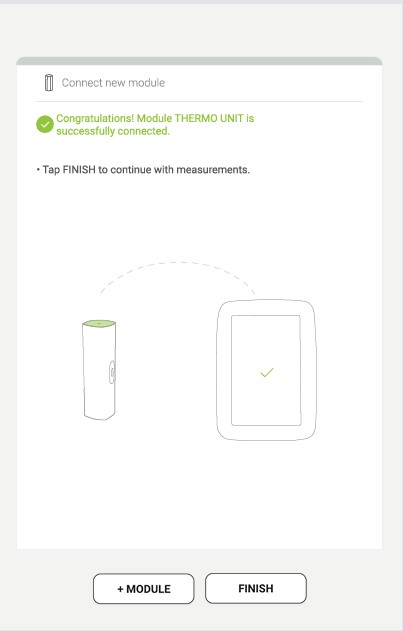
NOTE: When operating one MESI mTABLET UNIT only, this operation is only required once. In case of more MESI mTABLET UNITS, this process has to be repeated on each MESI mTABLET UNIT.
NOTE: The pairing process needs to be performed with all modules being used.
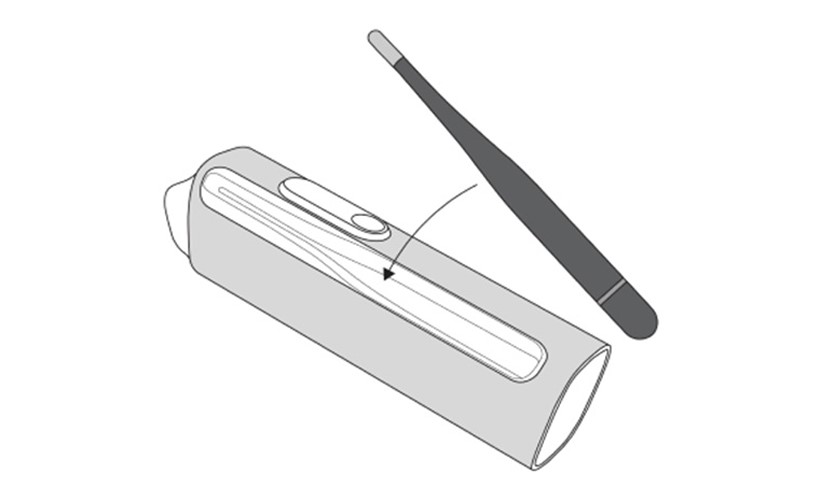
NOTE: The contact probe must always be used with the MESI contact probe shield. Do not use it without a shield or with other brands. The probe shield does not affect measurement accuracy.
Before using the MESI THERMO contact probe, apply the MESI disposable contact probe shield to prevent cross-contamination.
Step 1
Hold the probe shield and insert the thermometer between the two tabs. Slide to the farthest point.
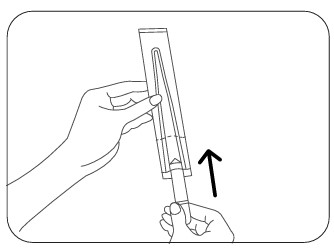
Step 2
Hold the thermometer and the back of the shield firmly. Peel away the front paper protective cover.
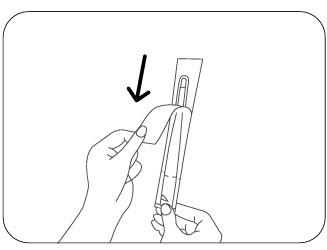
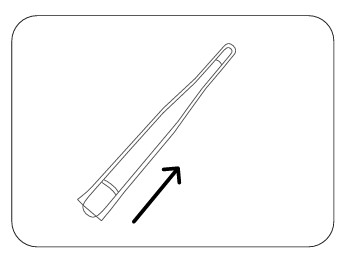
Step 3
Peel away the paper backing. The thermometer is now protected and ready for use.

Step 4
After use, remove the disposable probe shield without touching the contaminated part and dispose of it.
The MESI disposable contact probe shield set contains 100 contact probe covers.
⚠️While attaching the MESI disposable contact probe shield onto the MESI THERMO contact probe, check for any openings that may occur during placement.
⚠️Dispose the contact probe shield after the measurement. Do not clean the probe shield as this increases the risk of cross-contamination.
4.3. PATIENT SELECTION
Before performing a measurement, a patient needs to be selected or added to your working group’s patient list.
4.3.1 SELECTING A PATIENT
Step 1
Press the Patient tab button on the home screen.
Step 2
Use the search bar (1) or scroll (2) to the patient who is having the THERMO measured.
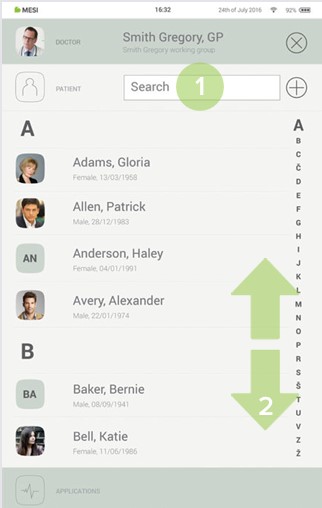
Step 3
Select the patient.

4.3.2 ADDING A PATIENT
Step 1
On the home screen, press the + button in the Patient tab.
Step 2
Fill out required fields (Name, Surname, Date of Birth and Gender) and any additional information regarding the patient.
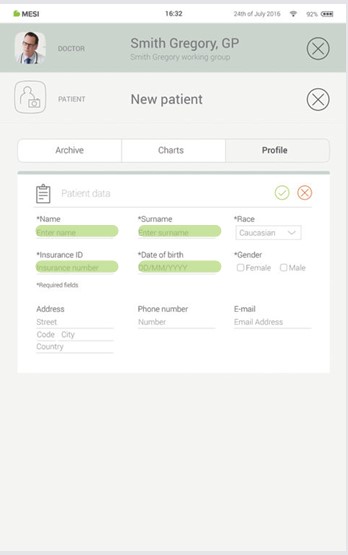
Step 3
Save the patient by pressing the ✔️ or ”SAVE” button. Cancel adding the patient by pressing the ”X” or ”Delete patient” button.
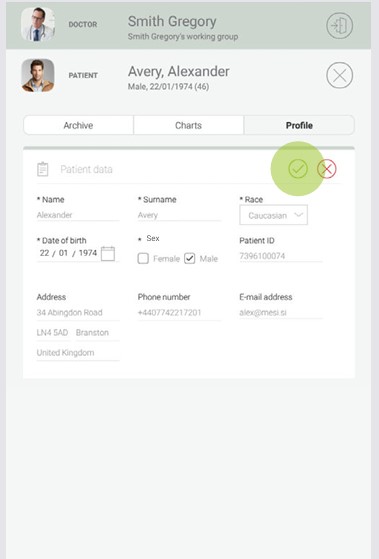
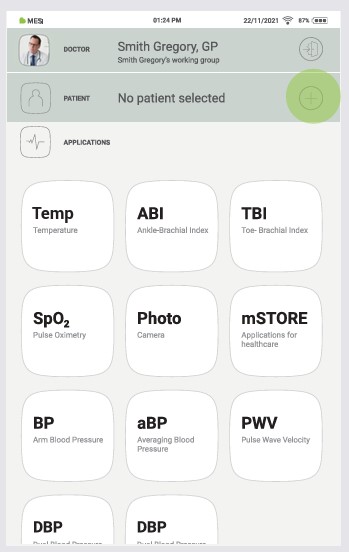
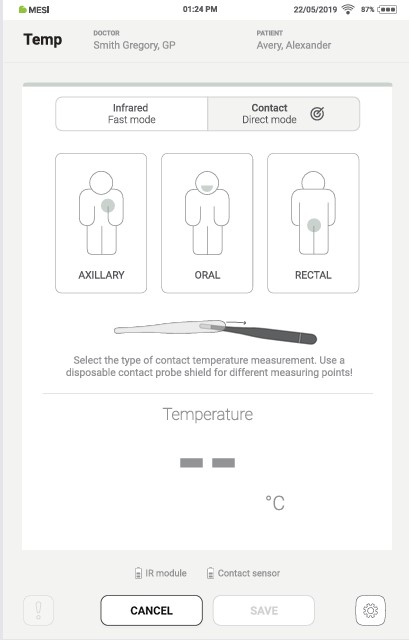
After selecting a patient as described in the previous chapter, press the Temp application in the applications menu.
NOTE: For additional information, see the MESI mTABLET Instructions for Use, chapter 9 – Managing users.
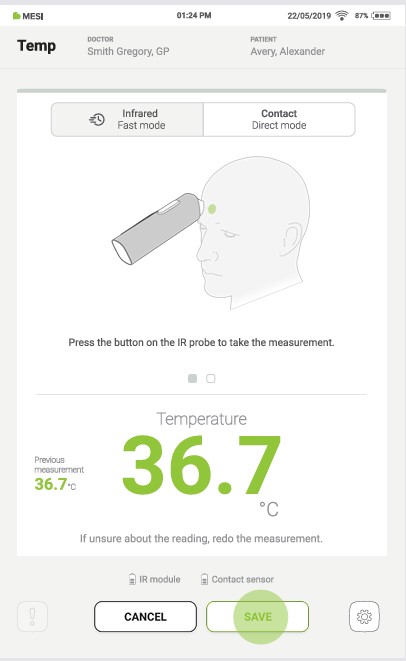
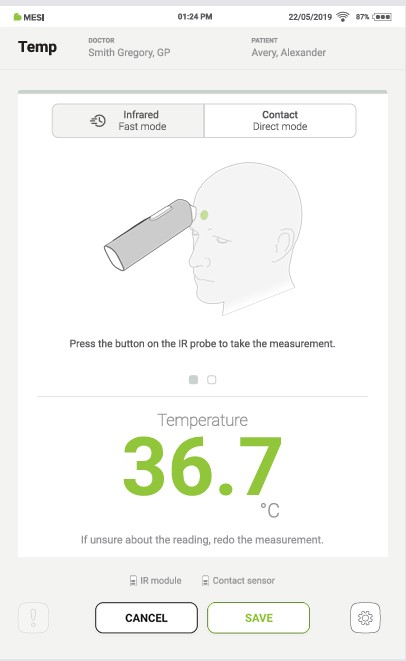
4.4.1 INFRARED MEASUREMENT
The measurement selected by default in the Temp application is the infrared one. The default measurement can be changed on the measurement screen; more details under chapter 4.5.4 – Options menu.
NOTE: Make sure that the patient is adjusted to room temperature and has not exercised in the last 5 minutes. Please check that the point of measurement is clean and not obstructed.
Step 1
Make sure the application has the Infrared measuring mode selected.
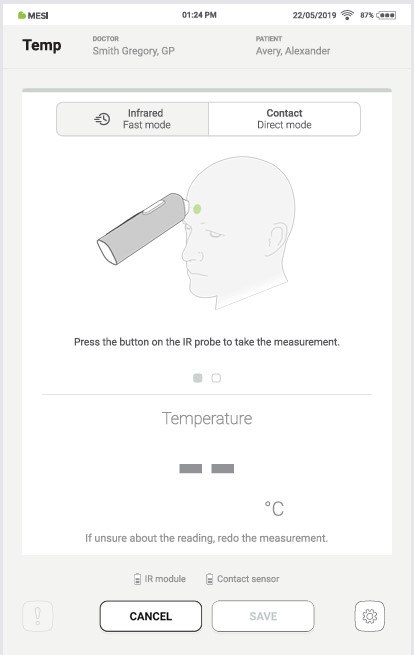
Step 2
Take the THERMO module and point it at the measurement point on the forehead as shown in the application.
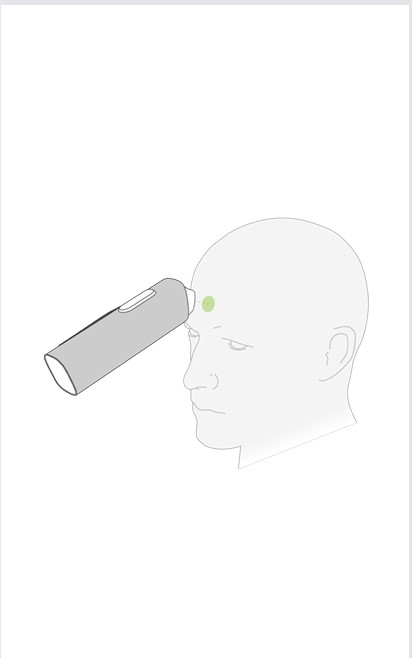
Step 3
Move the THERMO module 3 cm from the measurement point to get the correct measuring distance. The appropriate distance is indicated by three white LED lines above the measurement button.
For more information, see chapter 4.5.1.2 – Infrared probe distance LED indicators.
Step 4
Hold the THERMO module parallel to the patient’s forehead for the optimal measurement angle.
Step 5
Press the measurement button for at least 1 second to take the measurement.
Step 6
After the measurement is taken, the result is shown in the application.
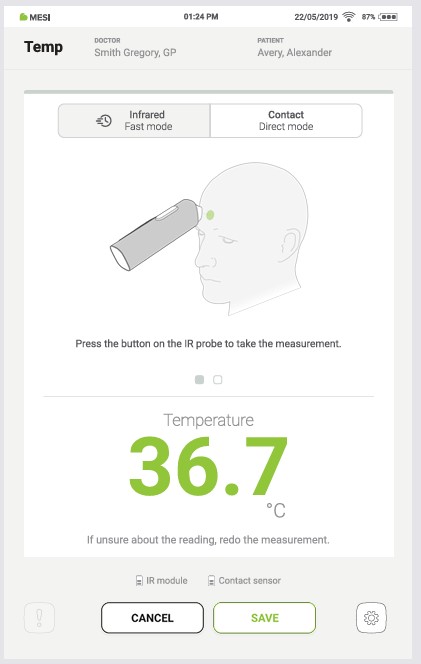
Step 7
If the measurement button is pressed again, a new measurement result is displayed. The old measurement is displayed on the left.
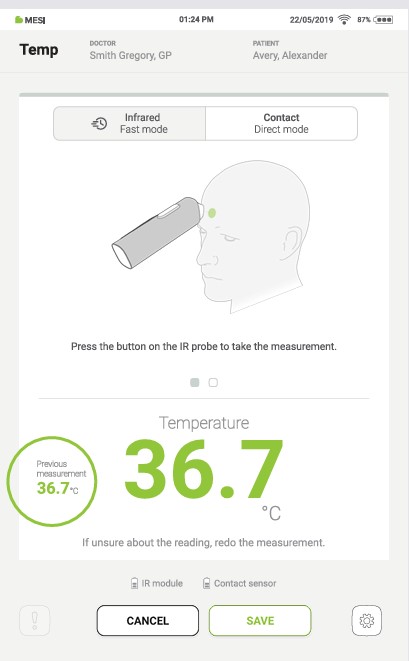
Step 8
To complete the measurement, save the last displayed result by pressing the “SAVE” button.
Pressing the “CANCEL” button closes the application without saving the results.
Step 1
Check the battery indicator above the “CANCEL” and “SAVE” buttons in the application to make sure that the contact probe is successfully connected.
If it is not, a WARNING massage will be displayed instead of the battery indicator.
Step 2
If the Infrared measurement is the default setting, press the “CONTACT” button to switch to the contact measurement.
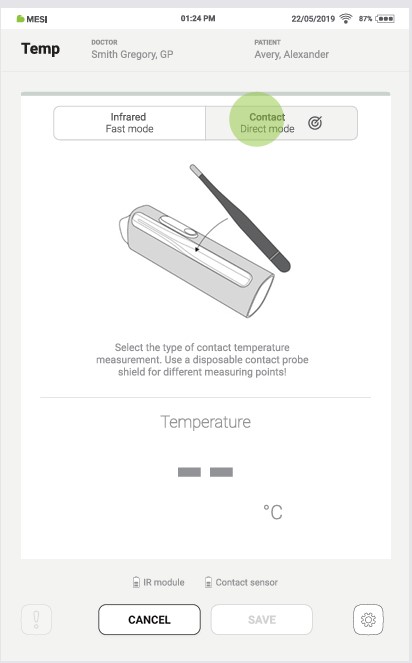
Step 3
Press the “AXILLARY”, “ORAL”, or “RECTAL” to select the type of contact measurement.
⚠️To prevent cross-contamination, use the MESI probe shields.
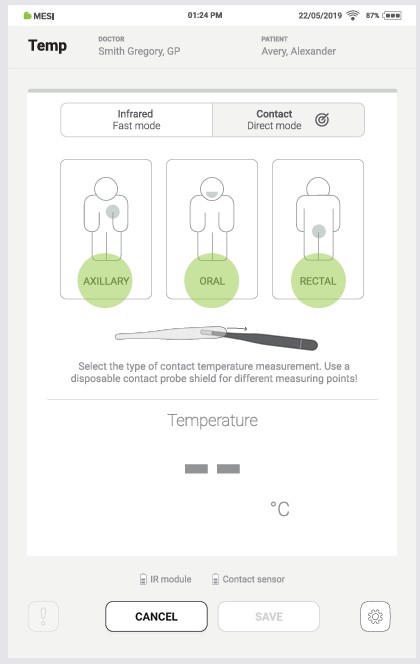
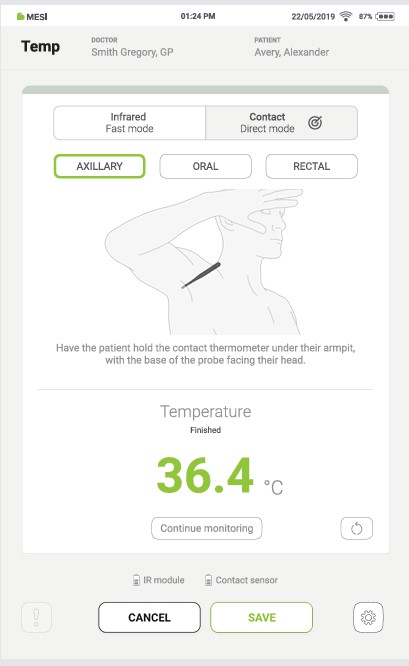
4.4.2.1 Axillary type measurement
Step 1
Ensure that the patient’s axillary area is clean and dry.
Step 2
Place a disposable probe shield on the thermometer to prevent crosscontamination. For more details, see chapter 4.2.6 – Using the MESI disposable contact probe shield”.
Step 3
Place a disposable probe shield on the thermometer to prevent crosscontamination. For more details, see chapter 4.2.6 – Using the MESI disposable contact probe shield”.
Step 4
Instruct the patient to lower their arm, keep it pressed against their side to hold the thermometer in place, and avoid any excessive movement.
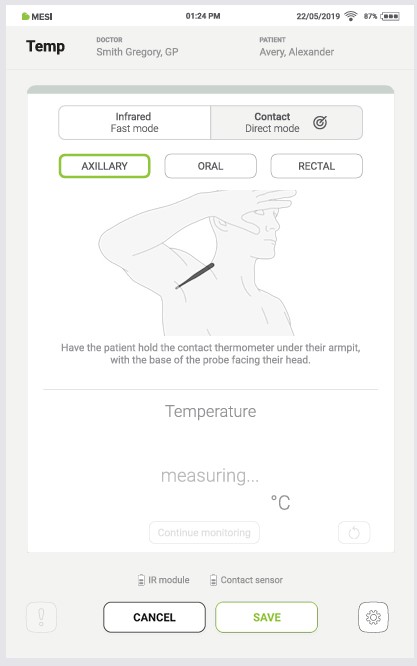
Step 5
Keep the thermometer in place for at least 3,5 minutes. When the measurement is complete, a sound signal is played, the result appears on the tablet screen, and the thermometer’s LED changes colour according to the result.
Step 6
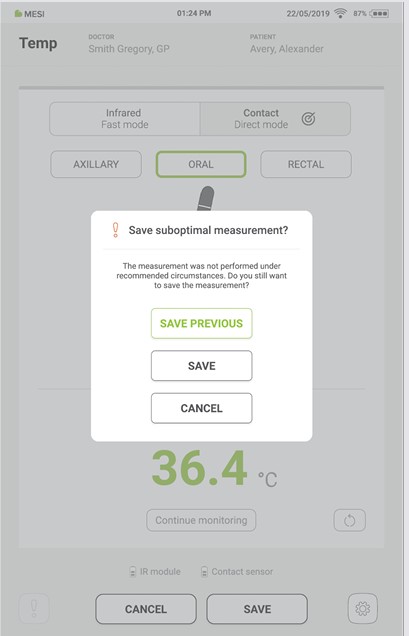
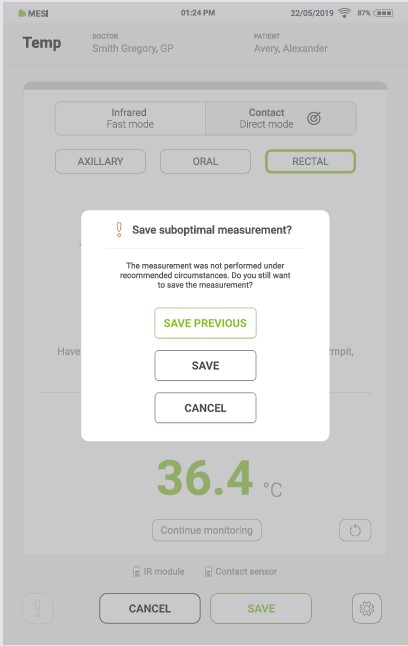
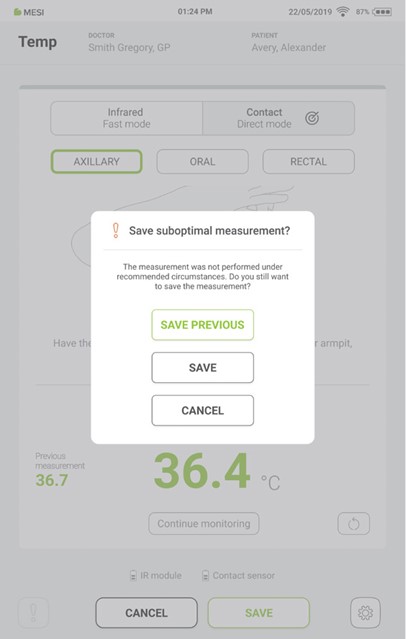
If the measurement is interrupted, it can be repeated by pressing the “REDO” button.
Step 7
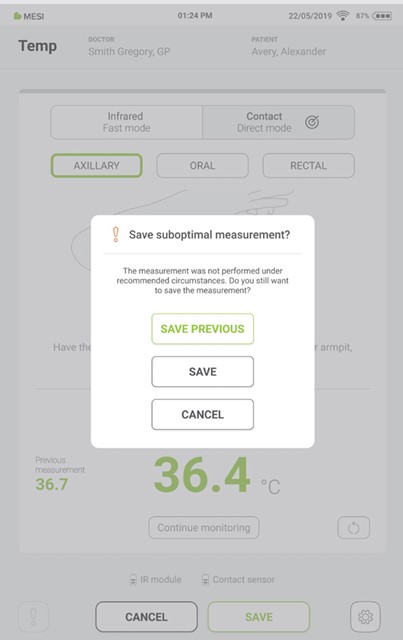
Pressing the “CONTINUE MONITORING” button starts the continuous temperature measurement. During this process, pressing the “SAVE” button at any time saves the result.
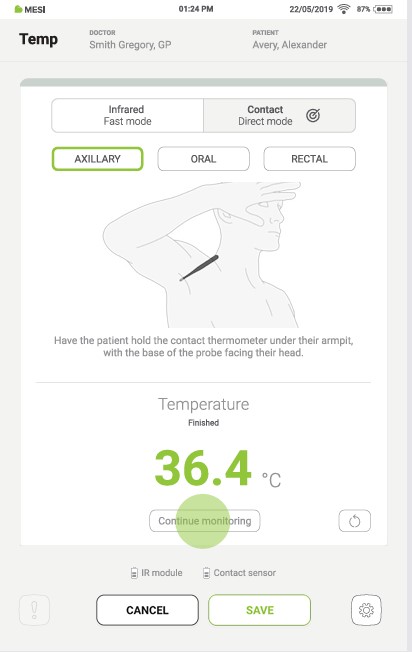
Step 8
If the last measurement is interrupted, the previous measurement can be saved by pressing the “SAVE PREVIOUS” button.
If the measurement is not interrupted, the last displayed result is saved by pressing the “SAVE” button.
Pressing the “CANCEL” button closes the application without saving the results.
Step 9
Remove the disposable probe shield and clean the thermometer with an alcohol wipe.
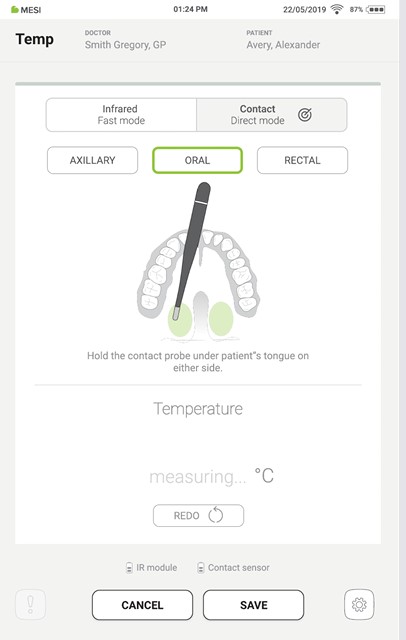
4.4.2.2 Oral type measurement
NOTE: Make sure the person has not consumed any hot or cold beverages as this can affect the accuracy of the measurement.
Step 1
Place a disposable probe shield on the thermometer to prevent crosscontamination. For more details, check chapter 4.2.6 – Using the MESI disposable contact probe shield.
Step 2
Place the contact probe on the measurement point as shown on the tablet screen.
Step 3
Instruct the patient to gently close their lips and keep the thermometer in place for at least 3,5 minutes.
During the measurement, ensure that the patient breathes through their nose and does not bite or clamp down on the thermometer.
Step 4
When the measurement is complete, a sound signal is played, the result appears on the tablet screen, and the thermometer’s LED changes colour according to the result.
Step 5
Once the recommended time has passed, remove the thermometer from the mouth.
Step 6
If the measurement is interrupted, it can be repeated by pressing the “REDO” button.
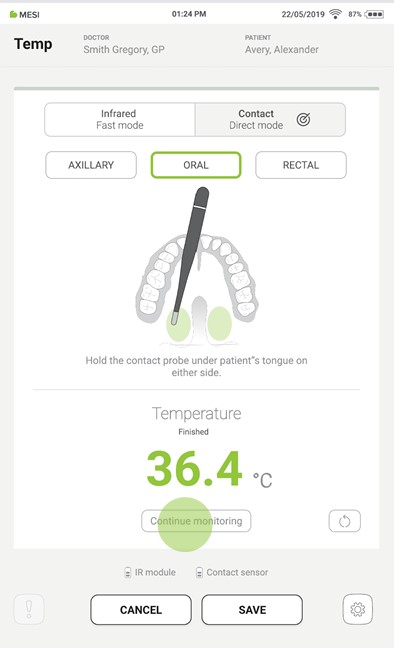
Step 7
Pressing the “CONTINUE MONITORING” button starts the continuous temperature measurement. During this process, pressing the “SAVE” button at any time saves the result.
Step 8
If the last measurement is interrupted, the previous measurement can be saved by pressing the “SAVE PREVIOUS” button.
If the measurement is not interrupted, the last displayed result is saved by pressing the “SAVE” button.
Pressing the “CANCEL” button closes the application without saving the results.
Step 9
Remove the disposable probe shield and clean the thermometer with an alcohol wipe.
4.4.2.3 Rectal type measurement
There are different guidelines for different age groups that define the recommended depth of thermometer insertion. See the table below for more information.
Rectal type measurement | Neonates (0–3 months) & Infants (3–12 months) | Paediatric (3 months–13 years) | Adults |
|---|
| 1.5–2.5 cm | 2–3 cm | 3–5 cm |
Step 1
Put on disposable gloves to ensure cleanliness and prevent crosscontamination.
Step 2
Place a disposable probe shield on the thermometer to prevent crosscontamination. For more details, check chapter 4.2.6 – Using the MESI disposable contact probe shield.
Step 3
Apply a small amount of water-based lubricant or petroleum jelly to the tip of the thermometer to ease insertion.
Step 4
Ask the patient to lie on their side with their knees bent towards their chest.
Step 5
Gently insert the thermometer into the rectum, aiming towards the navel, up to the point shown on the screen.
Step 6
Hold the thermometer in place and make sure the patient remains still and relaxed throughout the measurement.
Step 7
Keep the thermometer in place for at least 1,5 minutes, then carefully remove it, ensuring the probe shield stays in place.
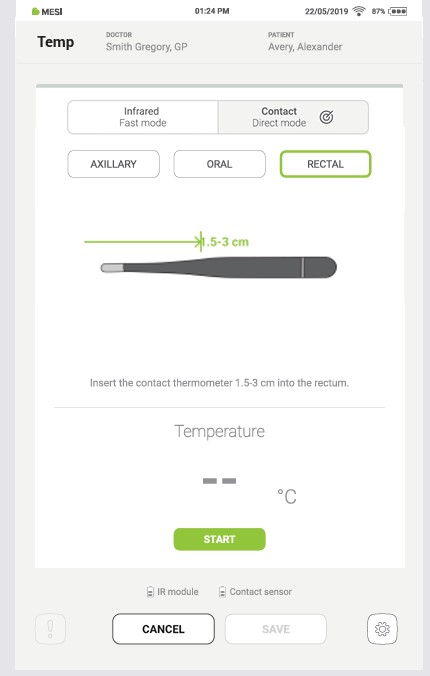
Step 8
When the measurement is complete, a sound signal is played, the result appears on the tablet screen, and the thermometer’s LED changes colour according to the result.
Step 9
If the measurement is interrupted, it can be repeated by pressing the “REDO” button.
Step 10
Pressing the “CONTINUE MONITORING” button starts the continuous temperature measurement. During this process, pressing the “SAVE” button at any time saves the result.
Step 11
If the last measurement is interrupted, the previous measurement can be saved by pressing the “SAVE PREVIOUS” button.
If the measurement is not interrupted, the last displayed result is saved by pressing the “SAVE” button.
Pressing the “CANCEL” button closes the application without saving the results.
Step 12
Remove the disposable probe shield and clean the thermometer with an alcohol wipe.
4.4.2.4 Switching between different measurement methods and types
The MESI mTABLET THERMO lets you switch between different measurement methods and types.
Step 1
After a measurement has been performed, a different measurement method can be accessed by pressing the Infrared or Contact button, depending on which measurement is currently selected.
Step 2
On the Contact measurement screen, a specific type of contact measurement can be performed by pressing the “AXILLARY”, “ORAL”, or “RECTAL” buttons, and pressing the “START” button.
Step 3
During this process, pressing the “SAVE” button at any time saves the result.
Pressing the “CONTINUE MONITORING” button starts the continuous temperature measurement.
Pressing the “CANCEL” button closes the application without saving the results.
Step 4
If the last measurement is interrupted, the previous measurement can be saved by pressing the “SAVE PREVIOUS” button.
Pressing the “SAVE” button saves the current measurement.
Pressing the “CANCEL” button closes the application without saving the results.
4.5 TEMPERATURE INTERPRETATION
During the measurement process, the lights on the IR and contact probes indicate the measured body temperature. The colours in the table below match the colour on the MESI THERMO module and the MESI Temp application result screen.
Temperature interpretation| Oral (°C) | Armpit/ Forehead (°C) | Rectum (°C) | Description |
|---|
| ⬜ < 32 | ⬜ < 32 | ⬜ < 32 | Temperature measurement not valid |
| 🟦 32 – 35.3 | 🟦 32 – 35.2 | 🟦 32 – 35.8 | Abnormally low body temperature |
| 🟩 35.4 - 37.7 | 🟩 35.3 - 37.4 | 🟩 35.9 - 38.2 | Normal body temperature |
| 🟨 37.8 – 39.4 | 🟨 37.5 – 39.4 | 🟨 38.3 – 39.9 | Elevated body temperature |
| 🟥 39.5 – 43 | 🟥 39.5 – 43 | 🟥 40 – 43 | Critically high temperature |
| ⬜ < 43 | ⬜ < 43 | ⬜ < 43 | Temperature measurement not valid |
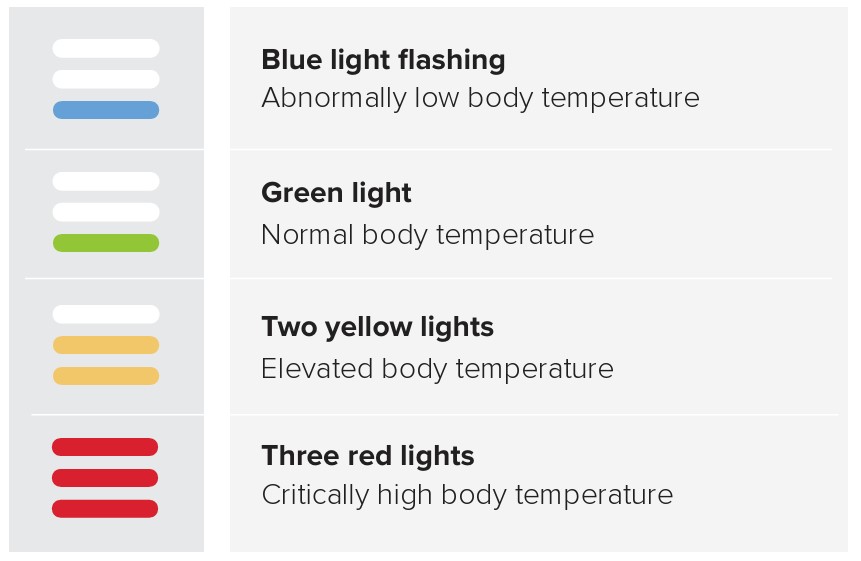
4.5.1 INFRARED PROBE LED INDICATORS
The LED colour above the measurement button changes according to the measured result:
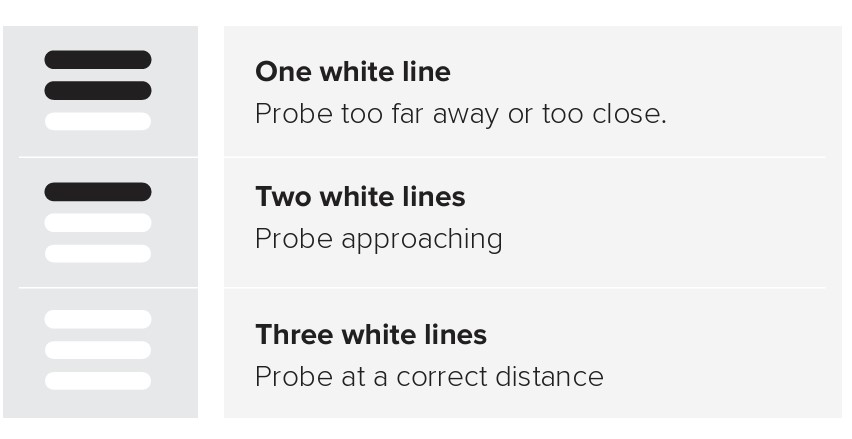
4.5.1.2 Infrared probe distance LED indicators
The white LED lines indicate the distance to the measurement point:
4.5.2.1 Contact probe body temperature indicators
The LED ring colour on the contact probe changes according to the result interpretation:
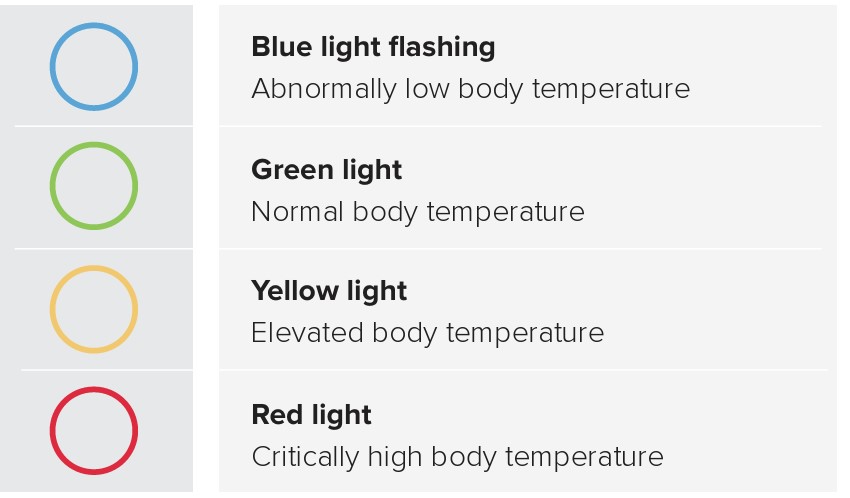
NOTE: The MESI temperature scale is based on medical studies but cannot replace a doctor’s diagnosis.
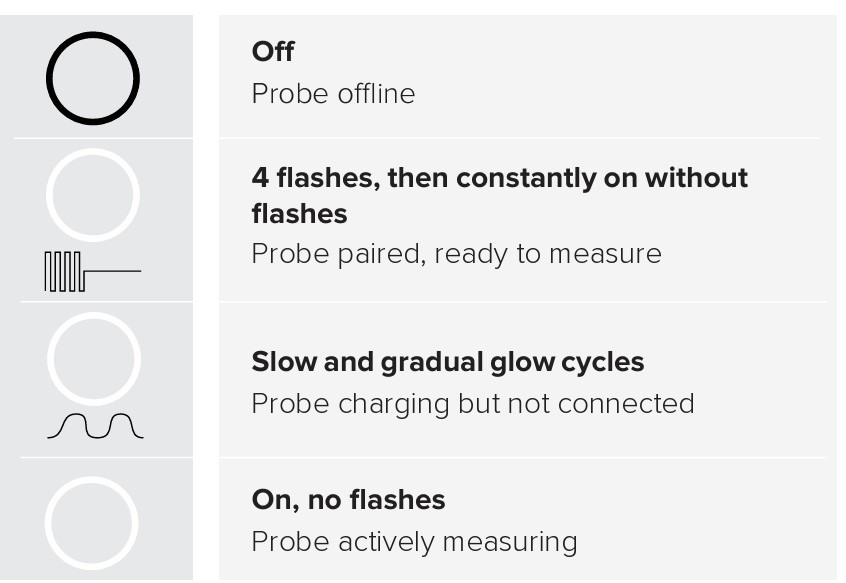
The white LED ring indicates the battery status of the contact probe:
4.5.3 COLOURED RESULTS ON THE MESI mTABLET TEMP APPLICATION
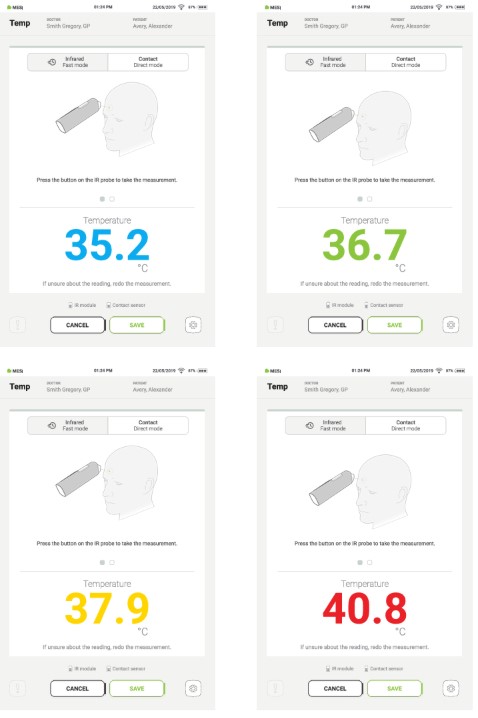
The predictable measurement range on the MESI THERMO module is 32 to 43 °C body temperature. Depending on the temperature result, the following massages will appear:
Blue: Abnormally low body temperature
Green: Normal body temperature
Yellow: Elevated body temperature
Red: Critically high body temperature
NOTE: The MESI temperature scale is based on medical studies but cannot replace a doctor’s diagnosis.
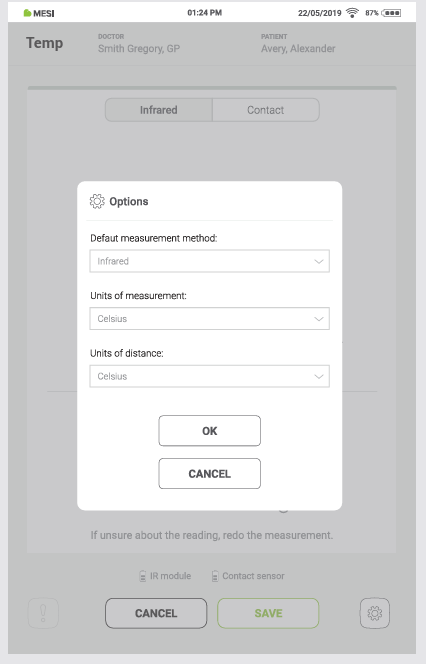
The Options menu can be accessed by pressing the Options button in the lower right corner of the screen in the Temp application. It contains the following options:
Default measurement method: select the measurement method that opens as a default when the Temp application is started. Options: Infrared, Contact
Units of measurement: switch between different units of measurement. Options: Celsius, Fahrenheit
Units of distance: switch between different units of distance. Options: Centimetres, Inches
“OK” button: Confirms the selected options
“CANCEL” button: Discards the changes and closes the Options menu
4.6. RESULTS
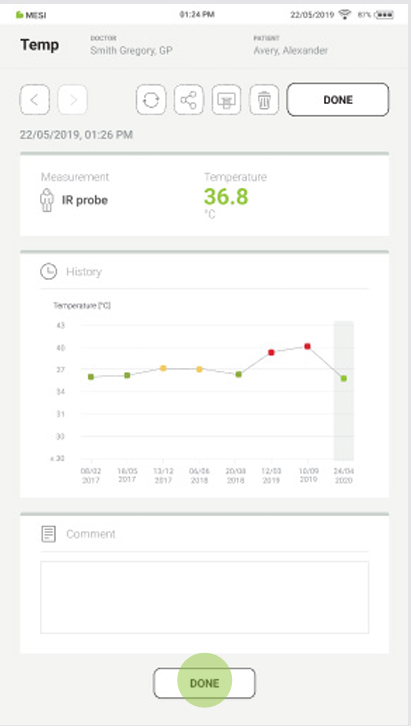
Once the measurement has been taken, the system automatically switches to the results screen. By scrolling the results page, the measurement parameters can be viewed.
The following actions are listed at the top of the navigation menu:
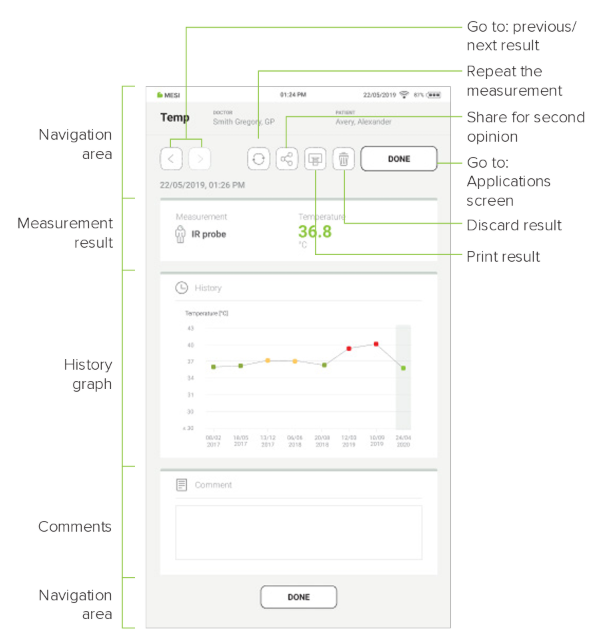
Step 1
When the measurement results are saved, the result screen appears.
Step 2
The results screen contains the following information:
Measurement site
Measured temperature
Unit of measurement
Trend graph
Comment section
Step 3
Pressing the “DONE” button saves the report.
4.7.1 LED INDICATORS
Although most of the MESI THERMO UNIT control takes place through the MESI mTABLET UNIT interface, there is also a multifunctional LED button at the top of the device. In addition to the basic colour light notification functionalities of this button, it is also possible to perform some additional operations. These operations are based on the current status of the MESI THERMO UNIT.
4.7.1.1 Standby
Green 🟩: The battery capacity is at more than 25%.
Red 🟥: The battery is at less than 25%. Please recharge the battery as soon as possible.
4.7.1.2 Charging
Orange 🟨: The battery is charging.
Green 🟩: The battery is fully charged.
4.7.1.3 Pairing
Blue 🟦: The unit is waiting for conformation from the MESI mTABLET.
4.7.2.1 Standby
Button functions - Standby| Column A | Column B |
|---|
| Status check | A quick press on the status button in standby mode performs a basic status check of the MESI THERMO UNIT. A green button means a more than 25% battery charge. A red button means that less than a 25% charge is left, and the module should be charged. |
| Pairing mode | Holding the status button for 4 seconds puts the module into pairing mode, so that it can be connected to the MESI mTABLET UNIT (for more information, go to chapter 5.1.5 Pairing). |
| Resetting the THERMO UNIT | To reset the THERMO UNIT, press and hold the status button for 10 seconds until the LED ligh changes to red. The unit is ready to use in a few seconds. |
4.7.2.2 Measurement mode
Measurement mode| Column A | Column B |
|---|
| Stop measuring | The measurement is stopped by quickly pressing the top button on the MESI THERMO UNIT while performing the measurement. |
Maintenance
5.1 CHARGING THE BATTERY
The device can only be used on battery power. Therefore, the battery must be charged regularly. One battery charge is sufficient for approximately 2500 measurements or 19 hours of continuous use.
To charge the battery, place the MESI THERMO UNIT on the MESI LARGE CHARGING PLATE (CS4SYS) or MESI SMALL CHARGING PLATE (CS2SYS). During the charging process, the light on the module will flash orange. Only when the device is completely charged will it start flashing green. For more information, see chapter 4.7 – Multifunctional buttons.
If the capacity of the battery is significantly decreased after a period of intensive use, the battery is most likely spent and should be replaced. As the device does not contain any parts that can be replaced by a user, contact your local distributor or the manufacturer for battery replacement.
5.2. CLEANING AND DISINFECTION
⚠️Before cleaning, disconnect from the mains. Due to constant standby mode of the device, do not clean the terminals as this may cause electrical shock.
⚠️Only perform routine cleaning and maintenance procedures specifically described in these Instructions for Use
MESI THERMOMETER UNIT
Do not use aggressive cleaning agents, volatile liquids or excessive force when cleaning the device. Do not dip the device or accessories in liquids or cleaning agents.
⚠️Do not use aggressive cleaning agents, volatile liquids or excessive force when cleaning the device. Don’t dip the sensor in liquids or cleaning agents.
MESI PULSE OXIMETER UNIT
Before cleaning, remove the MESI THERMO UNIT from the charging station and disconnect the sensor from the MESI THERMO UNIT.
Use a soft lint-free cloth dampened with a proper cleaning agent to clean and disinfect the exterior and interior of both the IR and contact probes.
Wipe off all residues of the cleaning solution with a dry cloth.
Dry the equipment before next use.
Recommended cleaning agents:
Not approved cleaning agents:
5.3 PRODUCT LIFE AND STORAGE
If correctly used and maintained, the device will have a minimum service life of 5 years. It is possible to store the device in suitable conditions for a maximum of 5 years. While in storage, the battery needs to be recharged once a month to avoid accidental over-discharge. When using the device after storage, we recommend a thorough maintenance check.
any mechanical or functional damage on device and accessories,
performance of device in accordance to instructions for use,
legibility of labels,
battery cycle count.
5.3.1 TRANSPORT & STORAGE CONDITIONS
TRANSPORT & STORAGE CONDITIONS| Column A | Column B |
|---|
| Temperature | -25° to 70°C |
| Relative humidity | 15 to 90% (no condensation) |
| Atmospheric pressure | 500 to 1060 hPa (mbar) |
The device should be inspected by a qualified service engineer at least every 12 months for the following safety checks:
Any mechanical or functional damage on the device and accessories
Performance of device in accordance with the Instructions for Use
Legibility of warning label
Battery cycle count
General warnings
6.1 MEASUREMENT PROCEDURE
⚠️Do not use this unit in areas with a presence of flammable gasses such as anaesthetic agents or in an oxygen-rich environment.
⚠️Monitor the patient closely during the measurement procedure. If there is any reason for concern, stop the test.
⚠️Important information on electromagnetic compatibility (EMC). As the number of electronic devices such as computers and mobile phones in the roomrooms increases, medical devices can become sensitive to the electromagnetic influences of other devices. Electromagnetic interference can cause medical devices to malfunction, which can potentially lead to dangerous situations. Furthermore, medical devices must not interfere with other devices. The IEC/EN 60601-1-2 standard was introduced due to the necessity to establish electromagnetic compatibility (EMC) requirements for the prevention of dangerous situations in the use of medical devices. The standard defines the level of resistance to electromagnetic interference for medical devices. This medical device is compliant with the IEC/EN 60601-1-2 standard in terms of resistance to electromagnetic interference and electromagnetic emissions. Nevertheless, do not use mobile phones and similar devices that create strong electromagnetic fields in the vicinity of the device. This can cause the device to malfunction and potentially cause a dangerous situation.
⚠️Do not operate in proximity of a steam kettle or any equipment that can generate moisture.
⚠️Do not operate in proximity of a fireplace, a or radiant heater or any equipment that can generate heat.
⚠️The cables and accessories may negatively affect the EMC performance. While operated, the device should not be closer than 30 cm (12 inches) from another medical device.
⚠️Do not use near devices that produce microwave radiation as this might interfere with the device operation.
⚠️The contact thermometer probe is designed exclusively for measuring temperature on intact skin. If measuring orally, ensure to use a protective cover.
6.2 MAINTENANCE
⚠️Do not dispose of the device as unsorted municipal waste. Prepare it for recycling or separate waste collection in accordance with Directive 2002/96/EC on scrap electrical and electronic equipment (WEEE).
⚠️Only use non-aggressive cleaning agents for cleaning the device. and Mmake sure that the device does not come in contact with an electrical current while it is being cleaned. The device may be wiped with a damp cloth.
⚠️Do not open the device. The device does not contain any parts that can be replaced by a user. Do not alter or adapt the device.
⚠️Protect the device from moisture, liquids, extreme temperatures, mechanical stress, and exposure to direct sunlight. If the device is used or stored outside the specified environmental parameters, the parameters specified within the technical specifications of the device are not guaranteed.
⚠️Do not immerse the unit or cable assemblies in liquid under any circumstances.
⚠️Do not use high-temperature sterilisation processes (such as autoclaving). Do not use e-beam or gamma radiation sterilisation.
⚠️Only perform routine cleaning and maintenance procedures specifically described in these Instructions for Use.
⚠️During transportation or storage, the temperature of the control device may have decreased or increased outside operating temperatures. Do not use the device until it has been at room temperature from 10 °C (50 °F) to 30 °C (86 °F) for at least two hours. This time is required for the thermometer unit to reach its normal recommended operating temperature.
⚠️Never carry out repairs of any kind yourself. Do not open the device. The device does not contain any parts which can be replaced by the user. Do not alter or adapt the device. If a defect occurs, consult your dealer or distributor.
⚠️Do not position the ME equipment so that it is difficult to operate the disconnection device.
⚠️ AC/DC power supply unit is considered a disconnecting device from the mains.
6.3 FUNCTIONING OF THE DEVICE
⚠️The device may only be used by professional medical personnel. The device is class A equipment; it can cause radio interference or even prevent nearby devices from functioning. It may be necessary to reposition the MESI mTABLET THERMO device or protect the room containing the device from electromagnetic radiation.
⚠️The product should not be used if any of its parts are broken, worn, missing, incomplete, distorted, or contaminated.
Troubleshooting
Troubleshooting| Column A | New Column | Column B |
|---|
| A continuously flashing purple or red indicator on the MESI THERMO UNIT. | Incorrect state of the diagnostic module. | Restart the MESI THERMO UNIT by pressing and holding the button at the top of the unit. The light should start flashing. |
| No light shows when the multifunctional button at the top of the MESI THERMO UNIT is pressed. | Depleted battery. | Place the MESI THERMO UNIT onto the charging station and leave it to charge for at least half an hour before retrying. |
| Temperature measurement will not start even though the MESI THERMO UNIT is paired and next to MESI mTABLET UNIT. | Possibility of electromagnetic interference. | Make sure that there are no devices nearby that produce electromagnetic interference. These devices can interfere with the basic functions of the MESI mTABLET UNIT; this can potentially lead to dangerous situations. |
NOTE: If the problem continues, contact the manufacturer or the local distributor for further assistance.
Warranty information
For the THERMOSYS systems purchased from April 1, 2026 on, the company MESI, Ltd. hereby ensures a warranty period up to two years, which begins with the date of purchase (delivery date shown on the invoice). The warranty is valid with an invoice or a copy of the invoice. The Company MESI, Ltd. also guarantees that the THERMOSYS system you have purchased is free from defects in materials and is made from suitable materials. In the warranty period the company MESI, Ltd. guarantees a free repair of defective device or parts covered by this warranty. If the defective device in the warranty period cannot be repaired, a free replacement will be provided. The company MESI, Ltd. will ensure maintenance and supply spare parts for a period of ten years from the date of purchase as long as (spare) parts are available from suppliers.
The warranty does not cover:
The cost of repairs and/or damage done by an unauthorized person. If you wish to make a warranty claim, please contact your local distributor or the manufacturer of the THERMOSYS system, whose contact details can be found at the company’s website.
Regular inspections (at the customer’s request) and/or maintenance (replacement of worn parts).
Deterioration of accessories and other additions other than the main device.
Costs incurred due to disagreement with the warranty conditions (it shall be charged).
Any damage caused by accidents, misuse, neglect, abrasion, exposure to extreme temperatures, solvents, acids, water, normal wear and tear or damage in transit, theft or loss.
Use of the device for purposes other than its intended use.
Damage caused by airline or freight company mishandling.
Improper use or abuse of THERMOSYS system, including but not solely limited to the failure to use this product for its normal purposes or in accordance with company’s instructions on usage and maintenance.
Defects resulting from usage of the product in conjunction with accessories that are not approved by company MESI Ltd. for use with the THERMOSYS system.
Defects or deficiencies of the THERMOSYS system arising from incorrect installation or use not consistent with the instructions and technical or safety standards prescribed in the device’s user manual.
Accidents, Acts of God, lightning, water, fire, public disturbances, improper ventilation, voltage fluctuations or any cause beyond the control of company MESI Ltd.
Damage to the battery caused by failing to charge the empty battery regularly, or failure to use in accordance with the instructions of user manual.
Replacement or repair of defective device or its parts, if the serial number on the product has been altered, deleted, removed or made illegible.
Warranty table| Column A | Column B |
|---|
| Parts included in the two-year warranty | Infra-red/non-contact measurement unit, probe/contact measurement unit |
| Parts excluded from warranty | Packaging, probe shields |
All of the above is the sole and exclusive warranty for the THERMOSYS system.
We state:
That during the warranty period the THERMOSYS system will work flawlessly, if handled as stated in the instructions for use and if maintained regularly.
That the warranty period commences on the date of purchase.
That in the warranty period the defects and technical deficiencies of the THERMSYS system that are generated during normal use will be eliminated at the company’s own expense.
That the THERMOSYS system will be fully operational, if optimum conditions for the operation of the product, ranging from 16- 40 C, max. 75% humidity, non-condensing and without excessive amounts of dust and dirt, are fulfilled.
That the warranty is not applicable to cases other than defects in material and workmanship.
That the warranty is void if the THERMOSYS system is used in a rental capacity and damaged at the same time.
That the repair or replacement under the terms of this warranty does not provide the right to extension or renewal of the warranty period.
That the warranty will be void if payments are not received by company MESI Ltd. in the period after any agreed upon credit terms expire.
Description of the warranty claim process:
The warranty is valid only if the THERMOSYS system and its parts are returned during the applicable warranty period, together with the original invoice or its copy issued by the manufacturer of the device. If necessary, give a description of the problem. In case the invoice is not presented, the company MESI, Ltd. holds the right to void the warranty.
Errors
Errors| Error | Description | Solution |
|---|
| N21: The THERMO module is not in range. | The MESI THERMO UNIT is out of range. | Bring the MESI THERMO UNIT closer to the tablet and restart the Temp application. |
| N21: The THERMO module is not in range. | The connection between the MESI THERMO UNIT and the MESI mTABLET UNIT is not optimal. | Remove any mobile devices in the proximity of the MESI THERMO UNIT or bring the MESI mTABLET UNIT closer to the MESI THERMO UNIT. |
| N22: The THERMO module is not paired with the MESI mTABLET UNIT. | The MESI THERMO UNIT is not paired to the tablet. | Pair the MESI THERMO UNIT to the MESI mTABLET UNIT. For more information, see chapter 4.2.5 – Pairing. |
| N30: Depleted battery. Measurement ended. | Please disconnect the THERMO module from the power supply and restart the Temp application. | Dismantle the MESI THERMO UNIT from the MESI LARGE CHARGING PLATE (CS4SYS) or MESI SMALL CHARGING PLATE (CS2SYS). |
| N30: Depleted battery. Measurement ended. | An error occurred on the THERMO module, or there might be a communication problem between the module and the MESI mTABLET UNIT. | Restart the Temp application and the recording process. |
| N25: Connection to the diagnostic module has been interrupted. Please restart the recording process. | The connection between the MESI mTABLET UNIT and the MESI THERMO UNIT has been lost, and the measurement process stopped. | Reconnect the MESI THERMO UNIT in the settings on the MESI mTABLET and perform the measurement again. |
| N27: Measurement was stopped because the stop button was pressed on the diagnostic module. | Pressing the status button on the bottom of the IR probe stops the measurement. | De-press the status button and restart the measurement process. |
| N141: The MESI THERMO module is operating outside the allowed temperature range. | The measured temperature is below 32 °C or above 43 °C, which may affect the accuracy of the measurement. | Ensure the device is used correctly and consider seeking immediate medical attention. |
| N142: The surrounding
environment’s temperature
is outside the allowed range
of THERMO module. | The surrounding environment’s temperature is below 10 °C or above 40 °C when using the contact probe. | Move the MESI THERMO contact probe to an environment between 10 °C and 40 °C. |
| N143: An error occurred. Please check the THERMO module and try again. | A non-specified error occurred; the measurement can’t be performed. | Ensure the thermometer is used correctly and repeat the measurement. |
| N144: The surrounding environment’s temperature is outside the allowed range of THERMO module. | The surrounding environment’s temperature is below 15 °C or above 40 °C when using the infrared probe. | Move the MESI THERMO infrared probe to an environment between 15 °C and 40 °C. |
Standard compliance
The project is compliant with Regulation (EU) 2017/745 concerning medical devices, RoHS Directive 2015/863/EU and Radio Equipment Directive (RED) 2014/53/EU.
Standard compliance| Reference Number (ID:year) | Description |
|---|
| EN 60601-1:2006/ A1:2013 | Medical electrical equipment - Part 1: General requirements for basic safety and essential performance |
| EN 60601-12:2015/A1:2021 | Medical electrical equipment - Part 1-2: General requirements for basic safety and essential performance - Collateral Standard: Electromagnetic disturbances - Requirements and tests |
| EN 60601-16:2010+A1:2015 +A2:2021 | Medical electrical equipment - Part 1-6: General requirements for basic safety and essential performance - Collateral standard: Usability |
| EN 62304:2006+A1:2015 | Medical device software – Software life cycle processes |
| ISO 80601-2-56 | Particular requirements for basic safety and essential performance of clinical thermometers for body temperature measurement |
| EN ISO 14971:2019 | Medical devices – Application of risk management to medical devices |
| EN ISO 13485:2016 | Medical devices – Quality management systems – Requirements for regulatory purposes |
| EN ISO 152231:2021 | Symbols for use in the labelling of medical devices |
| EN ISO 109931:2020 | Biological evaluation of medical devices – Part 1: Evaluation and testing within a risk management process |
| EN 62366-1:2015 +A1:2020 | Medical devices - Part 1: Application of usability engineering to medical devices |
| EN 60601-1:2006/ A1:2013 | Medical electrical equipment – Part 1: General requirements for basic safety and essential performance |
| EN 60601-12:2015/A1:2021 | Medical electrical equipment - Part 1-2: General requirements for basic safety and essential performance - Collateral Standard: Electromagnetic disturbances - Requirements and tests |
10.1. MANUFACTURER DECLARATION ON EMC
The MESI mTABLET THERMO is intended for use in the electromagnetic environment specified below. The customer or the user of the above models should ensure that they are used in such environment.
Manufacturer declaration on EMC| Emissions test | Compliance | Electromagnetic environment - guidance |
|---|
| RF emissions CISPR 11 | Group 1 | The models listed above use RF energy only for their internal function. Therefore, their RF emissions are very low and are not likely to cause any interference in nearby electronic equipment. |
| RF emissions CISPR 11 | Class B | The models listed above use RF energy only for their internal function. Therefore, their RF emissions are very low and are not likely to cause any interference in nearby electronic equipment. |
| Harmonic emissions IEC 61000-3-2 | N/A | The models listed above use RF energy only for their internal function. Therefore, their RF emissions are very low and are not likely to cause any interference in nearby electronic equipment. |
| Voltage fluctuations / flicker emissions IEC 61000-3-3 | Complies | The models listed above use RF energy only for their internal function. Therefore, their RF emissions are very low and are not likely to cause any interference in nearby electronic equipment. |
The MESI mTABLET THERMO is intended for use in the electromagnetic environment specified below. The customer or the user of the above models should ensure that they are used in such environment.
Patient coupling PORT
Patient coupling PORT| Immunity Test | Test Condition | IEC 60601 Compliance level | Electromagnetic environment - guidance |
|---|
| Electrostatic discharge (ESD) according to IEC 61000-4-2 | ± 8 kV Contact
± 2, 4, 8, 15 kV Air | ± 8 kV Contact
± 15 kV Air | Floors should be wood, concrete or ceramic tile. If floors are covered with synthetic material, the relative humidity should be at least 30%. |
| Conducted RF induced by RF fields IEC 61000-4-6 (a) | 3 Vrms 150 kHz - 80 MHz
6 Vrms in ISM bands between 150 kHz - 80 MHz c)
80% AM 1kHz | Exempt from this requirement - cable length is less than 3 m | - |
Comment: *Not applicable, unit, without Signal input/output parts PORT
a) SIP/SOPS whose maximum cable length is less than 3 m in length are excluded.
b) This test applies only to output lines intended to connect directly to outdoor cables.
c) The ISM (industrial, scientific and medical) bands between 0,15 MHz and 80 MHz are 6,765 MHz to 6,795 MHz; 13,553 MHz to 13,567 MHz; 26,957 MHz to 27,283 MHz; and 40,66 MHz to 40,70 MHz. The amateur radio bands between 0,15 MHz and 80 MHz are 1,8 MHz to 2,0 MHz, 3,5 MHz to 4,0 MHz, 5,3 MHz to 5,4 MHz, 7 MHz to 7,3 MHz, 10,1 MHz to 10,15 MHz, 14 MHz to 14,2 MHz, 18,07 MHz to 18,17 MHz, 21,0 MHz to 21,4 MHz, 24,89 MHz to 24,99 MHz, 28,0 MHz to 29,7 MHz and 50,0 MHz to 54,0 MHz.
The MESI mTABLET THERMO is intended for use in the electromagnetic environment specified below. The customer or the user of the above models should assure that they are used in such environment.
Enclosure Port
Enclosure Port| Immunity Test | Test Condition | IEC 60601 Compliance level | Electromagnetic environment - guidance |
|---|
| Electrostatic discharge (ESD) IEC 61000-4-2 | ±,8 kV Contact
± 2, 4, 8, 15 kV Air | ±8 kV Contact
± 15 kV Air* | Floors should be wood, concrete or ceramic tile. If floors are covered with synthetic material, the relative humidity should be at least 30% |
| Radiated RF EM fields and Proximity fields from RF wireless communications equipment
IEC 61000-4-3 | 3 V/m
80 MHz – 2.7 GHz
80% AM 1 kHz | 3 V/m
80 MHz – 2.7 GHz | The mains power quality should be that of a professional healthcare facility environment and home healthcare environment. |
| Radiated RF EM fields and Proximity fields from RF wireless communications equipment
IEC 61000-4-3 | 385 MHz (18Hz Pulse Modulation) | 27 V/m | The mains power quality should be that of a professional healthcare facility environment and home healthcare environment. |
| Radiated RF EM fields and Proximity fields from RF wireless communications equipment
IEC 61000-4-3 | 450 MHz (FM+/-5 KHz deviation 1 kHz sine or 18 Hz Pulse Modulation) | 28 V/m | The mains power quality should be that of a professional healthcare facility environment and home healthcare environment. |
| Radiated RF EM fields and Proximity fields from RF wireless communications equipment
IEC 61000-4-3 | 710 MHz (217 Hz PM) | 9 V/m | The mains power quality should be that of a professional healthcare facility environment and home healthcare environment. |
| Radiated RF EM fields and Proximity fields from RF wireless communications equipment
IEC 61000-4-3 | 745 MHz (217 Hz PM) | 9 V/m | The mains power quality should be that of a professional healthcare facility environment and home healthcare environment. |
| Radiated RF EM fields and Proximity fields from RF wireless communications equipment
IEC 61000-4-3 | 780 MHz (217 Hz PM) | 9 V/m | The mains power quality should be that of a professional healthcare facility environment and home healthcare environment. |
| Radiated RF EM fields and Proximity fields from RF wireless communications equipment
IEC 61000-4-3 | 810 MHz (18 Hz PM) | 28 V/m | The mains power quality should be that of a professional healthcare facility environment and home healthcare environment. |
| Radiated RF EM fields and Proximity fields from RF wireless communications equipment
IEC 61000-4-3 | 870 MHz (18 Hz PM) | 28 V/m | The mains power quality should be that of a professional healthcare facility environment and home healthcare environment. |
| Radiated RF EM fields and Proximity fields from RF wireless communications equipment
IEC 61000-4-3 | 930 MHz (18 Hz PM) | 28 V/m | The mains power quality should be that of a professional healthcare facility environment and home healthcare environment. |
| Radiated RF EM fields and Proximity fields from RF wireless communications equipment
IEC 61000-4-3 | 1720 MHz (217 Hz PM) | 28 V/m | The mains power quality should be that of a professional healthcare facility environment and home healthcare environment. |
| Radiated RF EM fields and Proximity fields from RF wireless communications equipment
IEC 61000-4-3 | 1845 MHz (217 Hz PM) | 28 V/m | The mains power quality should be that of a professional healthcare facility environment and home healthcare environment. |
| Radiated RF EM fields and Proximity fields from RF wireless communications equipment
IEC 61000-4-3 | 1970 MHz (217 Hz PM) | 28 V/m | The mains power quality should be that of a professional healthcare facility environment and home healthcare environment. |
| Radiated RF EM fields and Proximity fields from RF wireless communications equipment
IEC 61000-4-3 | 2450 MHz (217 Hz PM) | 28 V/m | The mains power quality should be that of a professional healthcare facility environment and home healthcare environment. |
| Radiated RF EM fields and Proximity fields from RF wireless communications equipment
IEC 61000-4-3 | 5240 MHz (217 Hz PM) | 9 V/m | The mains power quality should be that of a professional healthcare facility environment and home healthcare environment. |
| Radiated RF EM fields and Proximity fields from RF wireless communications equipment
IEC 61000-4-3 | 5500 MHz (217 Hz PM) | 9 V/m | The mains power quality should be that of a professional healthcare facility environment and home healthcare environment. |
| Radiated RF EM fields and Proximity fields from RF wireless communications equipment
IEC 61000-4-3 | 5785 MHz (217 Hz PM) | 9 V/m | The mains power quality should be that of a professional healthcare facility environment and home healthcare environment. |
| RATED power frequency magnetic fields
IEC 61000-4-8 | 50 Hz or 60 Hz | 30 A/m | The power frequency magnetic fields should be at levels characteristic of a typical location in a typical commercial or hospital environment. |
| Proximity magnetic fields IEC 61000-4-39 | 30 kHz (CW) (a)
134,2 kHz (2,1 kHz PM)
13,56 MHz (50 kHz PM) | 8 A/m
65 A/m (c)
7,5 A/m (c) | a) This test is applicable only to ME EQUIPMENT and ME SYSTEMS intended for use in the HOME HEALTHCARE ENVIRONMENT.
b) The carrier shall be modulated using a 50 % duty cycle square wave signal.
c) r.m.s., before modulation is applied. |
The MESI mTABLET THERMO is intended for use in the electromagnetic environment specified below. The customer or the user of the above listed models should assure that they are used in such an environment.
Input a.c. power PORT
Input a.c. power PORT| Immunity Test | Test Condition | IEC 60601 Compliance level | Electromagnetic environment - guidance |
|---|
| Electrical fast transient/bursts IEC 610004-4 | ± 2 kV
100 kHz Repetition frequency | ± 2 kV | Mains power quality should be that of a professional healthcare facility environment and Home healthcare environment. |
| Surges
IEC 61000-4-5 | ± 0.5 kV, ±1 kV line(s) to line(s)
± 0.5 kV, ±1 kV , ± 2 kV line(s) to ground (a) | ± 1 kV
Differential mode | Mains power quality should be that of a professional healthcare facility environment and Home healthcare environment. |
| Conducted RF induced by RF fields IEC 61000-4-6 | 3 Vrms 150 kHz - 80 MHz
6 Vrms in ISM bands between 150 kHz - 80 MHz c)
80% AM 1kHz | 3 Vrms 150 kHz - 80 MHz
6 Vrms in ISM bands between 150 kHz - 80 MHz c)
80% AM 1 kHz | Mains power quality should be that of a professional healthcare facility environment and Home healthcare environment. |
| Voltage dips, short interruptions and voltage variations on power supply input lines IEC 61000-4-11 | 0% UT;
0°.45°, 90°, 135°, 180°, 225°, 270°, 315°
0% UT;
0°
0% UT;
70%
0% UT;
0% | 0.5 Cycles
1 Cycle
25/30 cycles (50/60 Hz)
250/300 Cycles (50/60 Hz) (5 s) | Mains power quality should be that of a professional healthcare facility environment and home healthcare environment.
If the user of the models listed above requires continued operation during power mains interruptions, it is recommended that the MESI mTABLET THERMO is powered from an uninterruptible power supply or battery. |
Comment:
a) Not applicable to CLASS II ME EQUIPMENT and ME SYSTEMS.
b) The ISM (industrial, scientific and medical) bands between 0.15 MHz and 80 MHz are 6.765 MHz to 6.795 MHz; 13.553 MHz to 13.567 MHz; 26.957 MHz to 27.283 MHz; and 40.66 MHz to 40.70 MHz. The amateur radio bands between 0.15 MHz and 80 MHz are 1.8 MHz to 2.0 MHz, 3.5 MHz to 4.0 MHz, 5.3 MHz to 5.4 MHz, 7 MHz to 7.3 MHz, 10.1 MHz to 10.15 MHz, 14 MHz to 14.2 MHz, 18.07 MHz to 18.17 MHz, 21.0 MHz to 21.4 MHz, 24.89 MHz to 24.99 MHz, 28.0 MHz to 29.7 MHz and 50.0 MHz to 54.0 MHz.
The MESI mTABLET THERMO is intended for use in the electromagnetic environment specified below. The customer or the user of the above listed models should ensure that they are used in such environment.
Signal input/output parts PORT
Signal input/output parts PORT| Immunity Test | Test Condition | IEC 60601 Compliance level | Electromagnetic environment - guidance |
|---|
| Electrostatic discharge (ESD) IEC 61000-4-2 | ±,8 kV Contact
± 2, 4, 8, 15 kV Air | ±8 kV Contact
± 15 kV Air | Floors should be wood, concrete or ceramic tile. If floors are covered with synthetic material, the relative humidity should be at least 30%. |
| Electrical fast transient/bursts IEC 610004-4 (a) | ± 1 kV
100 kHz Repetition frequency | ± 1 kV | Mains power quality should be that of a professional healthcare facility environment and Home healthcare environment. |
| Conducted RF induced by RF fields IEC 61000-4-6 | ± 2 kV line(s) to ground | Not applicable. | Mains power quality should be that of a professional healthcare facility environment and home healthcare environment. |
| Conducted RF induced by RF fields IEC 61000-4-6 (a) | 3 Vrms
150 kHz - 80 MHz
6 Vrms in ISM bands between 150 kHz - 80 MHz c) 80% AM 1kHz | 3 Vrms
150 kHz - 80 MHz
6 Vrms in ISM bands between 150 kHz - 80 MHz c) 80% AM 1 kHz | Mains power quality should be that of a professional healthcare facility environment and Home healthcare environment. |
Comment: *Not applicable, unit, without Signal input/output parts PORT
a) SIP/SOPS whose maximum cable length is less than 3 m in length are excluded.
b) This test applies only to output lines intended to connect directly to outdoor cables.
c) The ISM (industrial, scientific and medical) bands between 0.15 MHz and 80 MHz are: 6.765 MHz to 6.795 MHz; 13.553 MHz to 13.567 MHz; 26.957 MHz to 27.283 MHz; and 40.66 MHz to 40.70 MHz. The amateur radio bands between 0.15 MHz and 80 MHz are: 1.8 MHz to 2.0 MHz, 3.5 MHz to 4.0 MHz, 5.3 MHz to 5.4 MHz, 7 MHz to 7.3 MHz, 10.1 MHz to 10.15 MHz, 14 MHz to 14.2 MHz, 18.07 MHz to 18.17 MHz, 21.0 MHz to 21.4 MHz, 24.89 MHz to 24.99 MHz, 28.0 MHz to 29.7 MHz, and 50.0 MHz to 54.0 MHz.
Guidance and manufacturer’s declaration - electromagnetic immunity
MESI mTABLET THERMO is intended for use in the electromagnetic environment specified below. The customer or the user of the above listed models should ensure that they are used in such environment.
Guidance and manufacturer’s declaration - electromagnetic immunity| Immunity test | IEC 60601 Test level | Compliance level | Electromagnetic environment - guidance |
|---|
| Conducted RF induced by RF fields IEC 61000-4-6
Radiated RF EM fields and Proximity fields from RF wireless communications equipment IEC 61000-4-3 | 3 Vrms 150 kHz - 80 MHz 6 Vrms in ISM bands between 150 kHz - 80 MHz c)
3 V/m 80 MHz – 2.7 GHz | 3 Vrms 150 kHz - 80 MHz 6 Vrms in ISM bands between 150 kHz - 80 MHz c)
3 V/m | Portable and mobile RF communications equipment should not be used no closer to any part of the above listed models, including cables, than the recommended separation distance calculated from the equation applicable to the frequency of the transmitter.
Recommended separation distance
d = 1.2√P
d = 1.2√P 80 MHz - 800 MHz
d = 2.3√P 800 MHz – 2.7 GHz
Where P is the maximum output power rating of the transmitter in watts (W) according to the transmitter manufacturer and d is the recommended separation distance in meters (m). Field strengths from fixed RF transmitters, as determined by an electromagnetic site survey a should be less than the compliance level in each frequency range. (b) Interference may occur in the vicinity of equipment marked with the following symbol: |
NOTE 1: At 80 MHz and 800 MHz, the higher frequency range applies.
NOTE 2: These guidelines may not apply in all situations. Electromagnetic propagation is affected by absorption and reflection from structures, objects and people.
a) Field strengths from fixed transmitters such as base stations for radio (cellular/cordless) telephones, land mobile radios, amateur radio, AM and FM radio broadcast and TV broadcast, cannot be predicted theoretically with accuracy. To assess the electromagnetic environment due to fixed RF transmitters an electromagnetic site survey should be considered. If the measured field strength in the location in which MESI mTABLET ABI is used, exceeds the applicable RF compliance level above, the above listed models should be observed to verify normal operation. If abnormal performance is observed, additional measures may be necessary, such as reorienting or relocating the above listed models.
b) Over the frequency range 150 kHz to 80 MHz, field strength should be less than 3 V/m.
c) The ISM (industrial, scientific and medical) bands between 0.15 MHz and 80 MHz are 6.765 MHz to 6.795 MHz; 13.553 MHz to 13.567 MHz; 26.957 MHz to 27.283 MHz; and 40.66 MHz to 40.70 MHz. The amateur radio bands between 0.15 MHz and 80 MHz are 1.8 MHz to 2.0 MHz, 3.5 MHz to 4.0 MHz, 5.3 MHz to 5.4 MHz, 7 MHz to 7.3 MHz, 10.1 MHz to 10.15 MHz, 14 MHz to 14.2 MHz, 18.07 MHz to 18.17 MHz, 21.0 MHz to 21.4 MHz, 24.89 MHz to 24.99 MHz, 28.0 MHz to 29.7 MHz and 50.0 MHz to 54.0 MHz.
Recommended separation distances between portable and mobile RF communications equipment and the above listed models
The MESI mTABLET THERMO is intended for use in the electromagnetic environment in which radiated RF disturbances are controlled. The customer or the user of the models listed above can help prevent electromagnetic interference by maintaining a minimum distance between portable and mobile RF communications equipment (transmitters) and the models listed above as recommended below, according to the maximum output power of the communication equipment.
Separation distance according to frequency of transmitter m
Separation distance according to frequency of transmitter m| Rated maximum output power of transmitter W | 150 kHz to 80 MHz d = 1.2√P | 80 MHz to 800 MHz d = 1.2√P | 800 MHz to 2.5 GHz d = 2.3 √P |
|---|
| 0.01 | 0.12 | 0.12 | 0.23 |
| 0.1 | 0.38 | 0.38 | 0.73 |
| 1 | 1.2 | 1.2 | 2.3 |
| 10 | 3.8 | 3.8 | 7.3 |
| 100 | 12 | 12 | 23 |
For transmitters rated at a maximum output power not listed above, the recommended separation distance d in metres (m) can be determined using the equation applicable to the frequency of the transmitter, where P is the maximum output power rating of the transmitter in watts (W) according to the transmitter manufacturer.
NOTE 1: At 80 MHz and 800 MHz, the separation distance for the higher frequency range applies.
NOTE 4: These guidelines may not apply in all situations. Electromagnetic propagation is affected by absorption and reflection from structures, objects and people.
The MESI THERMO MODULE is a part of the MESI mTABLET THERMO, whose essential performance is taking a temperature measurement in specified operating conditions. The measurement is defined as a measurement process and data storage to a MESI mTABLET UNIT. Due to the device’s high sensitivity, intended use and operating modes, the device is susceptible to EM interferences. If its essential performance is reduced, the device will notify the operator with error messages about any issues.
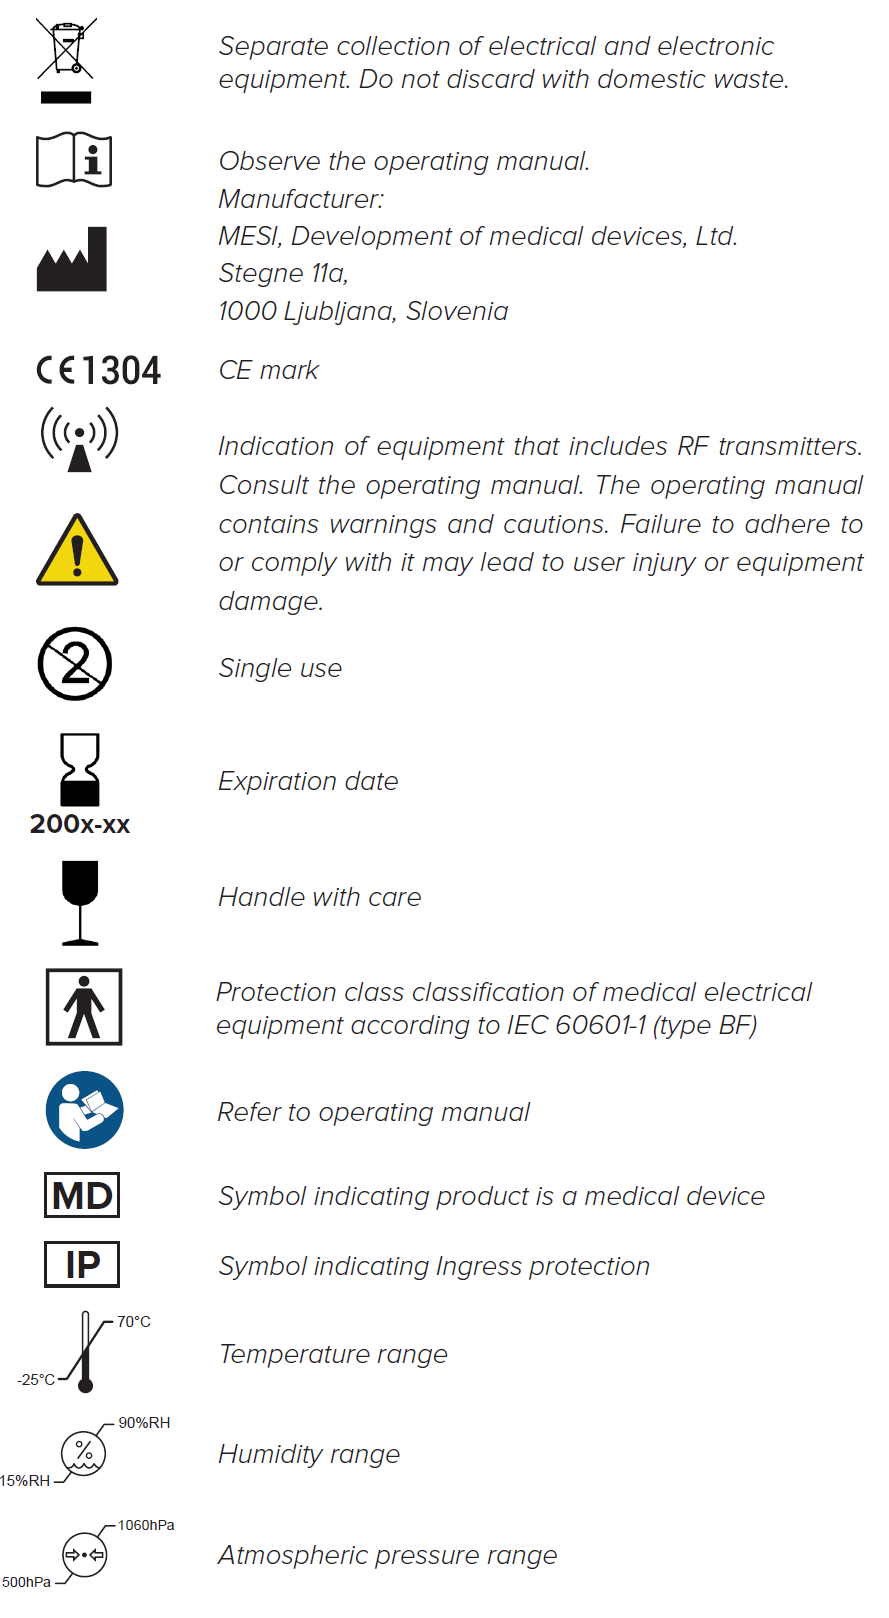
Important labels