Safety and legal recommendations
⚠️ The MESI mTABLET ABI users must be adequately trained to use the device. Before the first use of the device, users must carefully read the entire instructions for use and follow the instructions for use of the connected equipment.
All rights reserved. This publication may not be reproduced, copied or stored on a memory device. Furthermore, this publication may not be used for any purpose other than as the instructions for the use of the MESI TUBELESS CUFF modules (part of MESI mTABLET ABI). This publication may not be translated into other languages or converted into other formats in any way without the prior written permission of MESI Ltd.
The contents of the instructions for use may be altered without notice. The latest version of the instructions for use is available at www.mesimedical.com/support/mtablet/instructions-for-use.
To avoid personal injury and/or damaging the device or accessories, follow the safety recommendations given below.
1.2.1 SETUP AND TECHNICAL PERSONNEL
The device must be set up by authorized personnel with adequate professional training and experience who are aware of all the dangers in relation to the setup of the device and its use and who will take adequate risk prevention measures for themselves, users, other personnel and devices.
1.2.2 ACCESS TO THE DEVICE
Only authorized persons may be given access.
1.2.3 SAFETY MEASURES
Local safety requirements are to be complied with, if so required by regulations. In addition to local safety regulations, the safety instructions in this document are also to be complied with. Should there be any conflict between the safety recommendations in this document and the recommendations stipulated by local regulations, the local regulations take precedence.
Product description
2.1 WHAT IS IN THE PACKAGE
The MESI mTABLET ABI diagnostic system package includes the following equipment:
4x Tubeless Blood Pressure Cuff Module (including size M cuffs for the left arm, right arm, left ankle and right ankle),
a wireless medical tablet system (separate packaging), and
a 4-port charging station module (separate packaging).
2.1.1 ACCESSORIES
⚠️The MESI mTABLET ABI users must be adequately trained to use device. Before the first use of the device, users must carefully read the entire instructions for use and follow the Instructions for Use in full and follow the Instructions for Use for connected equipment.
2.2 INTENDED USE
The MESI mTABLET ABI is an automated wireless ankle-brachial index measuring system for screening patients for Peripheral Arterial Disease (PAD/LEAD). The system is intended to perform (and make viewable and storable) adult ankle-brachial index (ABI) measurement. It is a wireless system which is comprised of a wireless medical tablet system, four tubeless blood pressure cuff modules and a 4-port charging station module.
MESI mTABLET ABI is intended to be used solely in a professional healthcare environment by trained healthcare personnel which can correctly place blood pressure cuffs on a patient’s body, verify that these cuffs are inflating or deflating normally and start the measurement process.
MESI mTABLET ABI is intended to measure the Ankle-Brachial Index by using a type of oscillometric method plethysmography. The Ankle-Brachial Index result (along with blood pressure values used in calculating the ABI), pulse wave and oscillation graph are captured and displayed as a numerical and graphical representation on the MESI mTABLET UNIT.
With standard software, the MESI mTABLET ABI supports an automatic two-step measurement of systolic, diastolic and mean arterial blood pressure on both upper arm and ankle locations. The first part of the measurement performs a dual arm blood pressure measurement while the second part of the measurement performs a simultaneous ABI measurement considering the higher of the two arm blood pressures and both ankle blood pressures.
The device is recharged through the AC/DC power supply, however, the MESI mTABLET ABI is not intended to be used while connected to mains electricity.

Technical specifications
Listed below is technical information regarding the MESI TUBELESS CUFF MODULE and its on-delivery specifications.
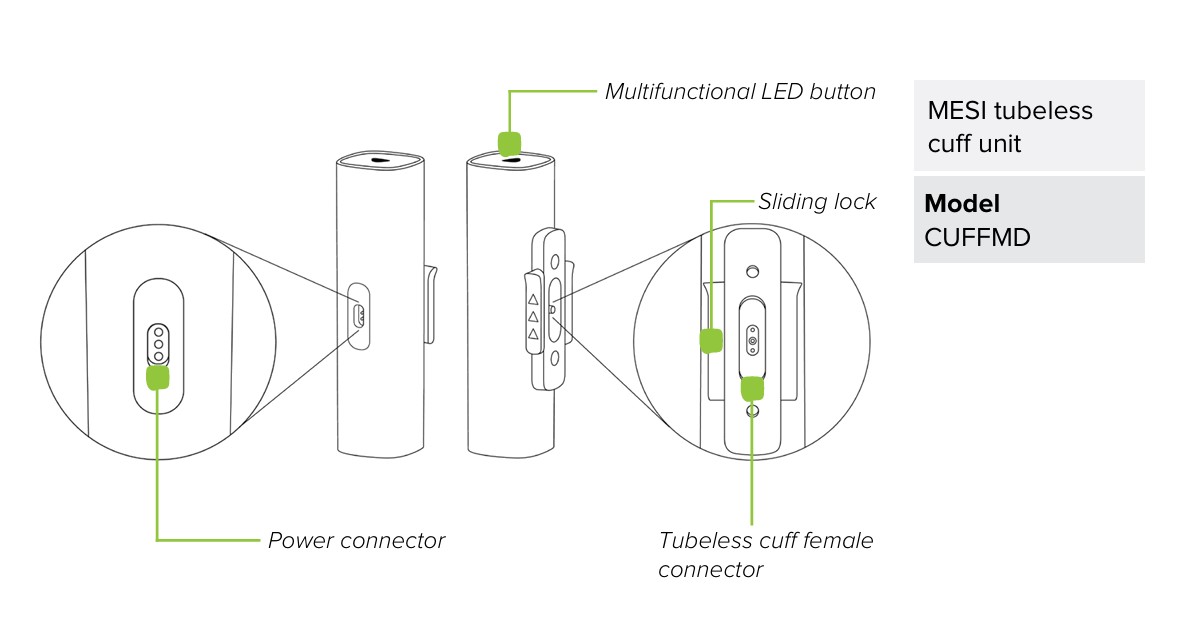
3.1 MESI TUBELESS CUFF UNIT (CUFFMD)
3.1.1 DIMENSIONS
Width: 40 mm (1.57 inches)
Depth: 40 mm (1.57 inches)
Height: 150 mm (5.91 inches)
Weight: 286 g
3.1.2 POWER & BATTERY
Power & Battery| Column A | Column B |
|---|
| Battery type | Rechargeable Lithium-Polymer battery |
| Capacity | 1240 mAh |
| Examinations per battery charge | > 200 |
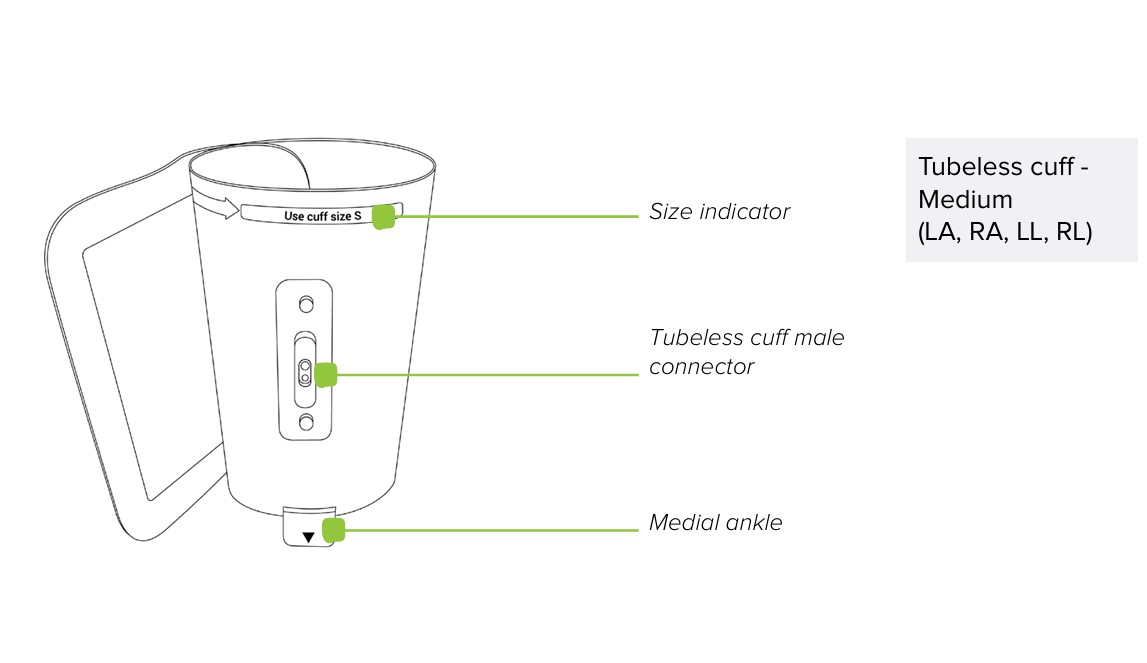
3.1.3 CUFF SIZES
Cuff sizes| Column A | Column B |
|---|
| Medium size cuffs | CUFF-RAM, CUFF-LAM, CUFF-RLM, CUFF-LLM |
| Circumference | 22-32 cm |
| Large size cuffs | CUFF-RAL, CUFF-LAL, CUFF-RLL, CUFF-LLL |
| Circumference | 32-43 cm |
3.1.4 CLASSIFICATION
Protection against electric shock: Class II equipment
Software classification: Class B
RF emissions (CIPSR 11): Group 1. Class B
3.1.5 OPERATING CONDITIONS
OPERATING CONDITIONS| Column A | Column B |
|---|
| Temperature, operating | 10° to 40°C |
| Relative humidity | 25 to 85% (no condensation) |
| Pressure during operation | 700 to 1060 hPa IP42 Rating |
⚠️The MESI mTABLET ABI users must be adequately trained to use the device. Before the first use of the device, users must carefully read the entire the Instructions for Use and follow the Instructions for Use for connected equipment.
3.1.6 MEASUREMENT SPECIFICATIONS
Measurements using oscillometry and volume plethysmography:
Measurement range:
Max deviation:
3.1.7 CONNECTIVITY
Data connectivity with MTABMD (Bluetooth 2.1 + EDR)
Connectivity| Column A | Column B |
|---|
| Receiving section | |
| Frequency range | 2401.3 MHz – 2480.7 MHz |
| Bandwidth | 0.930 MHz |
Connectivity| Column A | Column B |
|---|
| Transmitter | |
| Output power | 0.5 - 4.5 dBm |
| Frequency range | 2401.3 MHz – 2480.7 MHz |
| Modulation | GFSK |
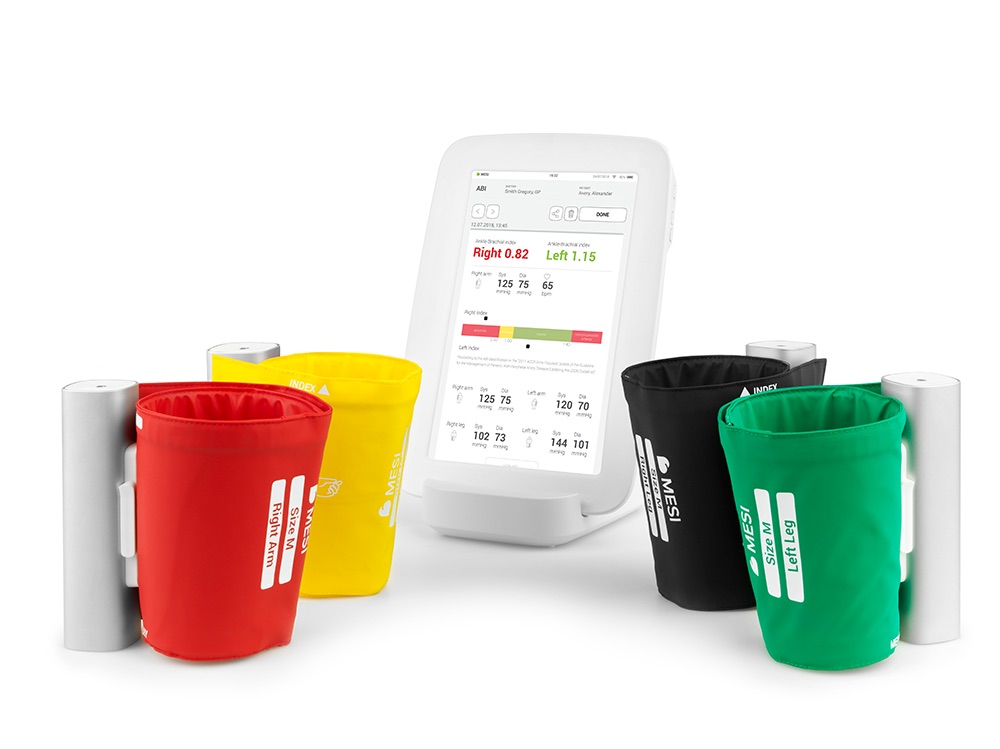
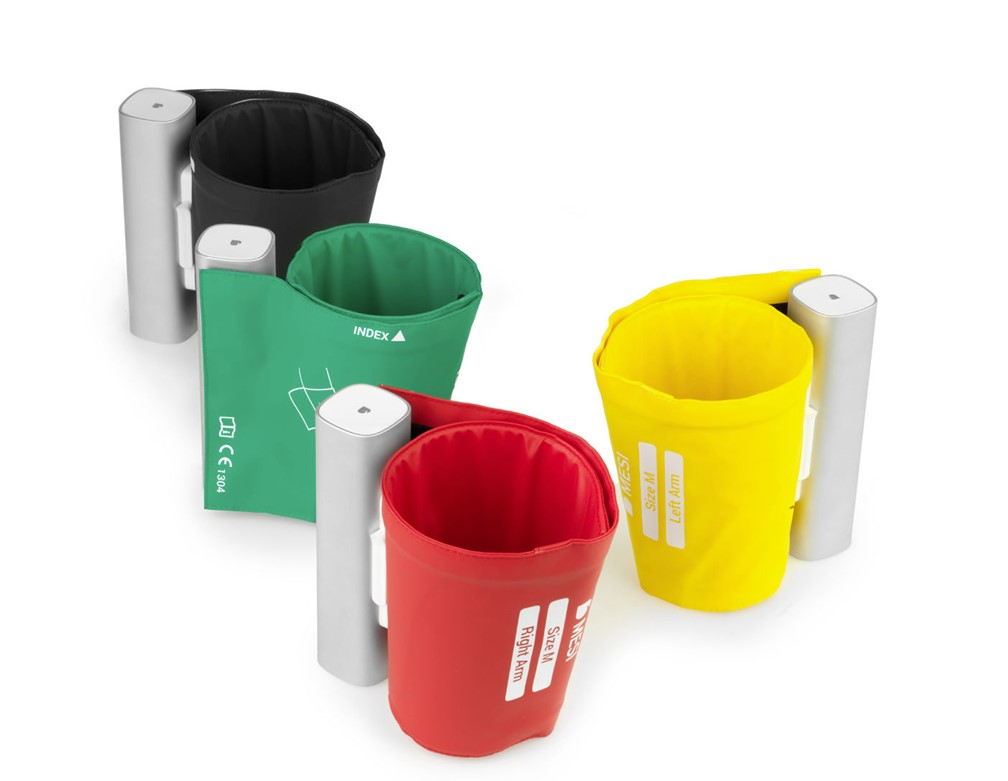
3.2 TUBELESS BLOOD PRESSURE CUFF MODULES
The MESI mTABLET ABI package includes 4 adult Tubeless Blood Pressure Cuff Modules (medium size) for automated wireless ankle-brachial index measurement.
Provided tubeless cuffs:
Right arm – red
Left arm - yellow
Right ankle – black
Left ankle – green
NOTE: For more information regarding approved cuffs and other accessories see instruction manual of the cuff available in the MESI package or contact your local distributor.
Quick measuring guide
NOTE: Before using the device for the first time, read the Instructions for Use carefully and follow the recommendations and suggestions. This Chapter only includes short instructions for the use of the MESI mTABLET ABI. For detailed description of short instructions on the device, see Chapter 5 DETAILED INSTRUCTIONS.
NOTE: When performing the Ankle-Brachial Index measurement the patient must be in supine position and remain still.
NOTE: The MESI mTABLET ABI is intended for use in professional environment, where measurements must be carried out by adequately trained medical personnel. The MESI mTABLET ABI is not intended for home use.
NOTE: The MESI mTABLET ABI may be used on pregnant women.
NOTE: The MESI mTABLET ABI is not intended for use on new-borns or children under the age of 10 years.
NOTE: In case of the presence of intravenous cannulas or arteriovenous (AV) fistulas, the cuffs and measurement can cause injury to the limb.
4.1 PREPARATION FOR MEASUREMENT
⚠️MESI TUBELESS CUFF MODULES are a part of the MESI mTABLET ABI system. Before starting a measurement be sure that you are familiar with all devices and their instructions which are part of the system.
4.1.1 PAIRING WITH A MESI mTABLET UNIT
Before any measurements can be performed all MESI TUBELESS CUFF UNIT devices need to be paired to the MESI mTABLET UNIT. For detailed instructions please follow instructions in Chapter 5.1.5 Pairing.
4.1.2 ASSEMBLY OF THE MESI TUBELESS CUFF UNIT
During shipping and transportation, the conical cuffs are disconnected from MESI TUBELESS CUFF UNITS. Before first use connect the cuffs to the port on the MESI TUBELESS CUFF UNIT as shown on the image below. Ensure that all cuffs are securely attached.
4.1.3 PATIENT PREPARATION
The patient must be in supine position and remain still and quiet. One thin layer of clothing is allowed.
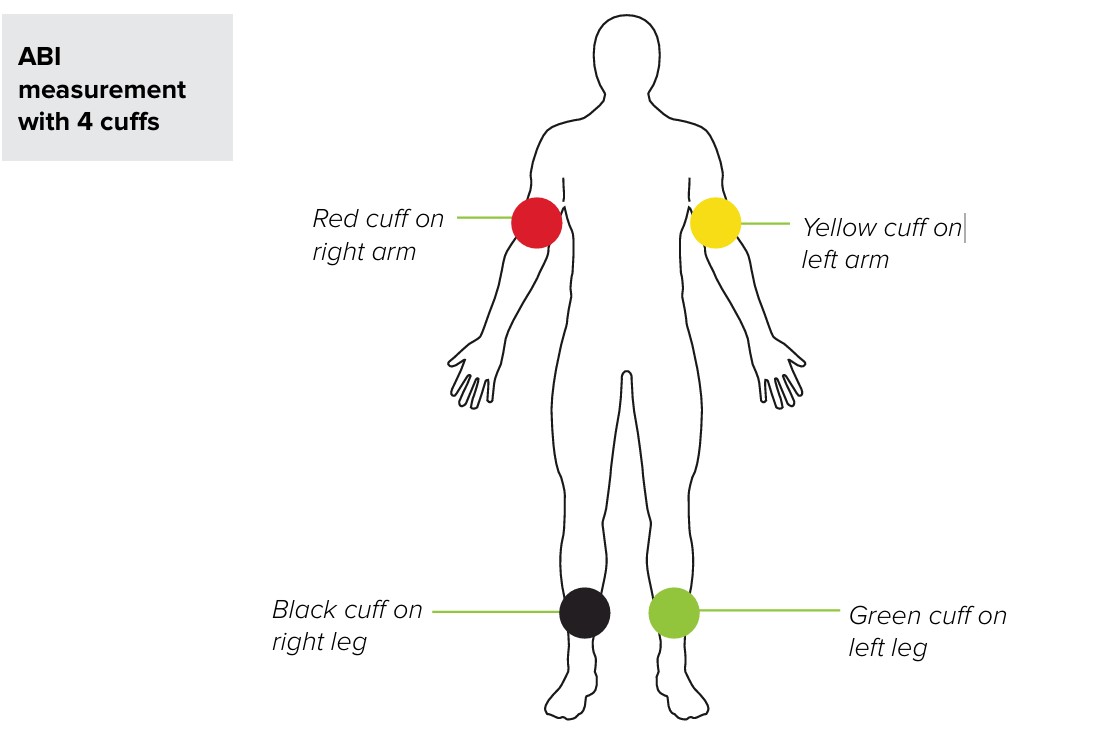
Step 1 Choosing the right colour of the cuff
Select the appropriate cuff, depending on the description and the colour of the cuff:
Choosing the right colour of the cuff | POSITION | DESCRIPTION on the cuff | COLOR on the cuff |
|---|
| Right arm | RIGHT ARM | RED |
| Left arm | LEFT ARM | YELLOW |
| Right ankle | RIGHT ANKLE | BLACK |
| Left ankle | LEFT ANKLE | GREEN |
NOTE: The cuffs can be connected to either of the MESI TUBELESS CUFF UNIT. The colour, size and positioning will be automatically detected by the MESI TUBELESS CUFF UNIT.
Step 2 Place the cuffs to the appropriate arm/leg
ARM:
Position the cuff 1-2 cm above the elbow joint. Align the label Artery with the Artery on inner side of an arm.
Place the cuff so that there is two fingers’ width of room between the limb and the cuff.
Check that you have chosen the correct size using the INDEX marking and the OK area of the cuff.
ANKLE:
Position the cuff 2-3 cm above the ankle. Make sure that the label Ankle points towards inner side of an ankle.
Place the cuff so that there is two fingers’ width of room between the limb and the cuff.
Check that you have chosen the correct size using the INDEX marking and the OK area on the cuff.
NOTE: Observe instructions for use that are provided with the cuff.
Step 1
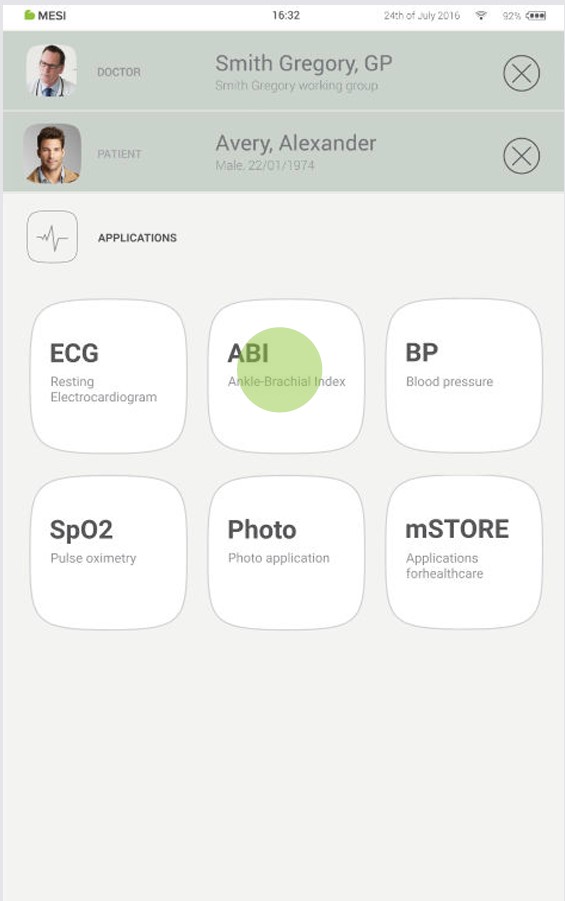
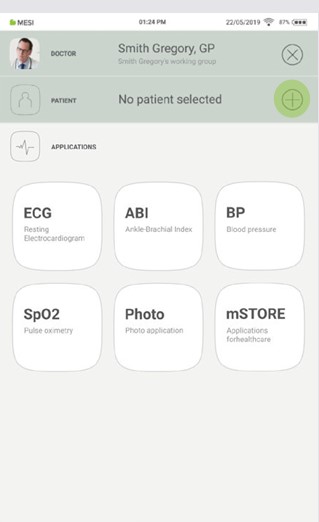
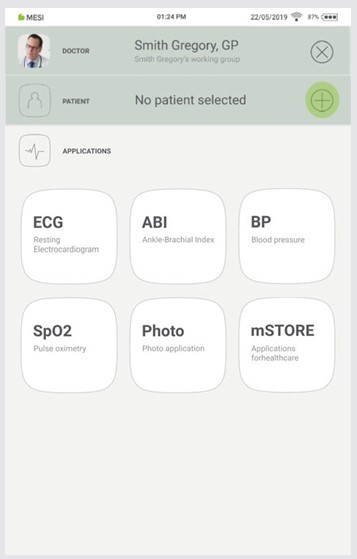
On the MESI mTABLET UNIT select an existing patient (1) or add a new one (2).

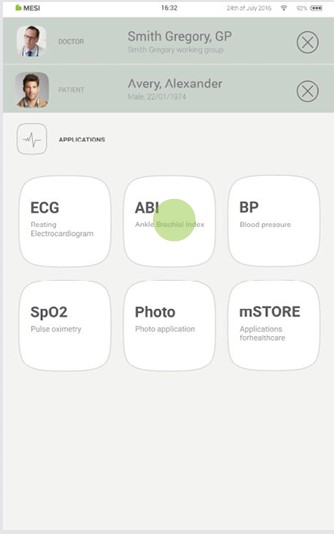
Step 2
After selecting the patient, select the ABI measurement in the application menu.
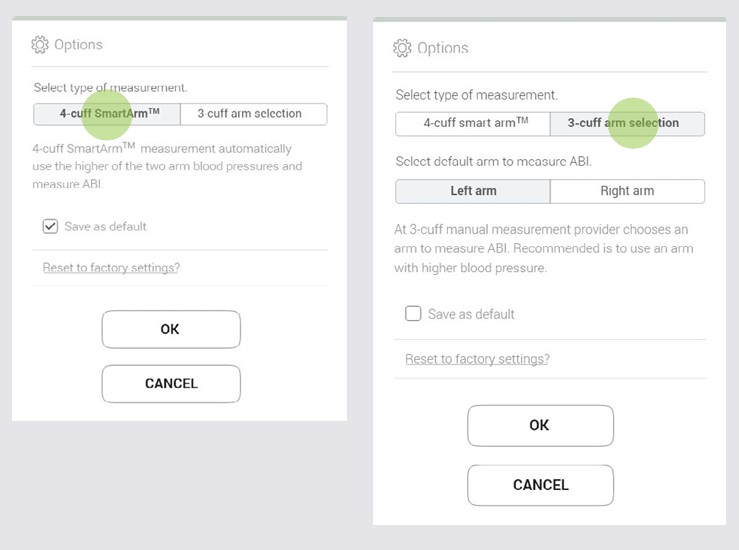
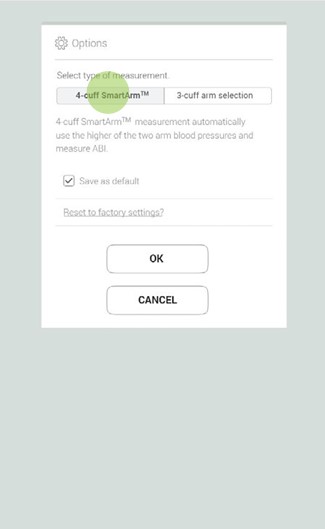
Step 3
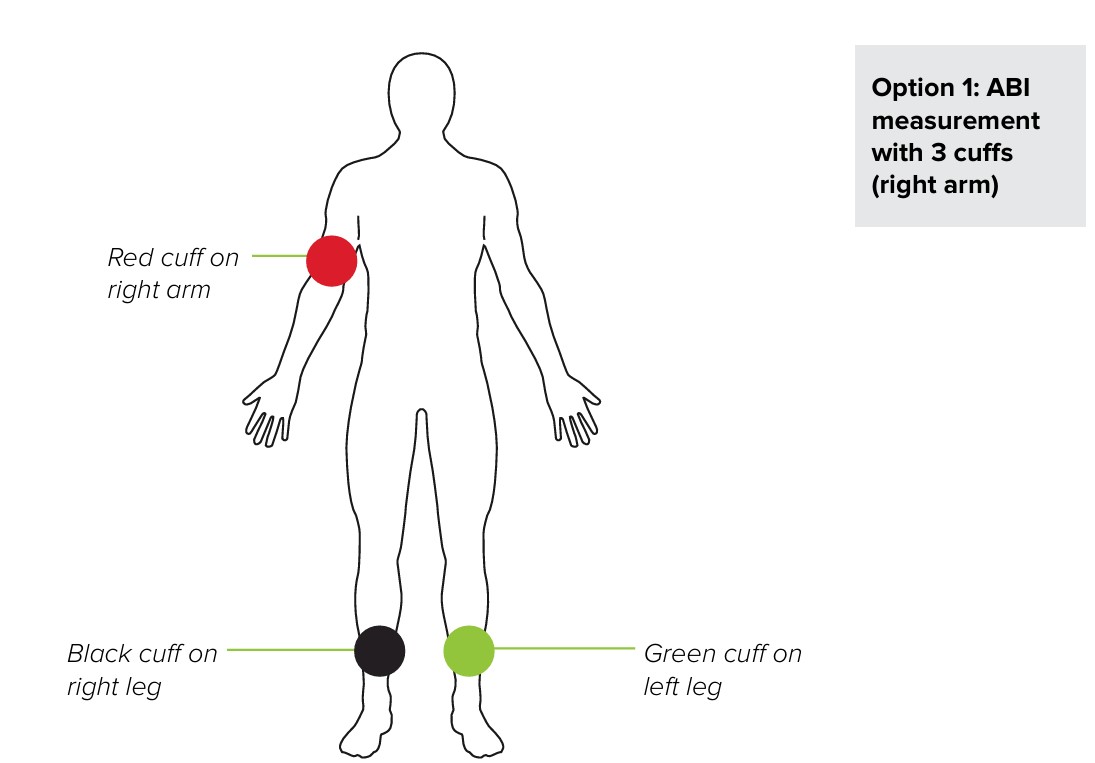
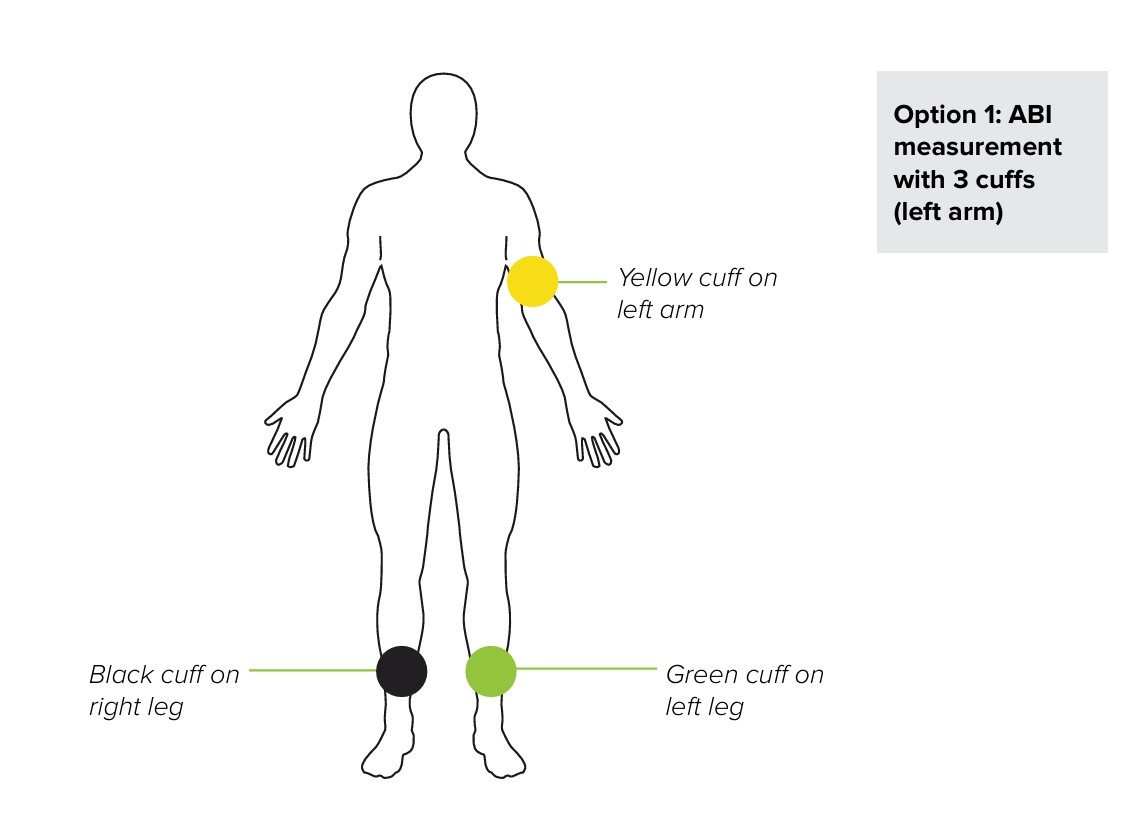
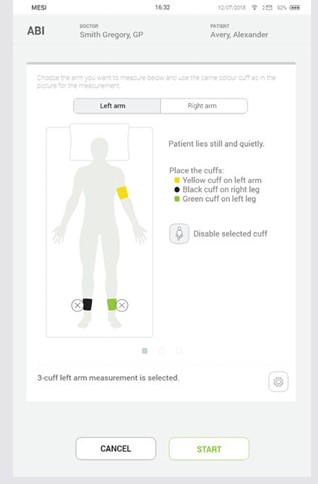
When starting the ABI application for the first time the default settings can be set by selecting between a 3-cuff or 4-cuff ABI measurement (when selecting a 3-cuff measurement, please select right or left arm) and confirming. These settings can be changed at any time by pressing "Options" .
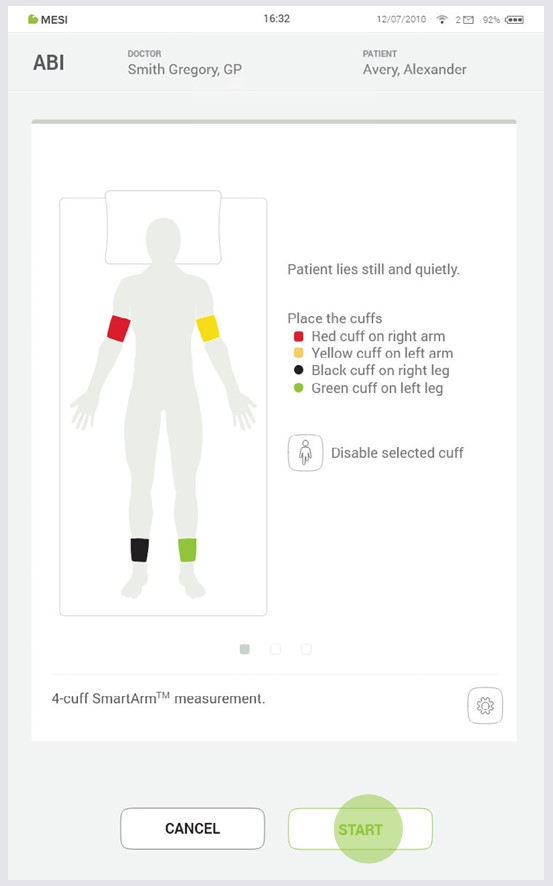
Step 4
Observe the position indication on the cuffs and place them on appropriate arm or leg. Then press START (1) and wait until the measurement is completed (2).
4.2 RESULTS
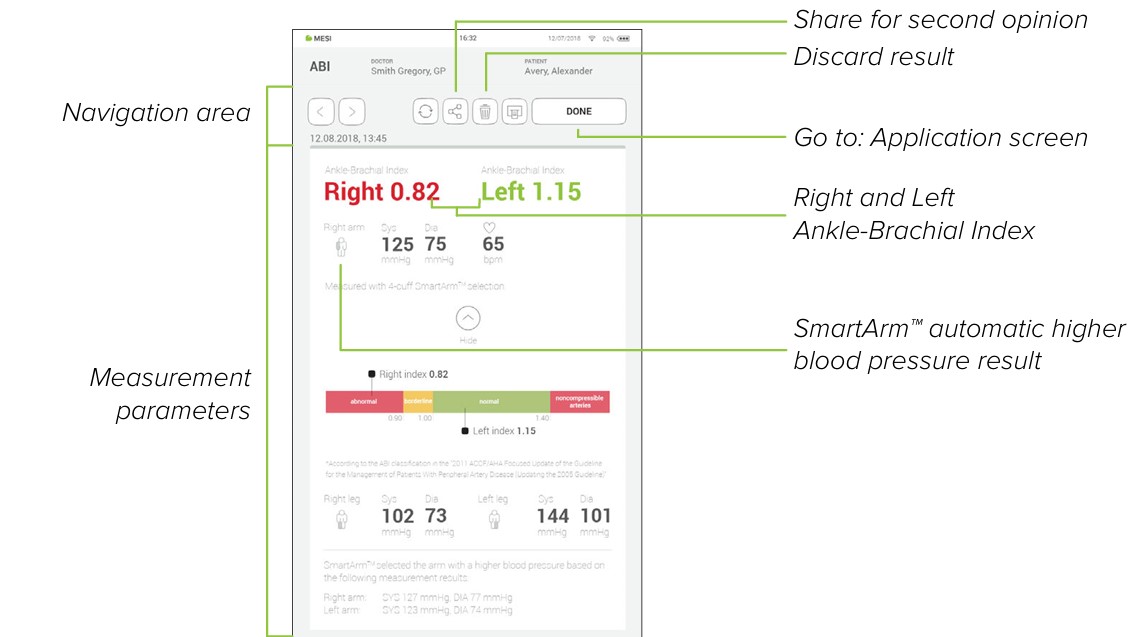
Once the measurement has been taken the system will automatically switch to the results page. By scrolling on the results screen the ABI, oscillation graph, pulse waveform and SmartArm™ selection can be reviewed.
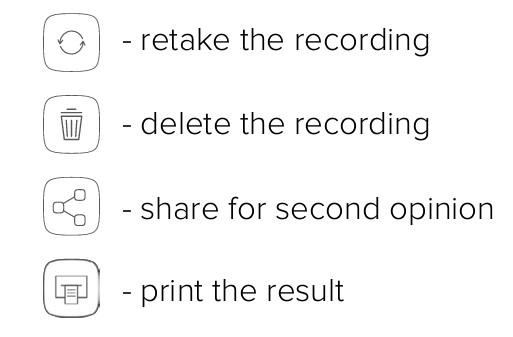
On the top the navigation menu provides the following actions:
NOTE: For more information about the result screen see Chapter 5.4 REVIEWING ABI MEASUREMENTS
Detailed instructions
This Chapter contains all the information required by users of the device for a safe, correct and accurate measurement. It includes a detailed and complete description of all the functions of the device, safety instructions and all the information required to understand operation of the device.
5.1 FIRST TIME USE
5.1.1 BASIC FUNCTIONALITIES
MESI mTABLET ABI package consists out of four MESI TUBELESS CUFF UNIT diagnostic devices and 4 tubeless cuffs. Before first use, the MESI TUBELESS CUFF UNITS need to be paired with MESI mTABLET UNIT. Follow the instructions carefully.
5.1.2 AC/DC POWER SUPPLY AND BATTERY
The MESI TUBELESS CUFF UNIT uses two power sources: mains electricity (which uses a AC/DC power supply for charging) and battery power (which is used while performing measurements).
Connect the AC/DC power supply to a wall socket with a mains voltage of 100-240V at 50-60Hz and to the connector at the back of the device.
5.1.3 ACTIVATION
When setting up the MESI TUBELESS CUFF UNIT for the first time it needs to be activated. The device will not respond until it is placed on the MESI LARGE CHARING PLATE and a multifunctional button illuminates. It is recommended that before first use the MESI TUBELESS CUFF UNIT is fully charged
NOTE: The battery inside a completely new device is most likely not completely empty and can provide enough power to start the device up. Nonetheless, please recharge the batteries before first use.
NOTE: When the battery needs to be replaced, the MESI mTABLET UNIT will display a battery warning. For more information see Chapter 8 ERRORS.
5.1.4 FIRST USE BATTERY STATUS
The MESI TUBELESS CUFF UNIT comes with an internal battery. To check the battery status, press multifunctional button on top of each MESI TUBELESS CUFF UNIT. The button will respond by lighting up in green or red depending on the battery state. Otherwise, see the chapter 6.1 CHARGING THE BATTERY for more information on battery charging
5.1.5 PAIRING
Before any measurements can be performed the MESI TUBELESS CUFF UNIT has to be paired with the MESI mTABLET UNIT. Take the MESI mTABLET UNIT, open user profile (for more information about user accounts see MESI mTABLET instruction manual, chapter MANAGING USERS) and observe the following instructions.
Step 1
Go to User profile > Settings > Modules > +Add module

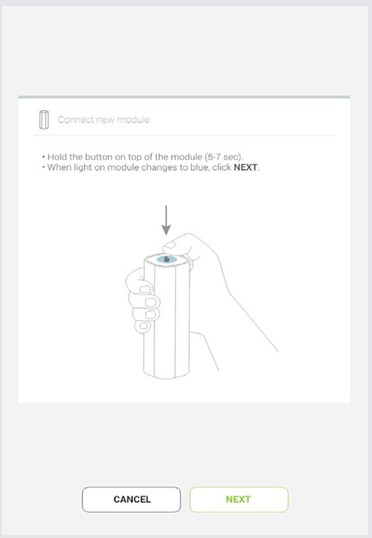
Step 2
Press and hold the button on the top of the MESI TUBELESS CUFF UNIT until the multifunctional button light changes to blue.
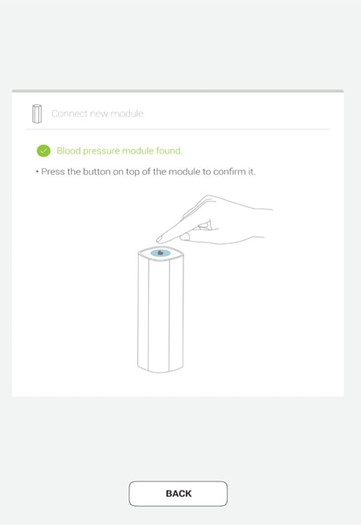
Step 3
When the MESI mTABLET UNIT establishes a connection with MESI TUBELESS CUFF UNIT, the light on top of the module will change to green. Confirm the pairing process by pressing the button on top of the module again.
NOTE: While operating only with one MESI mTABLET UNIT, performing this operation is required only once. In case of more MESI mTABLET UNITS this process will have to be repeated on each MESI mTABLET UNIT.
Step 4
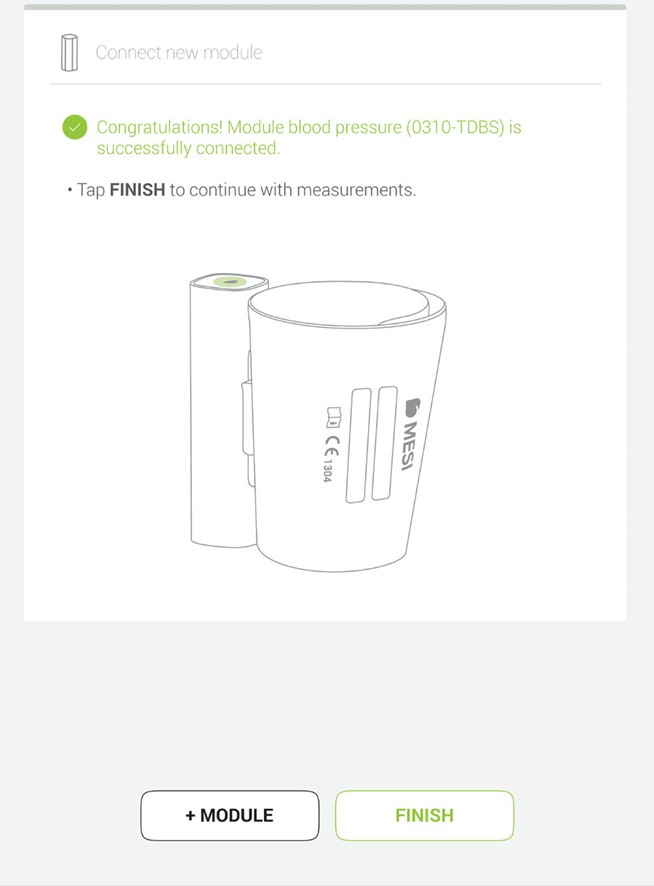
The final screen indicates successful connection between the MESI mTABLET UNIT and the MESI TUBELESS CUFF UNIT. It is possible to access all technical information about the connected modules in User profile >Settings > Modules > Connected modules
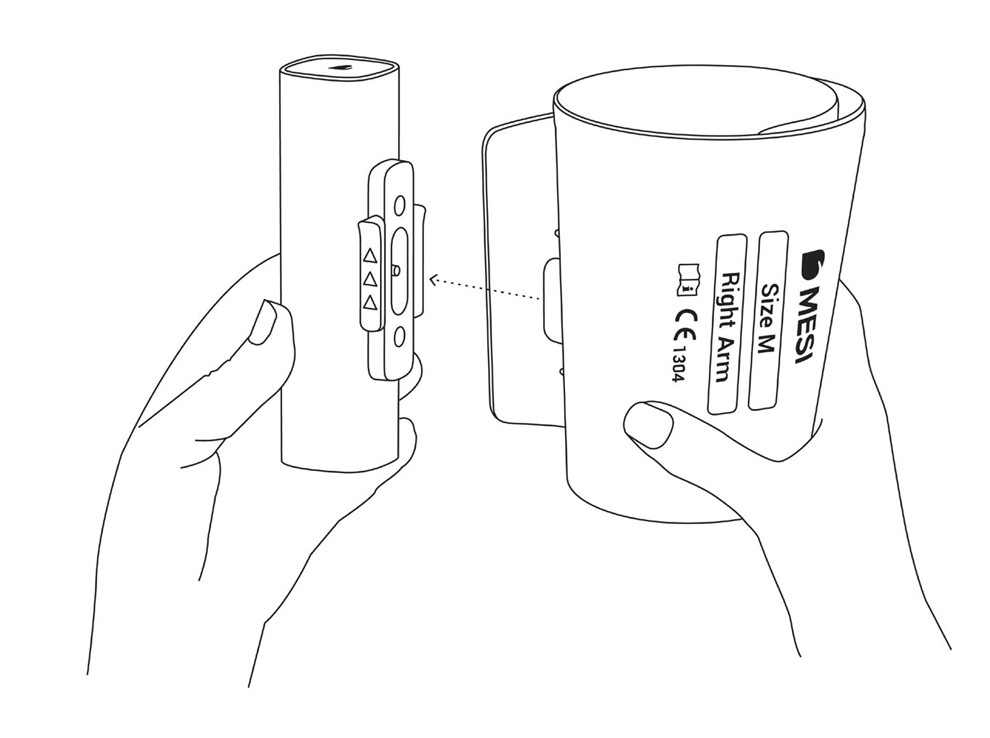
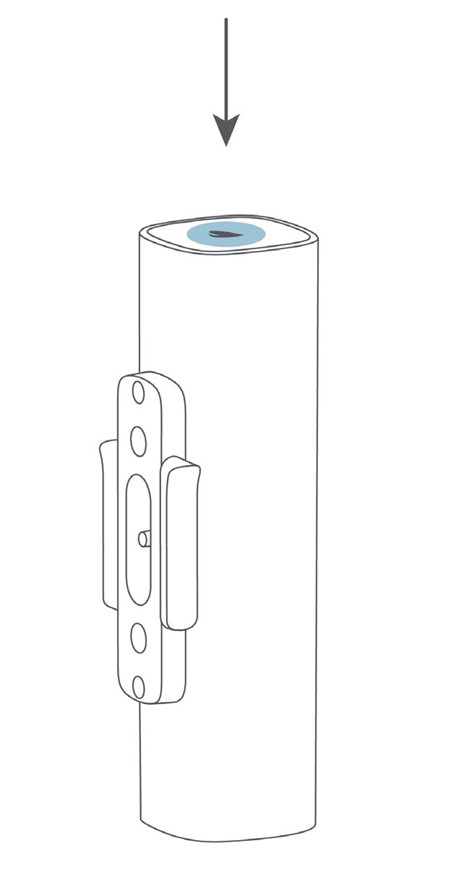
5.1.6 ATTACHING THE CUFFS
Before first use, cuffs should be disconnected from the MESI TUBELESS CUFF UNIT. The conical cuff can be orientated any way to the MESI TUBELESS CUFF UNIT. To connect the cuff, follow the next steps:
Step 1
Hold MESI TUBELESS CUFF UNIT firmly in your hands.
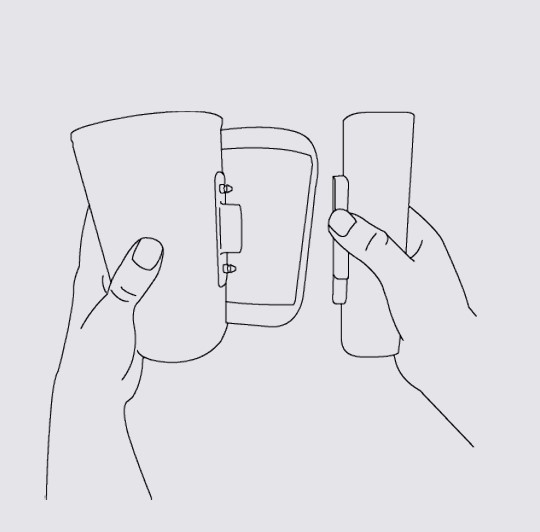
Step 2
Attach cuff to the MESI TUBELESS CUFF UNIT.
5.1.7 DETACHING THE CUFFS
During transportation, each conical cuff should be disconnected from the MESI TUBELESS CUFF UNIT. To detach the cuff, follow the next steps:
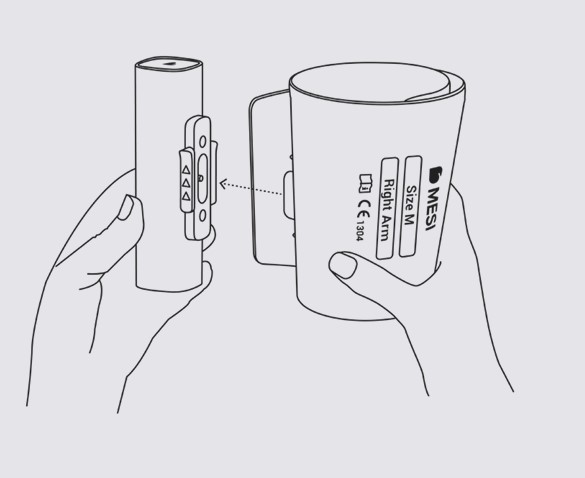
Step 1
Hold MESI TUBELESS CUFF UNIT firmly in your hands.
Step 2
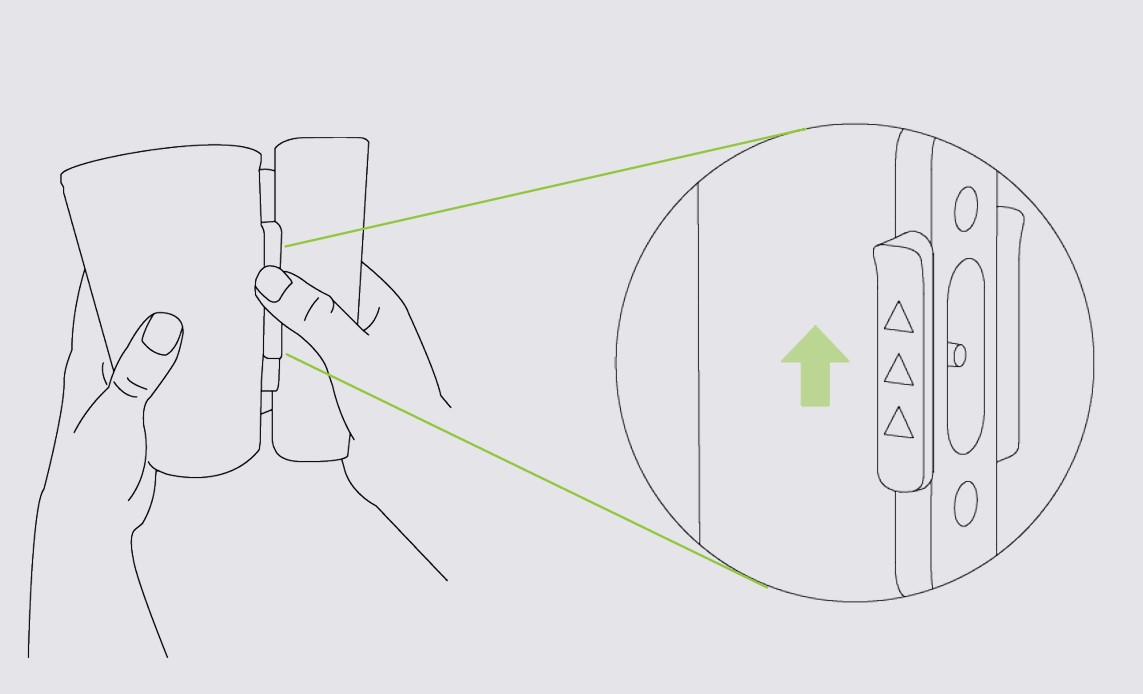
Push the sliding lock in the direction indicated on it and detach the conical cuff.
5.2 PATIENT SELECTION
Before performing a measurement, patient needs to be selected or added to your working groups a patient list.
5.2.1 SELECTING A PATIENT
Step 1
Select the patient tab button.
Step 2
Use the search bar (1) or scroll (2) to the patient who is having their ABI measured.
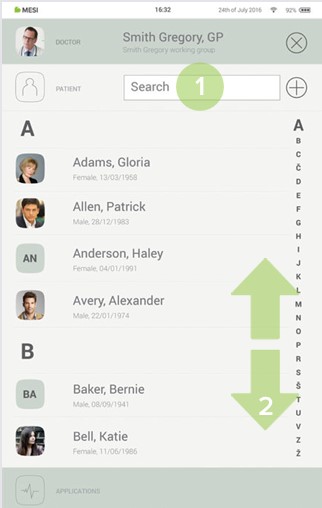
Step 3
Select the patient.

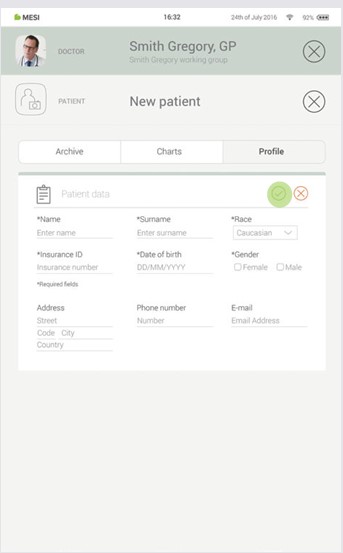
5.2.2 ADDING A PATIENT
Step 1
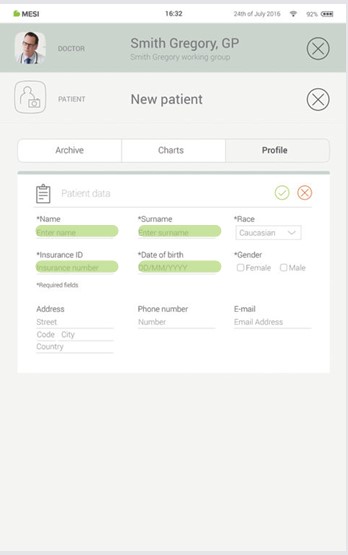
On your home screen, press the + button in the Patient tab.
Step 2
Fill out required fields (Name, Surname, Date of Birth and Gender) and any additional information regarding the patient.
Step 3
Save the patient by pressing the ✔️ button.
The patient must be in a supine position, remain still and remain quiet.
NOTE: It is recommended that the patient lies still for at least 5 minutes before starting the measurement process.
NOTE: The person carrying out the measurement should always remain by the patient’s side and closely monitor the measurement process.
5.3.1 CUFF PLACEMENT
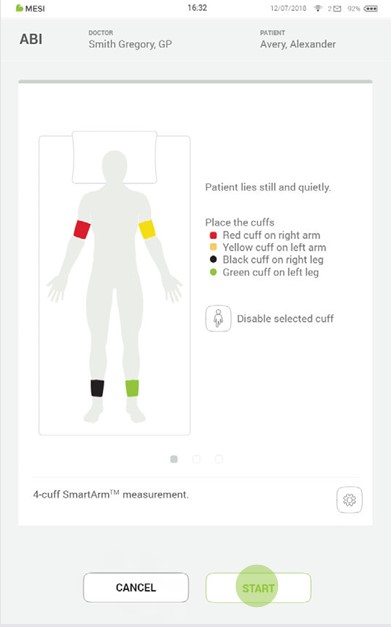
The MESI automated wireless ABI system includes 4 cuffs for arms/legs. The ABI measurement can be made using with 4 or 3 cuffs. When using 4 cuffs the MESI mTABLET ABI system uses the SmartArm™ algorithm to identify the arm with the higher systolic blood pressure, which will be used in the calculation of ABI.
When using only 3 cuffs the user needs to identify the arm with the higher systolic blood pressure manually or perform the ABI measurement with both arms to obtain an accurate result.
NOTE: Measurement of the Ankle-Brachial Pressure Index can be affected by the placement of the cuffs, the position of the patient and their physical condition. The functioning of the device can also be affected by high temperature, humidity and altitudes.
ARM CUFF
Place the appropriate cuff on left/right arm and position the cuff 1-2 cm above the elbow joint. Make sure that the arrowshaped artery marking is in line with the brachial artery.
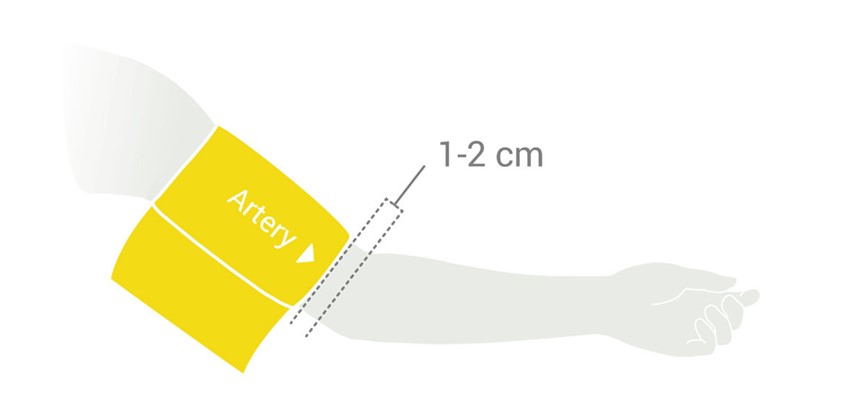
Place the cuff so that there is two fingers’ width of room between the limb and the cuff. Check that you have chosen the correct size using the SIZE marking and the OK area of the cuff.

ANKLE CUFF
Place the appropriate cuff on left/right leg and position the cuff 2-3 cm above the ankle. Make sure that the arrow-shaped MEDIAL ANKLE marking points towards the inner side of the ankle.
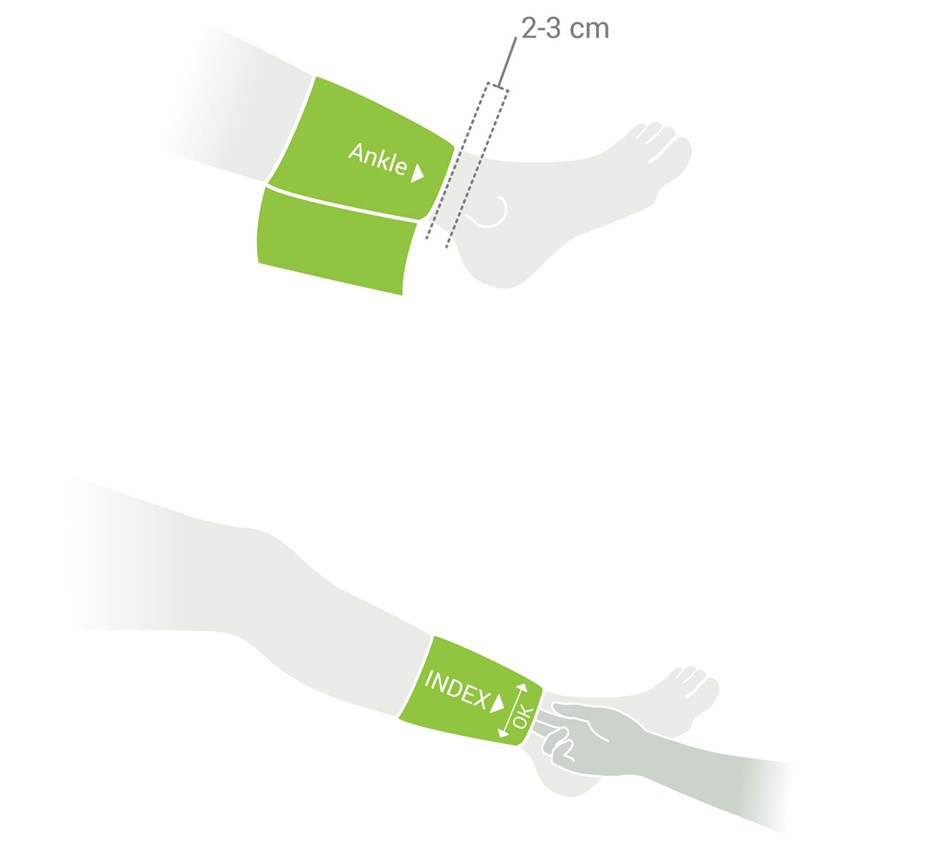
Place the cuff so that there is two fingers’ width of room between the limb and the cuff. Check that you have chosen the correct size using the SIZE marking and the OK area on the cuff.
NOTE: For other cuffs observe Instructions for use of the cuff available in the MESI TUBELESS CUFF MODULE package or contact your local distributor for more information.
Step 1
On the MESI mTABLET UNIT select an existing patient or add a new one. For additional information see chapter 5.2 PATIENT SELECTION.

Step 2
After selecting a patient, select the ABI application in application menu.
Step 3
Select the type of measurement – 4 cuffs or 3 cuffs (when selecting 3 cuffs you need to select the appropriate arm for calculating ABI – left/right). Press OK.
Step 4
Amputation option – if a patient has an amputated limb or is not compliant for ABI measurement due to severe and/or painful wounds, the ABI can be measured only on patient’s existing limbs. Before the measurement the user can disable the selected cuff, by clicking on the button and selecting the limb that is not compliant for measurement.
NOTE: If the MESI TUBELESS CUFF UNIT has low battery or connectivity issues, a warning will be displayed on the instructions screen. In case of errors please consult Chapters 8 ERRORS and 9 TROUBLESHOOTING.
Step 5
Apply the cuffs to the appropriate locations (arm/legs) according to Chapter 5.3.1 Cuff placement and follow the onscreen instructions. The patient should be in a supine position, remain still and remain quiet. Press the START button to begin the measurement.
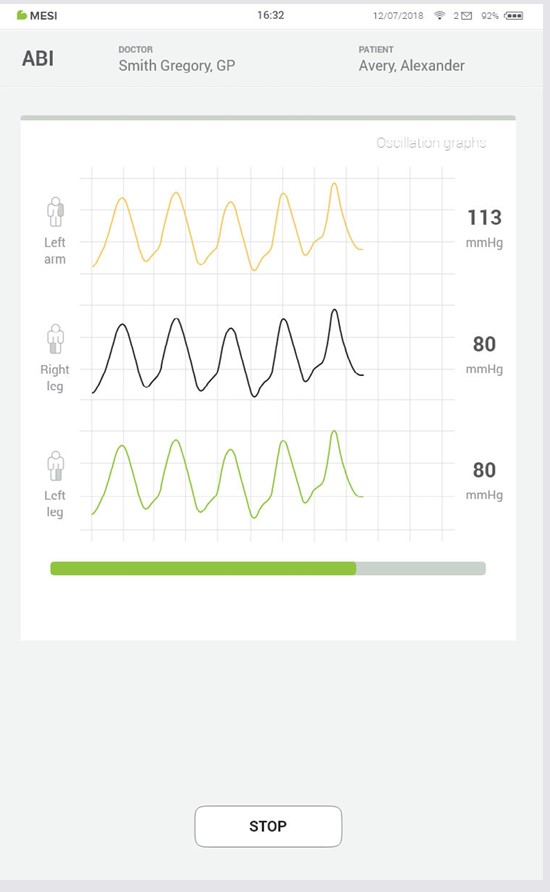
Step 6
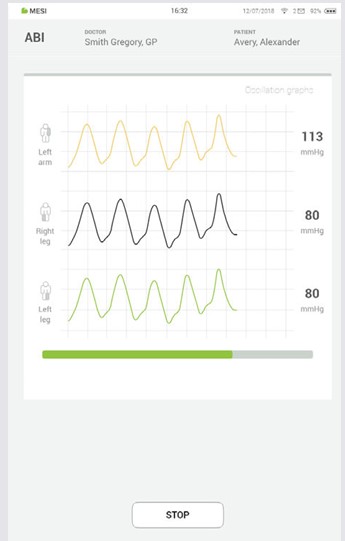
During the measurement the pressure waveforms show oscillation of pressure for each limb while the pressure next to the oscillation displays the current pressure in the corresponding cuff.
Progress bar: The progress bar shows the timeline of the ABI measurement. When the bar comes to an end the measurement of all blood pressures concludes and all the cuffs deflate. The results screen follows.
Cuff pressure (mmHg)
STOP button – for cancelling the measurement
5.4 REVIEWING AN ABI MEASUREMENT

5.4.1 MESI MTABLET RESULTS SCREEN
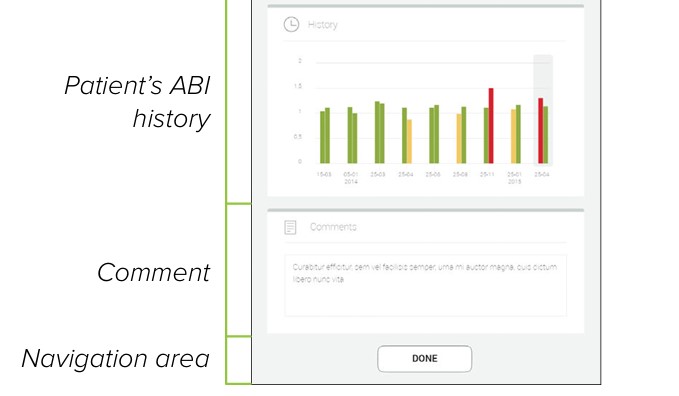
When the measurement process is completed, results will be displayed on the screen. This consists of seven different areas: navigation area, ABI values, SYS/MAP/DIA blood pressure values and SmartArm™ selection, Oscilation graphs and Pulse waveforms, patient’s measurements history, comments on the result and another navigation area.
NOTE: If the results of the Ankle-Brachial Pressure Index measurement are very unusual, repeat the measurement three times.
5.4.1.1 Navigation area
All the buttons and information placed in the navigation area are there to help you get around the application. You can toggle between previous results of this patient. If you are not satisfied with the result for any reason, you can quickly discard it or, in the case of uncertainty, you can consult with a specialist by entering their e-mail addresses or by pressing the printer icon which will provide you with a printout of a selected measurement. The navigation menu also contains the names of both the doctor performing the recording and the patient.
Parameters from the measurement (Right/Left Ankle-Brachial Index) This section shows the left and right Ankle-Brachial index results along with the systolic and diastolic blood pressures of the arm that was used for the calculation.
Pressing the “Show more” button will display more detailed information regarding the systolic and diastolic blood pressure measurement (mmHg) on the arm/s and leg/s and the pulse rate (depending on which option of the measurement did the user select 3-cuff or 4-cuff measurement).
In this section, the entire ABI measurement pulse waveform (oscillation graph) or a detailed view (pulse waveform) can be examined. For more information regarding the reading, the oscillation or pulse waveform graph see chapter 5.5 INTERPRETATION OF AN ABI RESULT.
5.4.1.4 Patient measurement history
History holds an overview of measurements measurements taken by the same doctor on the same patient. It shows the trend of the patient’s results for left and right ABI on a specific date.
A comment can be added to every measurement. It will be stored and always available together with recoding report.
5.5 INTERPRETATION OF AN ABI RESULT
5.5.1 DETECTION OF SEVERE PAD AND INCOMPRESSIBLE ARTERIES
When the result “Abnormally weak pulse” is displayed, there is a high probability of severe Peripheral Arterial Disease (PAD) or incompressible arteries (Medial Calcinosis).
NOTE: The majority of the “Abnormally weak pulse” results describe the patients with an ABPI around or lower than 0,5.
NOTE: In case of Medial Calcinosis, the arteries cannot be compressed due to stiff arterial walls. The measurement of blood pressure with cuffs is not possible, and therefore the ABPI cannot be reliable. The patient should be referred for a Toe Brachial Index measurement.
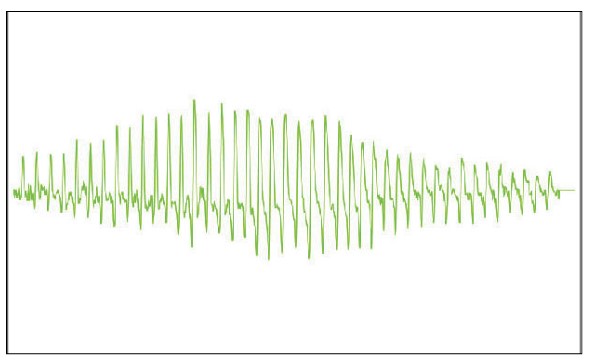
The MESI mTABLET ABI uses the PADsense™ pattern recognitional algorithm to automatically interpret the acquired pulse waveform and calculate the ABI with the result. However, to help an operator to better understand a performed ABI measurement, this pulse waveform is available on the applications results screen.
Combining both the ABI result and pulse waveform represents the best practice in evaluating the presence and severity of Peripheral Arterial Disease (PAD).
Normal pulse waveform will display:
(1) a rapid rise in the upstroke during systole,
(2) a very sharp peak,
(3) a gradual downstroke,
(4) a presence of dicrotic notch.
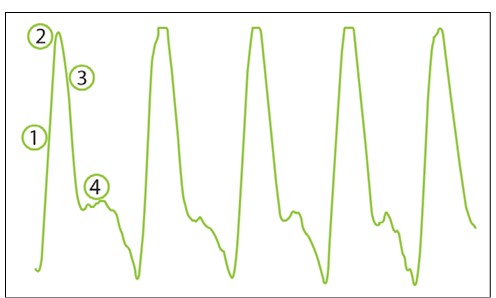
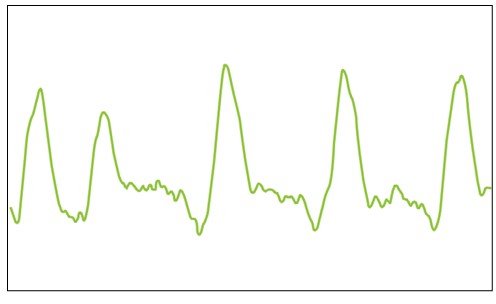
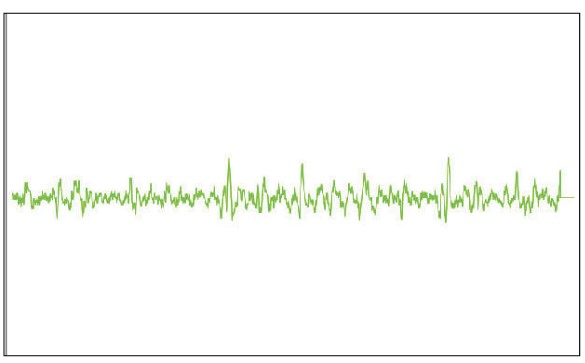
An absence of the dicrotic notch, a smaller amplitude, decreased slope and rounding of the systolic peak are the initial signs of a possible abnormality - the measured ABI value is lower than the one with normal pulse waveform.
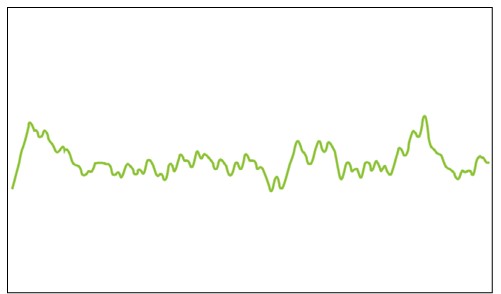
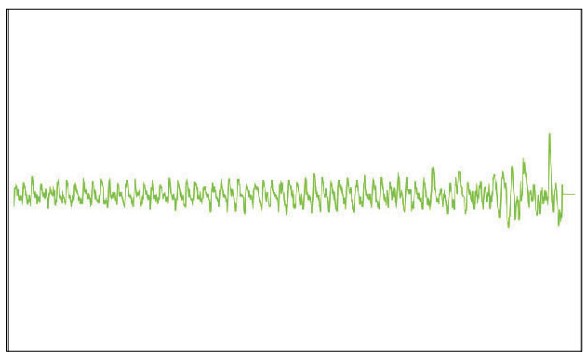
A flattened PVR waveform or a PVR without the typical shape is an indicator of severe PAD. The absence of the pulsations caused by occlusions in the artery makes it impossible to calculate the ankle pressures. Instead of ABI value, the device will display a “PAD” result, indicating severe disease. The result is confirmed with non-typical, f lattened PVR waveform, similarly to the picture below.
5.5.3 OSCILATION GRAPH
As with the pulse waveform the MESI mTABLET ABI displays on result page also oscillation graphs which provide the operator with a pulse waveform analysis through the whole ABI measurement.
Below are a couple of examples of different oscillation graphs:
Normal oscilation graph
Severe PAD oscilation graph
Incompressible arteriesoscilation graph
5.6.1 LED INDICATORS
Even though most of the MESI TUBELESS CUFF UNIT control is performed through the MESI mTABLET UNIT interface there is still a multifunctional button on top of the device. Next to basic colour light notification functionalities of this button there is also a possibility to perform some additional operations. These operations are based on the current status of the MESI TUBELESS CUFF UNIT.
5.6.1.1 Standby
Green: Battery capacity is more than 25%.
Red: Unit battery is less than 25%, please recharge the unit as soon as possible.
5.6.1.2 Charging
Green: Battery is fully charged.
Orange: Unit is charging.
5.6.1.3 Pairing
Blue: Unit is waiting for confirmation from the mTABLET.
5.6.2.1 Standby
Button functions - Standby| Column A | Column B |
|---|
| Status check | Quickly pressing the on button in standby mode will perform a basic status check of the MESI TUBELESS CUFF UNIT – green, more than 25% battery charge, while red means less than 25% charge is left, and the module should be charged. |
| Pairing mode | Holding the button for 4 seconds will put the module into pairing mode where it can be connected to the MESI mTABLET UNIT (for more information look at Chapter 5.1.5 Pairing). |
| Resetting the ABI unit | To perform a reset of the MESI TUBELESS CUFF UNIT press and hold the LED button for 10 seconds until it changes colour to red. Unit will be ready to use in a few seconds. |
5.6.2.2 Measurement mode
Button functions - Measurement mode| Column A | Column B |
|---|
| Stop measuring | Pressing the top button on the MESI TUBELESS CUFF UNIT while performing the ABI measurement will stop the measurement. |
Maintenance
6.1 CHARGING THE BATTERY
The device can be only used on battery power therefore it has to be ensured that the battery is charged regularly. One battery charge is enough for approximately 200 measurements.
To charge the battery, place the MESI TUBELESS CUFF UNIT on the MESI LARGE CHARGING PLATE UNIT. During the charging process the light on the module will be flashing yellow. Only when the device is completely charged it will start flashing green. For more information see chapter 5.5 Multifunctional button.
If the capacity of the battery is significantly decreased after a certain period of intensive use, the battery is most likely spent, and it should be replaced. As the device does not contain any parts which can be replaced by a user, contact your local distributor or the manufacturer about replacing the battery.
6.2 CLEANING INSTRUCTIONS
⚠️Read and follow cleaning instructions carefully.
Cleaning – MESI TUBELESS CUFF UNIT:
Before cleaning remove the MESI TUBELESS CUFF UNIT from the charging station and disconnect the cuff from the MESI TUBELESS CUFF UNIT.
Use a soft lint-free cloth dampened with a proper cleaning agent to clean and disinfect the exterior/interior of the unit/.
With a dry cloth wipe off all residues of the cleaning solution.
Dry the equipment before next use.
Recommended cleaning agents: Hydrogen peroxide (3%), Ethanol (70%), Isopropanol (70%), Mild soap (diluted), Ammonia (diluted), Sodium hypochlorite bleach (diluted)
Cleaning – cuff:
Clean the cuff’s surface by wiping a damp cloth with mild soap water.
Do not wash the cuffs or immerse it in water. Also do not use petrol, thinners or similar solvents to clean the cuffs.
⚠️Do not sterilise cuffs. Do not use bleach.
⚠️Wash and rinse temperatures should not exceed 40°C.
NOTE: Do not wash the cuffs in a washing machine or iron them.
NOTE: The device must be calibrated in the event of mechanical stress!
6.3 DISINFECTION
Disinfection – MESI TUBELESS CUFF UNIT:
Use commercially available disinfectants intended for the professional healthcare environment. Refer to the instruction for use of the producer.
Approved disinfectants:
Isopropyl alcohol 70%
Propanol (70-80%)
Ethyl hexanal
Aldehyde (2-4%)
Ethanol (70-80%)
Non-approved disinfectants:
Disinfection – cuff:
Can be disinfected with medical-grade alcohol 70%.
After disinfection, the cuff cover should be left air dry.
6.4 PRODUCT LIFE AND STORAGE
If correctly used and maintained the device will have a minimum service life of 5 years. It is possible to store the device in suitable conditions for a maximum of 5 years. While in storage the battery needs to be recharged once per three months to avoid accidentally over-discharging the batteries. When using the device after storage, we recommend subjecting the device to a thorough maintenance check.
The device should be inspected by a qualified service engineer at least every 12 months for the following safety checks:
Any mechanical or functional damage on the device and accessories,
Performance of device in accordance to instructions for use,
The warning label’s legibility, and
The battery cycle count.
General warnings
⚠️ Before using the device for the first time, read the Instructions for Use carefully and follow the recommendations.
⚠️ The MESI ABI device users must be adequately educated to use the device. The education must be performed by the trained MESI representative. Before the first use of the device, users must read the entire Instructions for Use for carefully and follow the instructions for the use of the connected equipment.
7.1 PATIENT INJURY PREVENTION
⚠️Do not place the cuffs on wounds, as this may cause additional injury. Only place the cuffs on the upper arms and lower legs.
⚠️In case of the presence of intravenous cannulas or arteriovenous (AV) f istulas in the limbs, the cuffs and measurement can cause injury to the limb.
⚠️If the patient has had breast surgery, do not place the arm cuff on the side which has been operated on.
⚠️Do not use the device on a patient while they are connected to a vital sign monitor.
⚠️Check the pressure in the cuff several times during measurement. If the cuff puts pressure on the limb for too long, it can impair the blood flow.
⚠️Consecutively carrying out too many measurements may result in injury to the patient.
7.2 MEASUREMENT PROCEDURE
⚠️The MESI ABI is intended for Ankle-Brachial Pressure Index measurement. Upper arm blood pressure measurements are for information purposes only.
⚠️Do not use the device when it is wet. After cleaning the device with a damp cloth, wait for it to dry. Only use the device when it is completely dry.
⚠️The MESI ABI is not intended for use in conjunction with high frequency surgical equipment.
⚠️The AC/DC power supply must be connected to an easily accessible socket (the AC/DC power supply also serves for galvanic isolation).
⚠️The MESI ABI must not be used in an oxygen-rich environment.
⚠️When repeating the Ankle-Brachial Pressure Index measurement or blood pressure measurement for several times a slight pain may appear at the measurement location. Other effects are excluded.
⚠️WARNING: Use of accessories and cables other than those specified or provided by the manufacturer of this equipment could result in increased electromagnetic emissions or decreased electromagnetic immunity of this equipment and result in improper operation.
⚠️Portable RF communications equipment including peripherals such as antenna cables and external antennas should be used no closer than 30 cm (12 inches) to any part of the device including cables specified by the manufacturer. Otherwise degradation of the performance of this equipment could result.
⚠️Use of this equipment adjacent to or stacked with other equipment should be avoided because it could result in improper operation. If such use is necessary, this equipment should be observed to verify that they are operating normally.
⚠️Important information on electromagnetic compatibility (EMC). As the number of electronic devices such as computers and mobile phones in the room increases, medical devices can become sensitive to the electromagnetic influences of other devices. Electromagnetic interference can cause medical devices to malfunction, which can potentially lead to dangerous situations. Furthermore, medical devices must not interfere with other devices. The IEC/EN 60601-1-2 standard was introduced due to the necessity to establish electromagnetic compatibility (EMC) requirements for the prevention of dangerous situations in the use of medical devices. The standard defines the level of resistance to electromagnetic interference for medical devices. This medical device is compliant with the IEC/EN 60601-1-2 standard in terms of resistance to electromagnetic interference and electromagnetic emissions. Nevertheless, do not use mobile phones and similar devices which create strong electromagnetic fields in the vicinity of the device. This can cause the device to malfunction, which can potentially cause a dangerous situation.
7.3 MAINTENANCE
⚠️Do not dispose the device as unsorted municipal waste. Prepare it for recycling or separate waste collection in accordance with Directive 2002/96/EC on scrap electrical and electronic equipment (WEEE).
⚠️To prevent electric shock hazard due to leakage current, only use AC/DC power supplies which are compliant with the technical specifications of the device.
⚠️Only use non-aggressive cleaning agents to clean the device. The device may be wiped with a damp cloth.
⚠️Be careful when wrapping the cuffs. Do not wrap them too tightly.
⚠️Make sure that the device does not come into contact with an electrical current while it is being cleaned.
⚠️Do not open the device. The device does not contain any parts which can be replaced by a user. Do not alter or adapt the device.
⚠️Protect the device from moisture and liquids and extremely high/low temperatures. Also protect the device from mechanical stress and do not expose it to direct sunlight, as this can cause the device to not function properly.
7.4 FUNCTIONING OF THE DEVICE
⚠️It is mandatory to have the device calibrated once per year to ensure the correct functioning and accuracy. Contact your dealer or the manufacturer about calibrating the device.
⚠️The device may only be used by professional medical personnel. The device is class A equipment and can cause radio interference or even cause nearby devices to cease to function. It may be necessary to reposition the MESI ABI device or protect the room containing the device from electromagnetic radiation.
Errors
Errors| Error | Description | Solution |
|---|
| E1: No oscillations detected. | There were no oscillations detected. | If the error is repeated, there is a possibility of critical ischemia. Check the placement of the cuffs and repeat the measurement. |
| E2: An anomaly has been detected. The patient may have moved during the measurement process. | An anomaly has been detected. | Remind the patient to remain still during measurement and repeat the measurement. |
| E3: Inflation insufficiency. Check the placement of the cuffs and repeat the measurement. | The cuff was insufficiently inflated. | Check the placement of the cuffs and repeat the measurement. |
| E4: An error occurred during heart rate calculation. | An error occurred during heart rate calculation. | Repeat the measurement. if the error is repeated, the measured value is outside the measurement range of the device. |
| E5: An error occurred during ankle brachial pressure index calculation. | An error occurred during ankle brachial calculation. | Repeat the measurement. if the error is repeated, the measured value is outside the measurement range of the device. |
| E6: Inflation error. | An error occurred during inflation of the cuff. | Check the placement of the cuffs and repeat the measurement. |
| E7: Deflation insufficiency. Check the placement of the cuffs and repeat the measurement. | The cuff was insufficiently deflated. | The cuff is not attached or is not attached correctly. Attach the cuff correctly and repeat the measurement. |
| E8: An error occurred during systolic pressure calculation. | An error occurred during systolic pressure calculation. | Repeat the measurement. if the error is repeated, the measured value is outside the measurement range of the device. |
| E9: An error occurred during diastolic pressure calculation. | An error occurred during diastolic pressure calculation. | Repeat the measurement. if the error is repeated, the measured value is outside the measurement range of the device. |
| E11: A large pressure fluctuation was detected. The patient may have moved. | A large pressure fluctuation was detected. The patient may have moved. | The results may be incorrect. Repeat the measurement. |
| E32: Module cannot be paired | | Module paired with too many MESI mTABLETs. Hold the multifunctional button until the blue light appears, then press it 5 times to put the module in pair-service mode. |
| E33: We have encountered an error. Please try again. | | Retry the operation. |
| E34: Missing (used for displaying missing requirements) | | Check for the missing item and restart the recording process. |
| E35: An error has occurred. Please try again. | | Retry the operation. |
| E42: The selected cuff could not be found. | | Place the cuffs correctly. Try using a different color (mixed leg-arm or left-right) cuff on the module. If the error is repeated, the measured value is outside the measurement range of the device. |
| N21: MESI TUBLESS CUFF Module not in range. | MESI TUBELESS CUFF UNIT is out of range (timeout). | Bring the MESI TUBELESS CUFF UNIT closer to the tablet and restart the ABI application. |
| N21: MESI TUBLESS CUFF Module not in range. | Connection between MESI TUBELESS CUFF UNIT and MESI mTABLET UNIT is not optimal. | Remove any mobile devices in proximity of MESI TUBELESS CUFF UNIT or bring the MESI mTABLET UNIT closer to the MESI TUBELESS CUFF UNIT. |
| N21: MESI TUBLESS CUFF Module not in range. | Depleted battery. | Place the MESI TUBELESS CUFF UNIT on the charging station. |
| N22: Module not paired with MESI mTABLET UNIT. | MESI TUBELESS CUFF UNIT is not paired to the MESI mTABLET UNIT. | Pair the MESI TUBELESS CUFF UNIT to the MESI mTABLET UNIT. For pairing see Chapter 5.1.5 Pairing. |
| N23: Replace battery. | High battery cycle | Battery will need to be replaced soon, please contact the manufacturer or the local distributor for replacement. |
| N24: Depleted battery. Measurement ended. | Depleted battery. | Place the MESI TUBELESS CUFF UNIT back to the charging station. |
| N25: Connection to the diagnostic module has been interrupted. Please restart the recording process. | | Restart the measurement. |
| E26: Connection to the diagnostic module has been interrupted. Please restart the recording process. | | Restart the measurement. |
| E27: Measurement stopped because the stop button was pressed on the diagnostic module. | | Begin a new measurement. |
| N28: Measurement stopped due to low battery. Please recharge the module battery and restart the measurement. | | Recharge the module battery of MESI TUBELESS CUFF MODULE/MESI TOE BLOOD PRESSURE MODULE and restart the measurement. |
| N29: Connection to the diagnostic module has been interrupted. Please restart the recording process. | | Please restart the recording process. |
| N30: Please disconnect the module from the power supply and restart the application | | Disconnect the module from the power supply. In case ECG is being used with automatic vacuum electrodes, change the setting on the MESI mTABLET. |
| N31: Module was not found | | Check the connection of the module. |
| N41: No cuff connected to MESI TUBLESS CUFF UNIT. | The cuff is disconnected from the MESI TUBELESS CUFF UNIT. | Disconnect the cuff from the MESI TUBELESS CUFF UNIT, turn it upside-down and reconnect it to the device. |
| N42: The selected cuff could not be found. | The chosen cuff is not correct. | Follow Chapter 5.3.1 Cuff placement and place the cuffs correctly. |
NOTE: For “Abnormally weak pulse detected” message, please see Chapter 8 Errors.
Troubleshooting
Troubleshooting| Column A | New Column | Column B |
|---|
| Unexpected result. | Incorrect cuff placement. | Reread the instructions for use and place the cuffs correctly. |
| Unexpected result. | Patient moving during measurement. | Repeat the measurement process. |
| Unexpected result. | Wrong cuff size used. | Use cuffs of the correct size. |
| Unexpected result. | Possible air leakage. | Check the cuffs, the air tubes and the connectors and replace them if necessary. If you cannot fix the issue yourself, consult your dealer or the manufacturer. |
| Audible stretching of the fastening tape | Incorrect cuff placement. | Reread the instructions for use and place the cuffs correctly. |
| Audible stretching of the fastening tape | Wrong cuff size used. | Use cuffs of the correct size. |
| Continuously flashing purple or red indicator on CUFFMD | Incorrect state of the diagnostic module | Press and hold the button on top of the MESI TUBELESS CUFF UNIT (CUFFMD) for 15 seconds to restart it. |
| No light indication when pressing the CUFFMD multifunctional button. | Battery is empty | Place the MESI TUBELESS CUFF UNIT on the charging station and leave it to charge for at least half an hour before retrying. |
| The cuffs do not inflate. Hissing noises. | Possible air leakage. | Check the cuffs, the air tubes and the connectors and replace them if necessary. |
NOTE: If the problem continues, contact the manufacturer or the local distributor for further assistance.
Warranty information
For the ABISYS systems purchased from April 1, 2026 on, the company MESI Ltd. hereby ensures a warranty period up to two years, which begins with the date of purchase (delivery date shown on the invoice). The warranty is valid with an invoice or a copy of the invoice. The Company MESI Ltd. also guarantees that the ABISYS system you have purchased is free from defects in materials and is made from suitable materials. In the warranty period the company MESI Ltd. guarantees a free repair of defective device or parts covered by this warranty. If the defective device in the warranty period cannot be repaired, a free replacement will be provided. The company MESI Ltd. will ensure maintenance and supply spare parts for a period of ten years from the date of purchase as long as (spare) parts are available from suppliers.
The warranty does not cover:
The cost of repairs and/or damage done by an unauthorized person. If you wish to make a warranty claim, please contact your local distributor or the manufacturer of the ABISYS system, whose contact details can be found at the company’s website.
Regular inspections (at the customer’s request) and/or maintenance (replacement of worn parts).
Deterioration of accessories and other additions other than the main device.
Costs incurred due to disagreement with the warranty conditions (it shall be charged).
Any damage caused by accidents, misuse, neglect, abrasion, exposure to extreme temperatures, solvents, acids, water, normal wear and tear or damage in transit, theft or loss.
Use of the device for purposes other than its intended use.
Damage caused by airline or freight company mishandling.
Improper use or abuse of ABISYS system, including but not solely limited to the failure to use this product for its normal purposes or in accordance with company’s instructions on usage and maintenance.
Defects resulting from usage of the product in conjunction with accessories that are not approved by company MESI Ltd. for use with the ABISYS system.
Defects or deficiencies of the ABISYS system arising from incorrect installation or use not consistent with the instructions and technical or safety standards prescribed in the device’s user manual.
Accidents, Acts of God, lightning, water, fire, public disturbances, improper ventilation, voltage fluctuations or any cause beyond the control of company MESI Ltd.
Damage to the battery caused by failing to charge the empty battery regularly, or failure to use in accordance with the instructions of user manual.
Replacement or repair of defective device or its parts, if the serial number on the product has been altered, deleted, removed or made illegible.
Items included in the warranty:| Column A | Column B |
|---|
| Parts included in the two-year warranty | Blood pressure measurement unit |
| Parts included in the one-year warranty | Blood pressure cuffs |
| Parts excluded from warranty | Packaging |
All of the above is the sole and exclusive warranty for the ABISYS system.
We state:
That during the warranty period the ABISYS system will work flawlessly, if handled as stated in the instructions for use and if maintained regularly.
That the warranty period commences on the date of purchase.
That in the warranty period the defects and technical deficiencies of the ABISYS system that are generated during normal use will be eliminated at company’s own expense.
That the ABISYS system will be fully operational, if optimum conditions for the operation of the product, ranging from 10-40 °C, max. 80% humidity, non-condensing and without excessive amounts of dust and dirt, are fulfilled.
That the warranty is not applicable to cases other than defects in material and workmanship.
That the warranty is void if the ABISYS system is used in a rental capacity and damaged at the same time.
That the repair or replacement under the terms of this warranty does not provide the right to extension or renewal of the warranty period.
That the warranty will be void if payments are not received by company MESI Ltd. in the period after any agreed upon credit terms expire.
Description of the warranty claim process:
The warranty is valid only if the ABISYS system and its parts are returned during the applicable warranty period, together with the original invoice or its copy issued by the manufacturer of the device. If necessary, give a description of the problem. In case the invoice is not presented, the company MESI Ltd. holds the right to void the warranty.
Standard compliance
The provisions of the Council Directive 93/42/EEC concerning medical devices were complied with. The standards in the table below were complied with.
Standard compliance| Reference number | Description |
|---|
| EN 60601-1:2006/ A1:2013 | Medical electrical equipment - Part 1: General requirements for basic safety and essential performance |
| EN 60601-1-2:2015 | Medical electrical equipment - Part 1-2: General requirements for basic safety and essential performance - Collateral Standard: Electromagnetic disturbances - Requirements and tests |
| EN 60601-1-6:2010/ A1:2015 | Medical electrical equipment - Part 1-6: General requirements for basic safety and essential performance - Collateral standard: Usability |
| EN 80601-230:2010/A1:2015 | Medical electrical equipment - Part 2-30: Particular requirements for the basic safety and essential performance of automated non-invasive sphygmomanometers |
| EN 10603:1997+A2:2009 | Non-invasive sphygmomanometers. Supplementary requirements for electromechanical blood pressure measuring systems |
| EN 1060-4:2004 | Non-invasive sphygmomanometers. Test procedures to determine the overall system accuracy of automated noninvasive sphygmomanometers |
| EN ISO 152231:2016 | Medical devices - Symbols to be used with medical device labels, labelling and information to be supplied - Part 1: General requirements |
| EN 303 446-1:2017 | Electromagnetic Compatibility (EMC) standard for combined and/or integrated radio and non-radio equipment; Part 1: Specific conditions for equipment in residential locations. |
| EN 62366:2008 | Medical devices - Application of usability engineering to medical devices |
| EN 62304:2006/ A1:2015 | Medical device software - Software lifecycle processes |
| EN ISO 109931:2009/AC:2010 | Biological evaluation of medical devices – Part 1: Evaluation and testing within a risk management process |
| EN ISO 14971:2012 | Medical devices – Application of risk management to medical devices |
| EN ISO 13485:2016 | Medical devices – Quality management systems – Requirements for regulatory purposes |
11.1. MANUFACTURER DECLARATION ON EMC
MESI mTABLET ABI is intended for use in the electromagnetic environment specified below. The customer or the user of the above listed models should assure that they are used in such an environment.
Manufacturer declaration on EMC| Emissions test | Compliance | Electromagnetic environment - guidance |
|---|
| RF emissions CISPR 11 | Group 1 | The above listed models use RF energy only for its internal function. Therefore, its RF emissions are very low and are not likely to cause any interference in nearby electronic equipment. |
| RF emissions CISPR 11 | Class B | MESI mTABLET ABI is suitable for use in all establishments, including domestic establishments and those directly connected to the public low-voltage power supply network that supplies buildings used for domestic purposes. |
| Harmonic emissions IEC 61000-3-2 | N/A | MESI mTABLET ABI is suitable for use in all establishments, including domestic establishments and those directly connected to the public low-voltage power supply network that supplies buildings used for domestic purposes. |
| Voltage fluctuations / flicker emissions IEC 61000-3-3 | Complies | MESI mTABLET ABI is suitable for use in all establishments, including domestic establishments and those directly connected to the public low-voltage power supply network that supplies buildings used for domestic purposes. |
MESI mTABLET ABI is intended for use in the electromagnetic environment specified below. The customer or the user of the above listed models should assure that they are used in such an environment.
Patient coupling PORT
Patient coupling PORT| Immunity Test | Test Condition | IEC 60601 Compliance level | Electromagnetic environment - guidance |
|---|
| Electrostatic discharge (ESD) according to IEC 61000-4-2 | ± 8 kV Contact
± 2, 4, 8, 15 kV Air | ± 8 kV contact discharge
± 2, 4, 8, 15 kV air discharge | Floors should be wood, concrete or ceramic tile. If floors are covered with synthetic material, the relative humidity should be at least 30%. |
| Conducted RF induced by RF fields IEC 61000-4-6 (a) | 3 Vrms 150 kHz - 80 MHz 6 Vrms in ISM bands between 150 kHz - 80 MHz c) 80% AM 1kHz | Exempt from this requirement - cable length is less than 3 m | - |
Comment: *Not applicable, unit, without Signal input/output parts PORT
a) SIP/SOPS whose maximum cable length is less than 3 m in length are excluded.
b) This test applies only to output lines intended to connect directly to outdoor cables.
c) The ISM (industrial, scientific and medical) bands between 0.15 MHz and 80 MHz are 6.765 MHz to 6.795 MHz; 13.553 MHz to 13.567 MHz; 26.957 MHz to 27.283 MHz; and 40.66 MHz to 40.70 MHz.
The amateur radio bands between 0.15 MHz and 80 MHz are 1.8 MHz to 2.0 MHz, 3.5 MHz to 4.0 MHz, 5.3 MHz to 5.4 MHz, 7 MHz to 7.3 MHz, 10.1 MHz to 10.15 MHz, 14 MHz to 14.2 MHz, 18.07 MHz to 18.17 MHz, 21.0 MHz to 21.4 MHz, 24.89 MHz to 24.99 MHz, 28.0 MHz to 29.7 MHz and 50.0 MHz to 54.0 MHz.
MESI mTABLET ABI is intended for use in the electromagnetic environment specified below. The customer or the user of the above listed models should assure that they are used in such an environment.
Enclosure Port
Enclosure Port| Immunity Test | Test Condition | IEC 60601 Compliance level | Electromagnetic environment - guidance |
|---|
| Electrostatic discharge (ESD) IEC 61000-4-2 | ±,8 kV Contact
± 2, 4, 8, 15 kV Air | ±8 kV Contact
± 15 kV Air* | Floors should be wood, concrete or ceramic tile. If floors are covered with synthetic material, the relative humidity should be at least 30% |
| Radiated RF EM fields and Proximity fields from RF wireless communications equipment IEC 61000-4-3 | 3 V/m 80 MHz – 2.7 GHz 80% AM 1 kHz | 3 V/m 80 MHz – 2.7 GHz | Mains power quality should be that of a professional healthcare facility environment and Home healthcare environment. |
| Radiated RF EM fields and Proximity fields from RF wireless communications equipment IEC 61000-4-3 | 385 MHz (18Hz Pulse Modulation) | 27 V/m | Mains power quality should be that of a professional healthcare facility environment and Home healthcare environment. |
| Radiated RF EM fields and Proximity fields from RF wireless communications equipment IEC 61000-4-3 | 450 MHz (FM+/-5 KHz deviation 1 kHz sine or 18 Hz Pulse Modulation) | 28 V/m | Mains power quality should be that of a professional healthcare facility environment and Home healthcare environment. |
| Radiated RF EM fields and Proximity fields from RF wireless communications equipment IEC 61000-4-3 | 710 MHz (217 Hz PM) | 9 V/m | Mains power quality should be that of a professional healthcare facility environment and Home healthcare environment. |
| Radiated RF EM fields and Proximity fields from RF wireless communications equipment IEC 61000-4-3 | 745 MHz (217 Hz PM) | 9 V/m | Mains power quality should be that of a professional healthcare facility environment and Home healthcare environment. |
| Radiated RF EM fields and Proximity fields from RF wireless communications equipment IEC 61000-4-3 | 780 MHz (217 Hz PM) | 9 V/m | Mains power quality should be that of a professional healthcare facility environment and Home healthcare environment. |
| Radiated RF EM fields and Proximity fields from RF wireless communications equipment IEC 61000-4-3 | 810 MHz (18 Hz PM) | 28 V/m | Mains power quality should be that of a professional healthcare facility environment and Home healthcare environment. |
| Radiated RF EM fields and Proximity fields from RF wireless communications equipment IEC 61000-4-3 | 870 MHz (18 Hz PM) | 28 V/m | Mains power quality should be that of a professional healthcare facility environment and Home healthcare environment. |
| Radiated RF EM fields and Proximity fields from RF wireless communications equipment IEC 61000-4-3 | 930 MHz (18 Hz PM) | 28 V/m | Mains power quality should be that of a professional healthcare facility environment and Home healthcare environment. |
| Radiated RF EM fields and Proximity fields from RF wireless communications equipment IEC 61000-4-3 | 1720 MHz (217 Hz PM) | 28 V/m | Mains power quality should be that of a professional healthcare facility environment and Home healthcare environment. |
| Radiated RF EM fields and Proximity fields from RF wireless communications equipment IEC 61000-4-3 | 1845 MHz (217 Hz PM) | 28 V/m | Mains power quality should be that of a professional healthcare facility environment and Home healthcare environment. |
| Radiated RF EM fields and Proximity fields from RF wireless communications equipment IEC 61000-4-3 | 1970 MHz (217 Hz PM) | 28 V/m | Mains power quality should be that of a professional healthcare facility environment and Home healthcare environment. |
| Radiated RF EM fields and Proximity fields from RF wireless communications equipment IEC 61000-4-3 | 2450 MHz (217 Hz PM) | 28 V/m | Mains power quality should be that of a professional healthcare facility environment and Home healthcare environment. |
| Radiated RF EM fields and Proximity fields from RF wireless communications equipment IEC 61000-4-3 | 5240 MHz (217 Hz PM) | 9 V/m | Mains power quality should be that of a professional healthcare facility environment and Home healthcare environment. |
| Radiated RF EM fields and Proximity fields from RF wireless communications equipment IEC 61000-4-3 | 5500 MHz (217 Hz PM) | 9 V/m | Mains power quality should be that of a professional healthcare facility environment and Home healthcare environment. |
| Radiated RF EM fields and Proximity fields from RF wireless communications equipment IEC 61000-4-3 | 5785 MHz (217 Hz PM) | 9 V/m | Mains power quality should be that of a professional healthcare facility environment and Home healthcare environment. |
| RATED power frequency magnetic fields IEC 61000-4-8 | 50 Hz or 60 Hz | 30 A/m | Power frequency magnetic fields should be at levels characteristic of a typical location in a typical commercial or hospital environment. |
Power frequency magnetic fields should be at levels characteristic of a typical location in a typical commercial or hospital environment.
Input a.c. power PORT
Input a.c. power PORT| Immunity Test | Test Condition | IEC 60601 Compliance level | Electromagnetic environment - guidance |
|---|
| Electrical fast transient/bursts IEC 610004-4 | ± 2 kV 100 kHz Repetition frequency | ± 2 kV | Mains power quality should be that of a professional healthcare facility environment and Home healthcare environment. |
| Surges
IEC 61000-4-5 | ± 0.5 kV, ±1 kV line(s) to line(s) ± 0.5 kV, ±1 kV , ± 2 kV line(s) to ground (a) | ± 1 kV
Differential mode | Mains power quality should be that of a professional healthcare facility environment and Home healthcare environment. |
| Conducted RF induced by RF fields IEC 61000-4-6 | 3 Vrms 150 kHz - 80 MHz 6 Vrms in ISM bands between 150 kHz - 80 MHz c) 80% AM 1kHz | 3 Vrms 150 kHz - 80 MHz 6 Vrms in ISM bands between 150 kHz - 80 MHz c) 80% AM 1 kHz | Mains power quality should be that of a professional healthcare facility environment and Home healthcare environment. |
| Voltage dips, short interruptions and voltage variations on power supply input lines IEC 61000-4-11 | 0% UT;
0°.45°, 90°, 135°, 180°, 225°, 270°, 315°
0% UT;
0°
0% UT;
70%
0% UT;
0% | 0.5 Cycles
1 Cycle
25/30 cycles (50/60 Hz)
250/300 Cycles (50/60 Hz) (5 s) | Mains power quality should be that of a professional healthcare facility environment and Home healthcare environment.
If the user of the above listed models requires continued operation during power mains interruptions, it is recommended that MESI mTABLET ABI is powered from an uninterruptible power supply or battery |
Comment:
a) Not applicable to CLASS II ME EQUIPMENT and ME SYSTEMS.
b) The ISM (industrial, scientific and medical) bands between 0.15 MHz and 80 MHz are 6.765 MHz to 6.795 MHz; 13.553 MHz to 13.567 MHz; 26.957 MHz to 27.283 MHz; and 40.66 MHz to 40.70 MHz. The amateur radio bands between 0.15 MHz and 80 MHz are 1.8 MHz to 2.0 MHz, 3.5 MHz to 4.0 MHz, 5.3 MHz to 5.4 MHz, 7 MHz to 7.3 MHz, 10.1 MHz to 10.15 MHz, 14 MHz to 14.2 MHz, 18.07 MHz to 18.17 MHz, 21.0 MHz to 21.4 MHz, 24.89 MHz to 24.99 MHz, 28.0 MHz to 29.7 MHz and 50.0 MHz to 54.0 MHz.
MESI mTABLET ABI is intended for use in the electromagnetic environment specified below. The customer or the user of the above listed models should assure that they are used in such an environment.
Signal input/output parts PORT
Signal input/output parts PORT| Immunity Test | Test Condition | IEC 60601 Compliance level | Electromagnetic environment - guidance |
|---|
| Electrostatic discharge (ESD) IEC 61000-4-2 | ±,8 kV Contact
± 2, 4, 8, 15 kV Air | ±8 kV Contact
± 15 kV Air | Floors should be wood, concrete or ceramic tile. If floors are covered with synthetic material, the relative humidity should be at least 30%. |
| Electrical fast transient/bursts IEC 610004-4 (a) | ± 1 kV
100 kHz Repetition frequency | ± 1 kV | Mains power quality should be that of a professional healthcare facility environment and Home healthcare environment. |
| Surges IEC 61000-4-5 (b) | ±2 kV line(s) to ground | Not applicable. | Mains power quality should be that of a professional healthcare facility environment and Home healthcare environment. |
| Conducted RF induced by RF fields IEC 61000-4-6 (a) | 3 Vrms
150 kHz - 80 MHz
6 Vrms in ISM bands between 150 kHz - 80 MHz c) 80% AM 1kHz | 3 Vrms
150 kHz - 80 MHz
6 Vrms in ISM bands between 150 kHz - 80 MHz c) 80% AM 1 kHz | Mains power quality should be that of a professional healthcare facility environment and Home healthcare environment. |
Comment:
a) Not applicable to CLASS II ME EQUIPMENT and ME SYSTEMS.
b) The ISM (industrial, scientific and medical) bands between 0.15 MHz and 80 MHz are 6.765 MHz to 6.795 MHz; 13.553 MHz to 13.567 MHz; 26.957 MHz to 27.283 MHz; and 40.66 MHz to 40.70 MHz. The amateur radio bands between 0.15 MHz and 80 MHz are 1.8 MHz to 2.0 MHz, 3.5 MHz to 4.0 MHz, 5.3 MHz to 5.4 MHz, 7 MHz to 7.3 MHz, 10.1 MHz to 10.15 MHz, 14 MHz to 14.2 MHz, 18.07 MHz to 18.17 MHz, 21.0 MHz to 21.4 MHz, 24.89 MHz to 24.99 MHz, 28.0 MHz to 29.7 MHz and 50.0 MHz to 54.0 MHz.
Guidance and manufacturer’s declaration - electromagnetic immunity
MESI mTABLET ABI is intended for use in the electromagnetic environment specified below. The customer or the user of the above listed models should assure that they are used in such an environment.
Guidance and manufacturer’s declaration - electromagnetic immunity| Immunity test | IEC 60601 Test level | Compliance level | Electromagnetic environment - guidance |
|---|
| Conducted RF induced by RF fields IEC 61000-4-6
Radiated RF EM fields and Proximity fields from RF wireless communications equipment IEC 61000-4-3 | 3 Vrms 150 kHz - 80 MHz 6 Vrms in ISM bands between 150 kHz - 80 MHz c)
3 V/m 80 MHz – 2.7 GHz | 3 Vrms 150 kHz - 80 MHz 6 Vrms in ISM bands between 150 kHz - 80 MHz c)
3 V/m | Portable and mobile RF communications equipment should not be used no closer to any part of the above listed models, including cables, than the recommended separation distance calculated from the equation applicable to the frequency of the transmitter.
Recommended separation distance
d = 1.2√P
d = 1.2√P 80 MHz - 800 MHz
d = 2.3√P 800 MHz – 2.7 GHz
Where P is the maximum output power rating of the transmitter in watts (W) according to the transmitter manufacturer and d is the recommended separation distance in meters (m). Field strengths from fixed RF transmitters, as determined by an electromagnetic site survey a should be less than the compliance level in each frequency range. (b) Interference may occur in the vicinity of equipment marked with the following symbol: |
NOTE 1: At 80 MHz and 800 MHz, the higher frequency range applies.
NOTE 2: These guidelines may not apply in all situations. Electromagnetic propagation is affected by absorption and reflection from structures, objects and people.
a) Field strengths from fixed transmitters such as base stations for radio (cellular/cordless) telephones, land mobile radios, amateur radio, AM and FM radio broadcast and TV broadcast, cannot be predicted theoretically with accuracy. To assess the electromagnetic environment due to fixed RF transmitters an electromagnetic site survey should be considered. If the measured field strength in the location in which MESI mTABLET ABI is used, exceeds the applicable RF compliance level above, the above listed models should be observed to verify normal operation. If abnormal performance is observed, additional measures may be necessary, such as reorienting or relocating the above listed models.
b) Over the frequency range 150 kHz to 80 MHz, field strength should be less than 3 V/m.
c) The ISM (industrial, scientific and medical) bands between 0.15 MHz and 80 MHz are 6.765 MHz to 6.795 MHz; 13.553 MHz to 13.567 MHz; 26.957 MHz to 27.283 MHz; and 40.66 MHz to 40.70 MHz. The amateur radio bands between 0.15 MHz and 80 MHz are 1.8 MHz to 2.0 MHz, 3.5 MHz to 4.0 MHz, 5.3 MHz to 5.4 MHz, 7 MHz to 7.3 MHz, 10.1 MHz to 10.15 MHz, 14 MHz to 14.2 MHz, 18.07 MHz to 18.17 MHz, 21.0 MHz to 21.4 MHz, 24.89 MHz to 24.99 MHz, 28.0 MHz to 29.7 MHz and 50.0 MHz to 54.0 MHz.
MESI mTABLET ABI is intended for use in the electromagnetic environment in which radiated RF disturbances are controlled. The customer or the user of the above listed models can help prevent electromagnetic interference by maintaining a minimum distance between portable and mobile RF communications equipment (transmitters) and the above listed models as recommended below, according to the maximum output power of the communication equipment.
Separation distance according to frequency of transmitter m
Separation distance according to frequency of transmitter m| Rated maximum output power of transmitter W | 150 kHz to 80 MHz d = 1.2√P | 80 MHz to 800 MHz d = 1.2√P | 800 MHz to 2.5 GHz d = 2.3 √P |
|---|
| 0.01 | 0.12 | 0.12 | 0.23 |
| 0.1 | 0.38 | 0.38 | 0.73 |
| 1 | 1.2 | 1.2 | 2.3 |
| 10 | 3.8 | 3.8 | 7.3 |
| 100 | 12 | 12 | 23 |
For transmitters rated at a maximum output power not listed above, the recommended separation distance d in metres (m) can be determined using the equation applicable to the frequency of the transmitter, where P is the maximum output power rating of the transmitter in watts (W) according to the transmitter manufacturer.
NOTE 1: At 80 MHz and 800 MHz, the separation distance for the higher frequency range applies.
NOTE 4: These guidelines may not apply in all situations. Electromagnetic propagation is affected by absorption and reflection from structures, objects and people.
MESI ABI MODULE is a part of MESI mTABLET ABI whose essential performance is performing an ABI measurement in specified operating conditions. The measurement is defined as measurement process and data storage to MESI mTABLET.
Due to the devices high sensitivity, intended use and operating modes the device is susceptible to EM interferences. If the device essential performance is degraded, the device will notify operator with error messages of any issues, while the cuffs (if in use during the event) will deflate and cause no harm to the patient.
Important labels