Safety and legal recommendations
1.1 LEGAL INFORMATION
All rights reserved. This publication may not be reproduced, copied or stored on a memory device. Furthermore, this publication may not be used for any purpose other than as the instructions for the use of the MESI mTABLET. This publication may not be translated into other languages or converted into other formats in any way without the prior written permission of MESI ltd.
The contents of the instructions for use may be altered without notice. The latest version of the instructions for use is available at www.mesimedical.com.
1.2 SAFETY INFORMATION
To avoid personal injury and/or damaging the device or accessories, follow the safety recommendations given below.
The device must be set up by authorized personnel with adequate professional training and experience who are aware of all the dangers in relation to the setup of the device and its use and who will take adequate risk prevention measures for themselves, users, other personnel and devices.
Only authorized persons may be given access.
Local safety requirements are to be complied with, if so required by regulations. In addition to local safety regulations, the safety instructions in this document are also to be complied with. Should there be any conflict between the safety recommendations in this document and the recommendations stipulated by local regulations, the local regulations take precedence.
MESI mTABLET & MESI mRECORDS
2.1 MESI mTABLET
MESI mTABLET is the heart of the MESI system of diagnostic tools. It enables medical personnel to manage all the different diagnostic modules with one device - from running measurements to storing their results. Measurements are saved and linked directly to the patient record, which reduces the loss of data and provides medical personnel with a better overview of patient medical history. With the MESI mTABLET, the user is also given access to web-based application MESI mRECORDS, where additional diagnostic tools and patient management is possible.
2.2 MESI mRECORDS
MESI mRECORDS can be accessed with the same user login data as MESI mTABLET at https://mrecords.mesimedical.com. Since MESI mRECORDS is a web app this gives you access from anywhere and anytime. All measurements and patient data is synced between the MESI mTABLET and MESI mRECORDS, thus giving the medical expert access to recorded measurement instantly.
For more information and tutorials please log-in or register your account on https://mrecords.mesimedical.com.
Product description
3.1 INTENDED USE
The MESI mTABLET is a handheld medical grade tablet unit and a MESI mTABLET docking station with access point. MESI mTABLET is designed to connect patients, measurements, medical applications and medical personnel within one ecosystem.
MESI mTABLET UNIT is intended to be used either as a standalone solution with a variety of different software or with diagnostic modules.
It is intended to be used exclusively by healthcare professionals in clinical, home, and long-term care settings. The expected user can use and knows how to operate smart phones or tablet computers.
The device can be recharged through AC/DC power supply.
3.2 WHAT IS IN THE PACKAGE
Your package includes the following equipment:
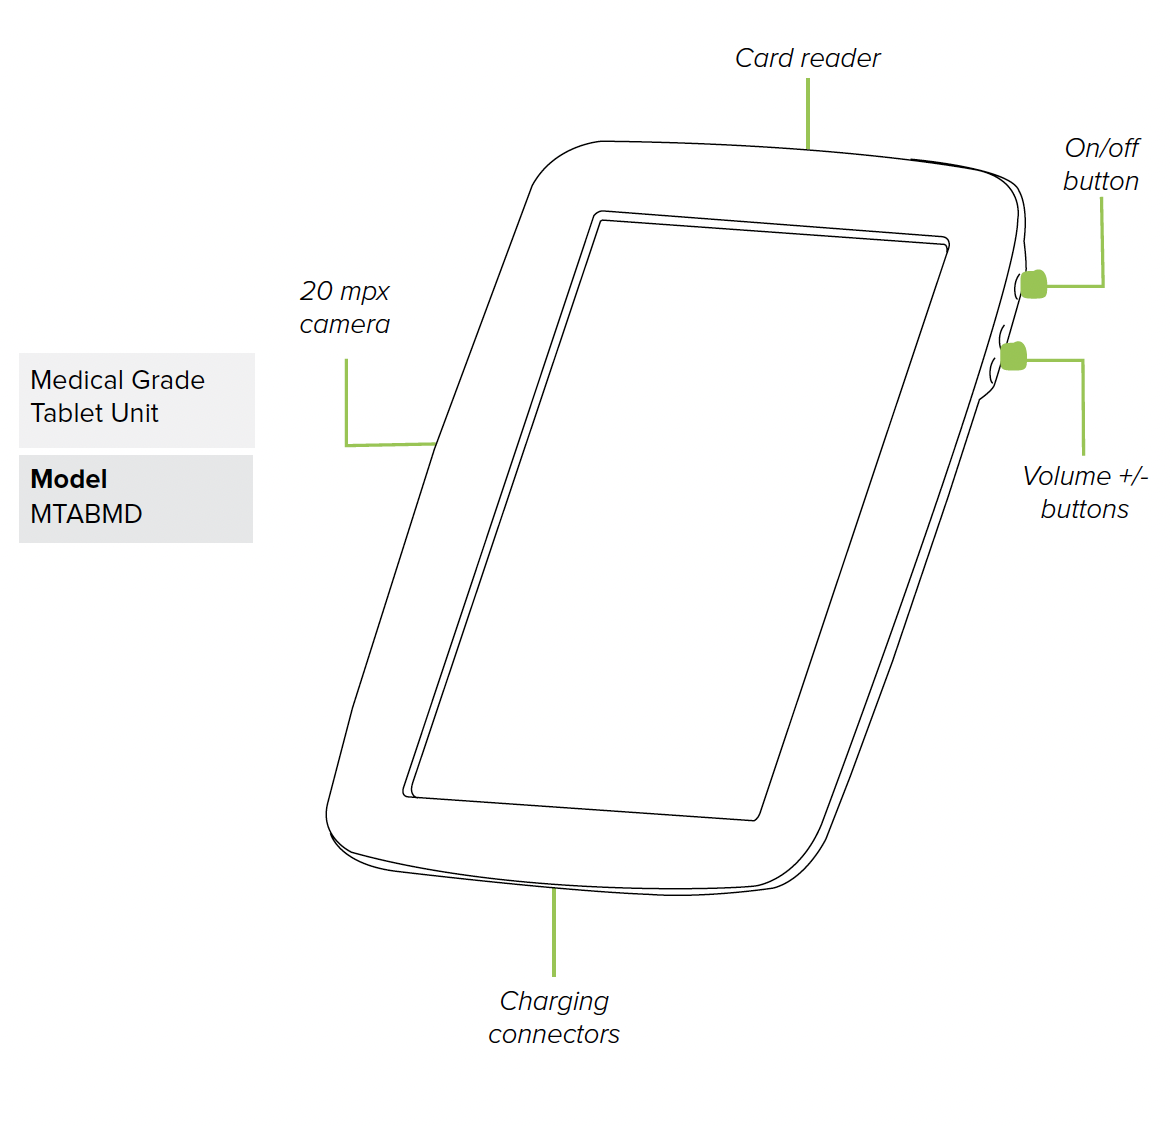
MESI mTABLET UNIT (MTABMD)
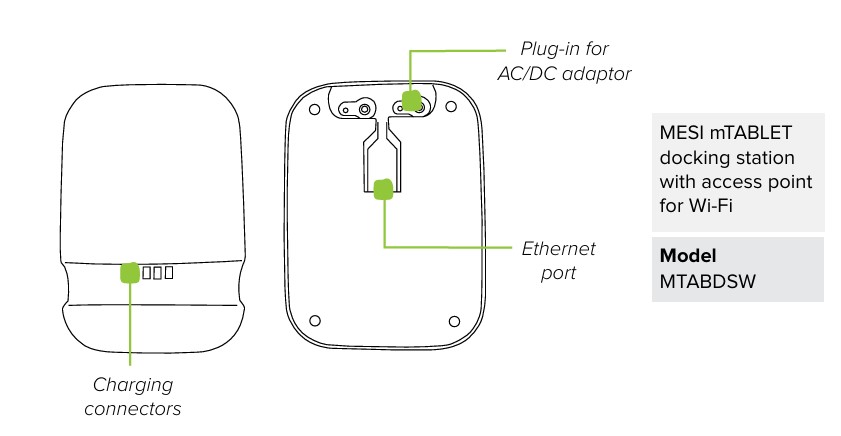
MESI mTABLET WI-FI DOCKING UNIT (MTABDSW)
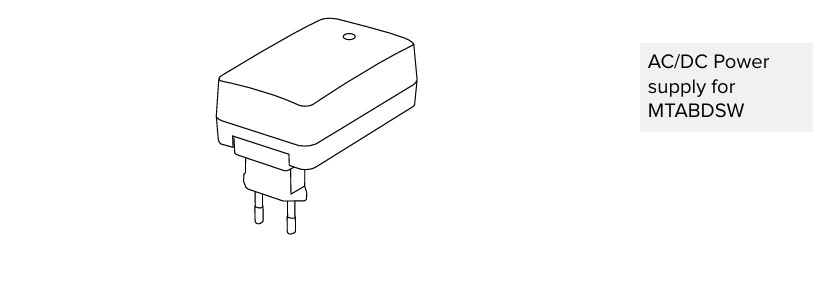
Power adapter
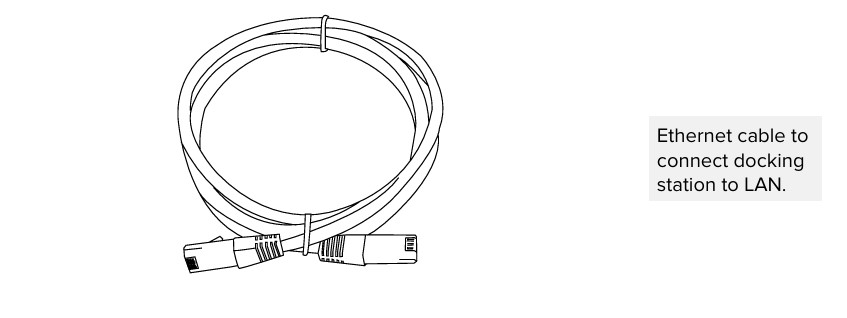
Network cable
User manual
3.2.1. ACCESSORIES
Please contact your local distributor for more information about MESI mTABLET accessories; such as carry bags, trolleys etc.
Technical specifications
Following are the technical information regarding MESI mTABLET, its operating system and accessories provided within the package.
4.1 MESI mTABLET
4.1.1 DIMENSIONS
Width: 199 mm
Depth: 35 mm
Height: 278 mm
Weight: 800 g
4.1.2 POWER & BATTERY
| Column A | Column B |
|---|---|
| AC/DC adaptor | NEO030.0-I-X-05 |
| Input | 100-240V AC / 50-60 Hz / 600 - 300 mA |
| Output | 5 V DC / 5.0 A |
| Battery type | Rechargeable Lithium-Polymer battery |
| Capacity | 8800 mAh |
| Battery operation | More than 8 hours |
4.1.3 CLASSIFICATION
Protection against electric shock: Class II equipment
Software safety classification: Class B
4.1.4 LED INDICATIONS MTABDSW
Green LED: Displays connection state (fixed light)
Orange LED: Represents LAN activity
4.1.5 LED INDICATIONS MTABMD
Green LED: Device is charging
Red LED: Device battery is low
White LED(Blinking): Device is starting
4.1.6 LED INDICATIONS POWER SUPPLY
Green LED: Power “ON”
4.1.7 MTABMD SPECIFICATIONS
| Column A | Column B |
|---|---|
| OS | MESI OS 2.0 (based on Android OS) |
| Processor | 64-bit ARM v8.0 processor (octa-core) |
| Barcode reader | 1D/2D barcode imager |
| Screen | 1280 x 800 px IPS |
| Memory | 64 GB |
| RAM | 4 GB |
| Connectivity | 2.4 & 5 GHz, 802.11a/b/g/n/ac/ax-ready |
| Camera | 20 MP with strobe |
| Environment | IP42, 90 cm drop resistant |
| Audio | Mono speaker |
| Security | 2 step authentication - User password or PIN, SMS verification code HTTPS transmission protocol |
4.1.8 CONNECTIVITY
Bluetooth
| Receiving station | - |
|---|---|
| Frequency range | 2402 MHz - 2480 MHz |
| Bandwidth | 1 MHz |
| Transmitter | - |
|---|---|
| Output power | 8 - 10 dBm |
| Frequency range | 2402 MHz - 2480 MHz |
| Modulation | GFSK |
Wi-Fi
| Receiving station | - |
|---|---|
| Frequency range | 2.4 & 5 GHz, 802.11a/ b/ g/ n/ ac |
| Bandwidth | 1.4/ 3/ 5/ 10/ 15/ 20 MHz |
| Transmitter | - |
|---|---|
| Output power | 20-27 dBm |
| Frequency range | 2.4 & 5 GHz, 802.11a/ b/ g/ n/ ac |
| Modulation | ODFM, DSSS |
LTE
EMEA/ South Korea/ South Asia/ Latin America/ India/ Australia/New Zealand/ South Africa
| Receiving station | - |
|---|---|
| Frequency bands LTE-FDD LTE-TDD | B1/ 2/ 3/ 4/ 5/ 7/ 8/ 20/ 28 B38/ 40/ 41 |
| Bandwidth | 1.4, 3, 5, 10, 15, 20 MHz |
| Transmitter | - |
|---|---|
| Output power | 23 dBm ± 2 dB |
| Frequency range LTE-FDD LTE-TDD | B1/ 2/ 3/ 4/ 5/ 7/ 8/ 20/ 28 B38/ 40/ 41 |
| Modulation | QPSK, 16-QAM, 64-QAM |
North America
| Receiving station | - |
|---|---|
| Frequency bands LTE-FDD LTE-TDD | B2/ 4/ 5/ 7/ 12/ 13/ 14/ 17/ 25/ 26/ 66/ 71 B41 |
| Bandwidth | 1.4/ 3/ 5/ 10/ 15/ 20 MHz |
| Transmitter | - |
|---|---|
| Output power | 23 dBm ± 2 dB |
| Frequency range LTE-FDD LTE-TDD | B2/ 4/ 5/ 7/ 12/ 13/ 14/ 17/ 25/ 26/ 66/ 71 B41 |
| Modulation | QPSK, 16-QAM, 64-QAM |
Japan
| Receiving station | Column B |
|---|---|
| Frequency bands LTE-FDD LTE-TDD | B1/ 3/ 5/ 8/ 11/ 18/ 19/ 21/ 26/ 28 B41 |
| Bandwidth | 5/ 10/ 15 MHz |
| Transmitter | - |
|---|---|
| Output power | 23 dBm ± 2 dB |
| Frequency range LTE-FDD LTE-TDD | B1/ 3/ 5/ 8/ 11/ 18/ 19/ 21/ 26/ 28 B41 |
| Modulation | QPSK, 16-QAM, 64-QAM |
Ethernet connection
10/100 Mbps Between MTABDSW and LAN Ethernet connection.
4.1.9 OPERATING CONDITIONS
| Column A | Column B |
|---|---|
| Ambient temperature | +10 °C to 35 °C |
| Relative humidity | 15% to 90%, non-condensing |
| Atmospheric pressure | 700 hPa to 1060 hPa |
4.1.10 TRANSPORT & STORAGE CONDITIONS
| Column A | Column B |
|---|---|
| Temperature | −20 °C to 60 °C (<1 month) −20 °C to 45 °C (<3 month) −20 °C to 25 °C (<12 month) |
| Relative humidity | 15 to 90 % (no condensation) |
| Air pressure | 500 to 1060 hPa |
⚠️ Operating or storing the device outside the specified conditions may lead to malfunction, reduced battery life, or safety hazards.
NOTE: When storing the device for more than 3 months, ensure the battery remains at 40–60% charge. Recharge the battery every 3–6 months to maintain a voltage of 3.7–4.0 V. Store in a cool and dry environment.
Getting started
5.1. MESI mTABLET UNBOXING
Before you start, you will need to set up all the components in your practice.
Step 1
Connect your charging station to the mains and to the local area network with the network cable and power adapter provided.
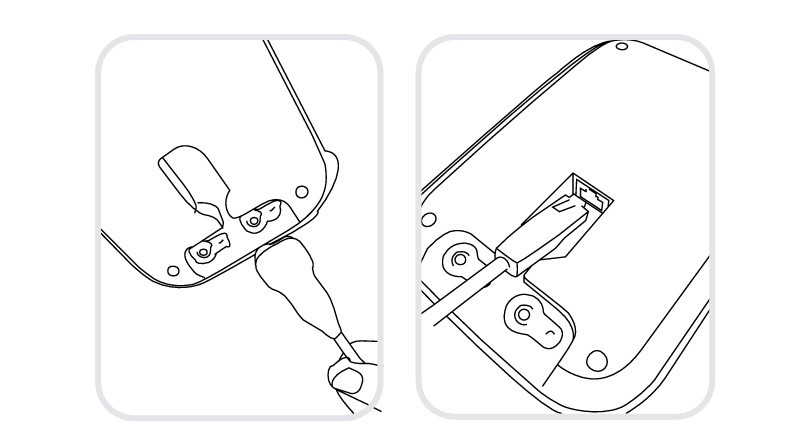
Step 2
Turn on your MESI mTABLET UNIT with the power button and set it on the charging dock to fully charge it.
After all the components are set the MESI mTABLET will connect automatically to the MTABDSW Wi-Fi and is ready to use.
5.2. SET UP
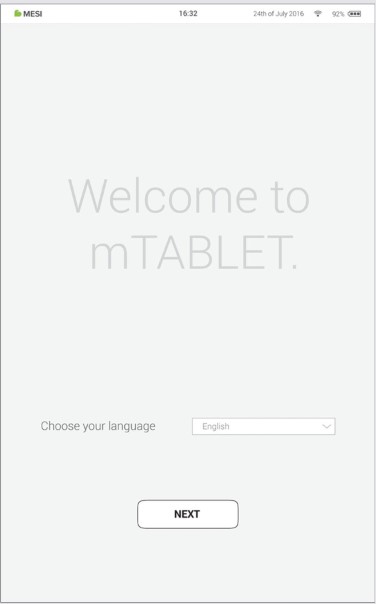
The first time you use the MESI mTABLET you will need to go through a setup process, which establishes the system according to your preferences. The guided process begins when you start your device for the first time and shouldn’t take more than 10 minutes.
The first part is the technical set up, which is only done by the first user. This includes setting up additional WI-FI connections and deciding on language use.
The second part is establishing your user account, which will be used to access your patient’s data on the MESI mTABLET UNIT or MESI mRECORDS.
Step 1 - Languages
Since the MESI mTABLET UNIT offers several languages, select the language you wish to use from the drop-down menu. This setting can be changed later in user settings.
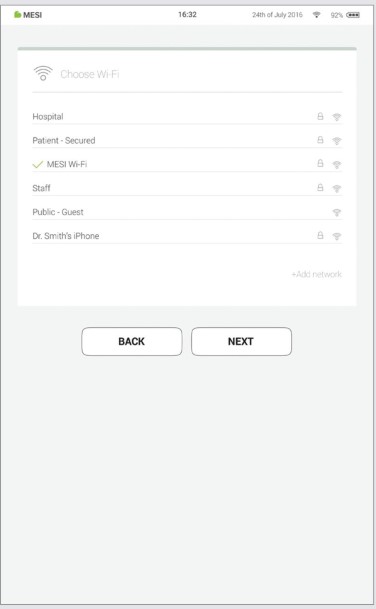
Step 2 - Wi-Fi
The MESI mTABLET WI-FI DOCKING UNIT for the MESI mTABLET UNIT comes with a built-in Wi-Fi access point to which the MESI mTABLET UNIT will connect automatically on first use.
If another wireless network is desired, please select it from the list and enter security information.
Wi-Fi is not required for the essential functions of the MESI mTABLET, but it is necessary for measurements to be synced to the MESI mRECORDS web application.
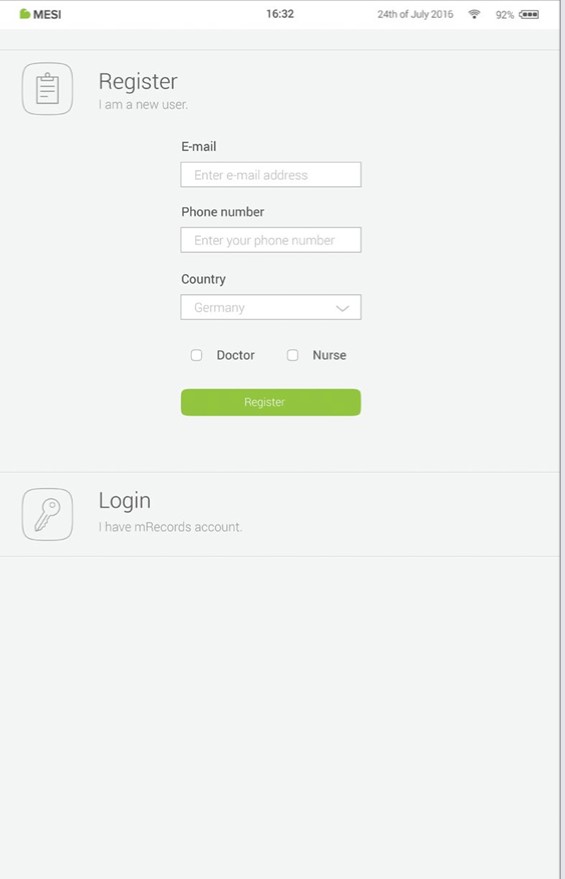
Step 3 - Register
Each user accessing the MESI mTABLET needs to register an account, which will also enable them to access data securely on other devices (personal computer, tablet, phone if needed).
To secure your account, we provide a two-step verification process - meaning you need to confirm the account with your e-mail account, as well as with your mobile phone.
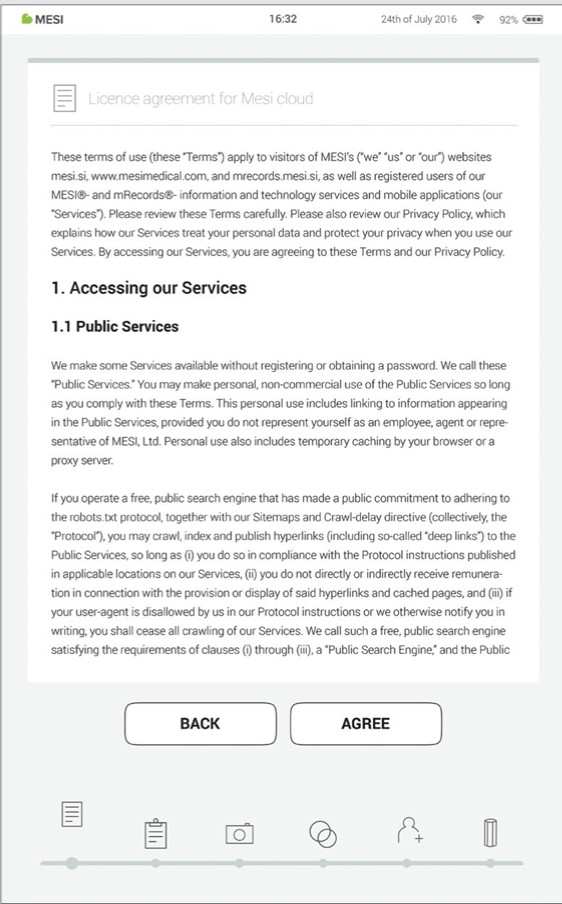
Step 4 - Licence Agreement
Before you start using the device, you will need to agree to the terms and conditions. This includes privacy policies and how we handle your data. You can always review it in the MESI mRECORDS web app. The account is not created until you have read and agreed with the terms and conditions.
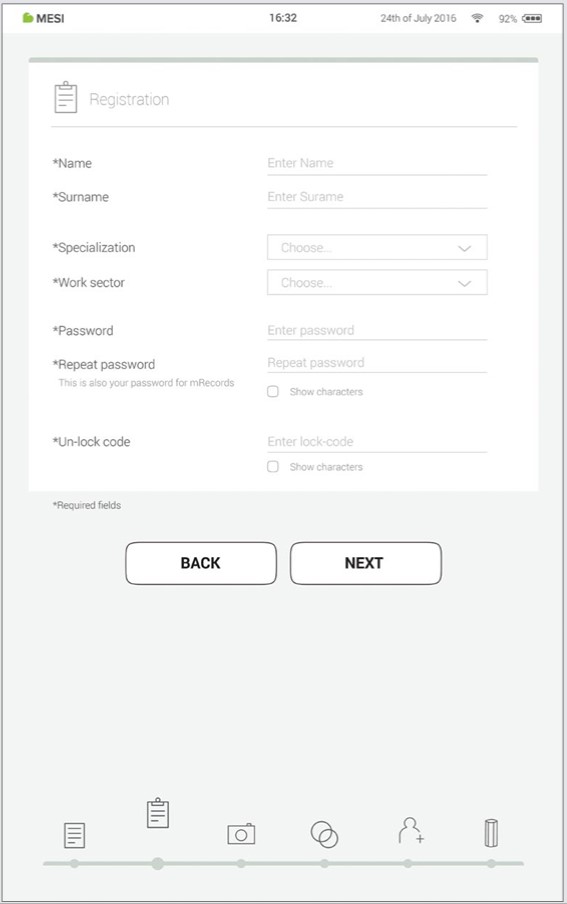
Step 5 - Registration
Registration is the part where you insert your personal information like Name, Surname, Specialisation and where you choose all your passwords and lock code for fast tablet access.
Step 6 - Choose avatar
For faster identification of your profile, you can choose your avatar from a set that is provided at this step. Profile image can be changed later on under user settings either on MESI mTABLET UNIT or in MESI mRECORDS.
User types
Registered users are set into working groups which, depending on their user profile have different rights.
Users are separated into two groups "doctor" and "nurse". A doctor can create and is a working group owner, giving him the option to invite other doctors or nurses into his working group. A “nurse” profile, on the other hand, can only access the MESI mTABLET UNIT in cases where the doctor has invited her into his/her working group. This access can be revoked at any time by the working group owner.
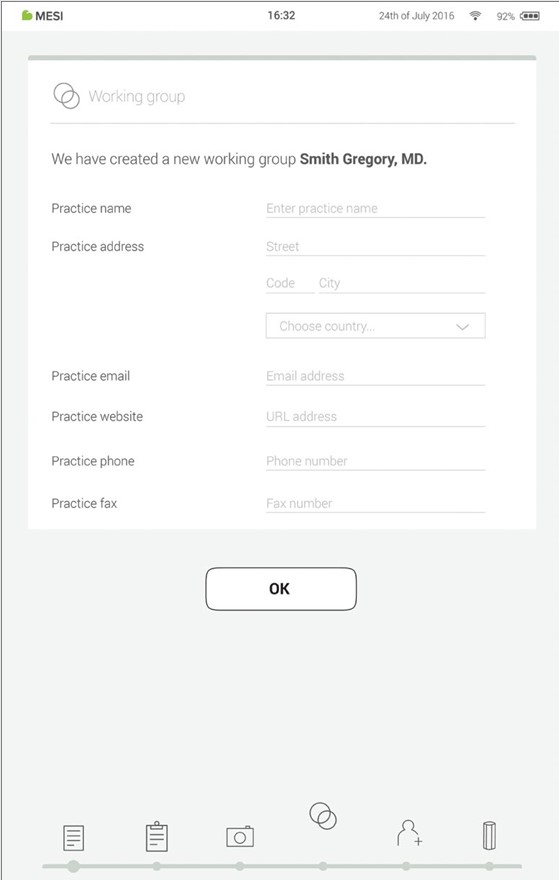
Step 7 - Practice info
Like a real practice, the MESI mTABLET system connects medical personnel in a working group environment. They are created to enable patient data sharing between practice staff and at the same time protect it.
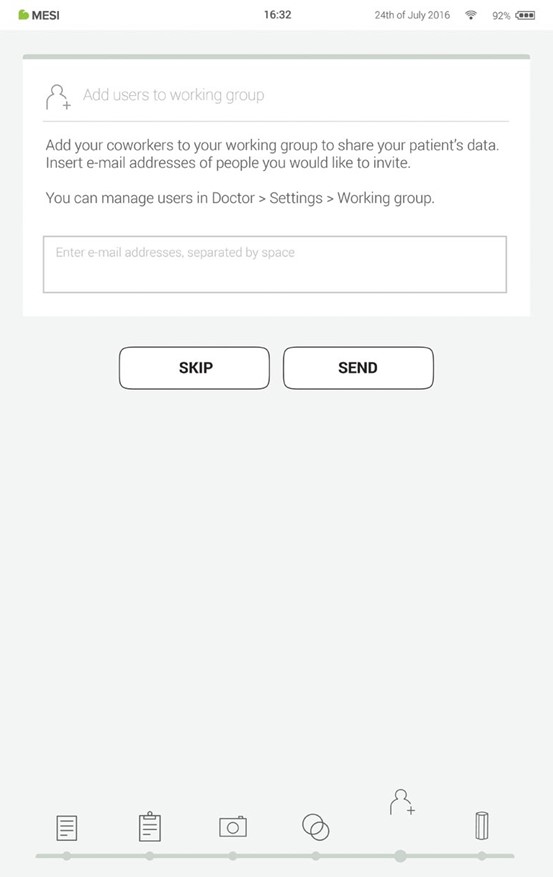
Adding users to your working group helps you share patient data with your coworkers.
The first time you use the tablet, enter the e-mails of your co-workers. If they already have an account registered, they will become a part of your working group and if not, they will get an invitation in their e-mail inbox to register online.
Adding users into your working group is optional at this point. If you want to add users at another time, go to Doctor > Settings > Working groups.
Step 8 - Working groups
Each doctor can be the owner of only one working group but can be invited into multiple working groups. At the same time, he can add multiple nurses or doctors into his/her working group. Nurses, on the other hand, can be part of many working groups, but they can’t create one or add more people to it. This system enables greater oversight of patient data access.
NOTE: the 1st user that registers becomes the MESI mTABLET UNIT owner which has the highest level of authority on the MESI mTABLET UNIT. This user has the privilege to remove unnecessary accounts and paired modules from the MESI mTABLET UNIT.
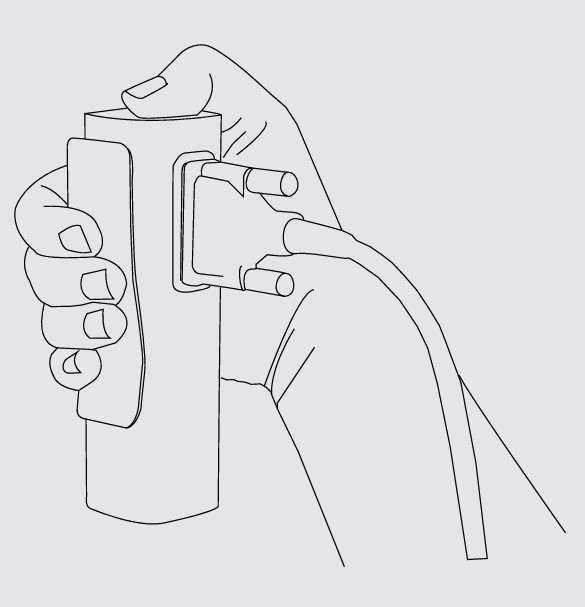
5.3. PAIRING A DIAGNOSTIC MODULE
Before any recordings can be performed, the appropriate module needs to be paired to your MESI mTABLET UNIT. Please take the MESI mTABLET UNIT and open user tab (for more information about user accounts please see the chapter 9 Managing users).
Step 1
Go to User profile > Settings > Modules > +Add module
Step 2
Press button on top of the appropriate module.
NOTE: If you are operating only with one MESI mTABLET UNIT, then performing this operation is required only once. In case of more MESI mTABLET UNIT this process will have to be repeated on each MESI mTABLET UNIT
Step 3
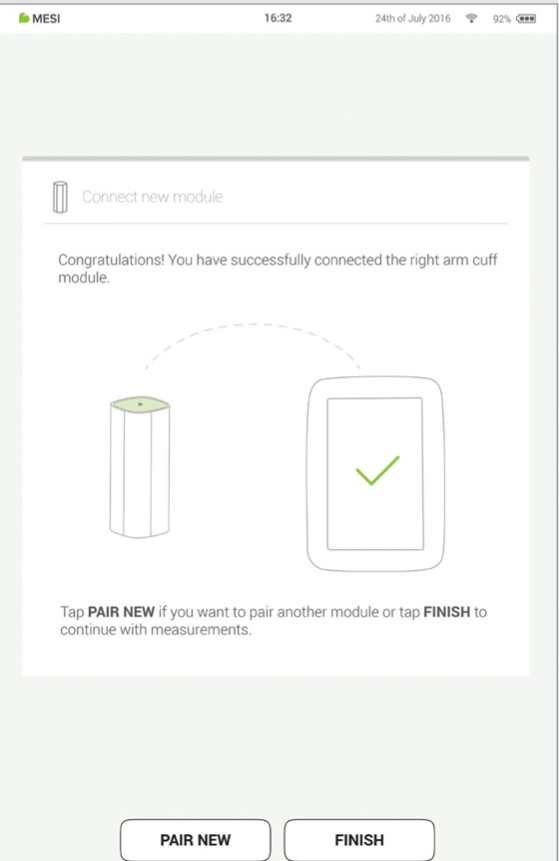
When the MESI mTABLET UNIT establishes a connection with the module, the light on top of the module will change. Confirm the pairing process by pressing the button on top of the module again.

Step 4
Final screen indicates successful connection between the MESI mTABLET UNIT and the wireless module. You can access all technical information about the connected modules in User profile > Settings > Modules.
Performing your first measurement
Performing your first measurement is a straightforward task. As you are already signed in to your account, you will need to follow the steps below.
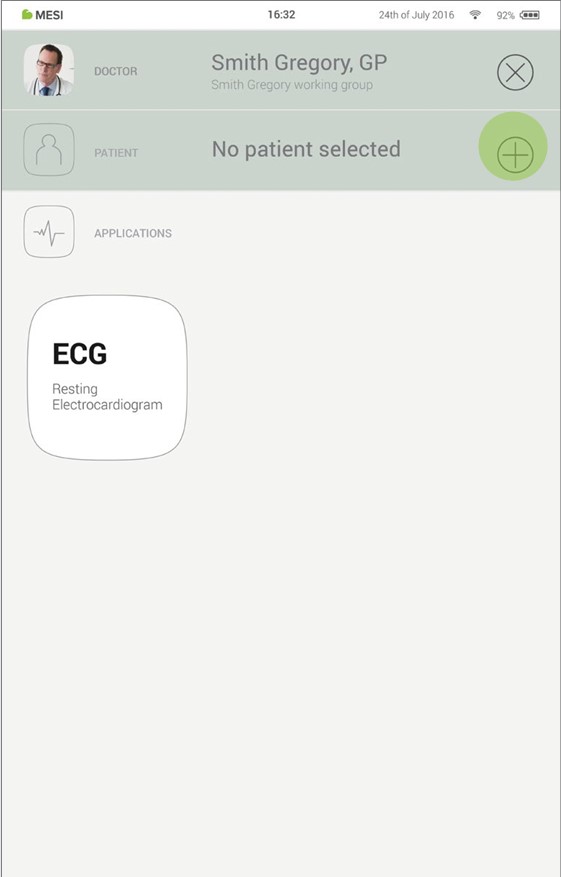
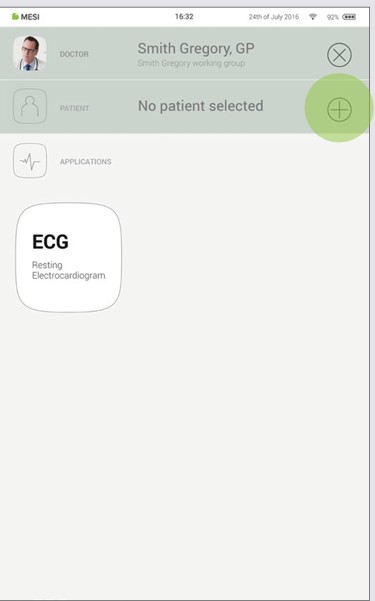
Step 1 - Add first patient
On your home screen, press the + button in the Patient tab.
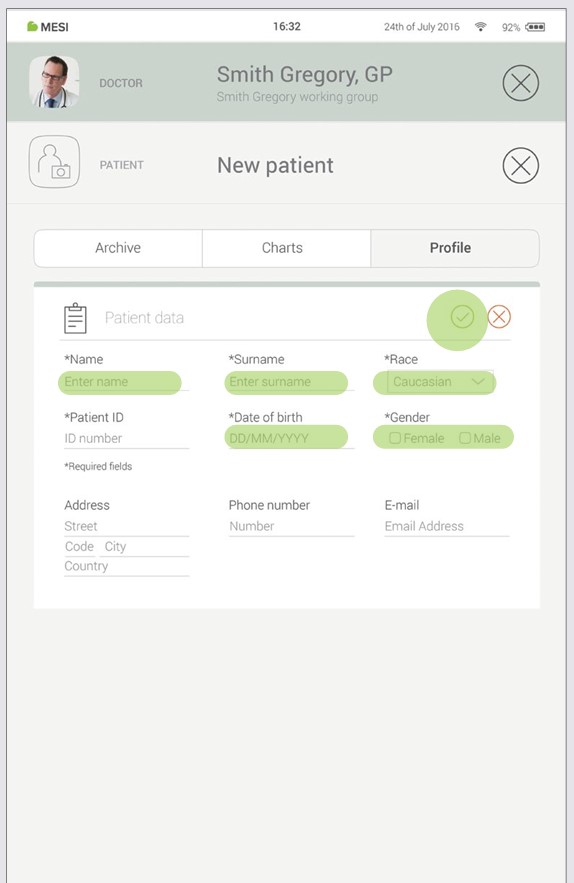
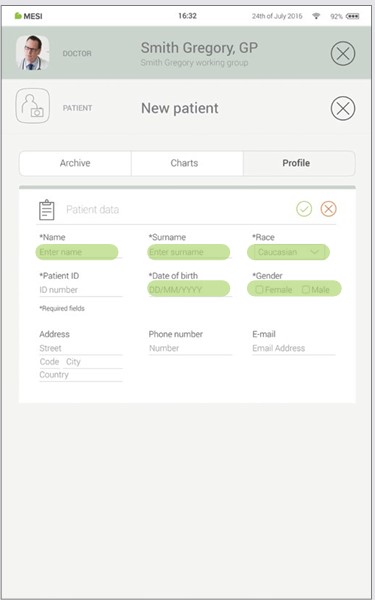
Step 2 - Fill out patient’s data
Fill out required fields (Name, Surname, Date of Birth and Gender) and any additional information regarding the patient. Save the patient by pressing the ✅ button.
NOTE: There are also ways to import patients from your EHR to MESI mRECORDS, which will then sync with MTABMD. Please contact your local MESI representative.
NOTE: When creating your profile a "Test patient" is added to your working group to help with initial adjusting to MESI mTABLET interface. This patient will be automatically removed after 2 weeks or it can be removed by a user on MESI mRECORDS.
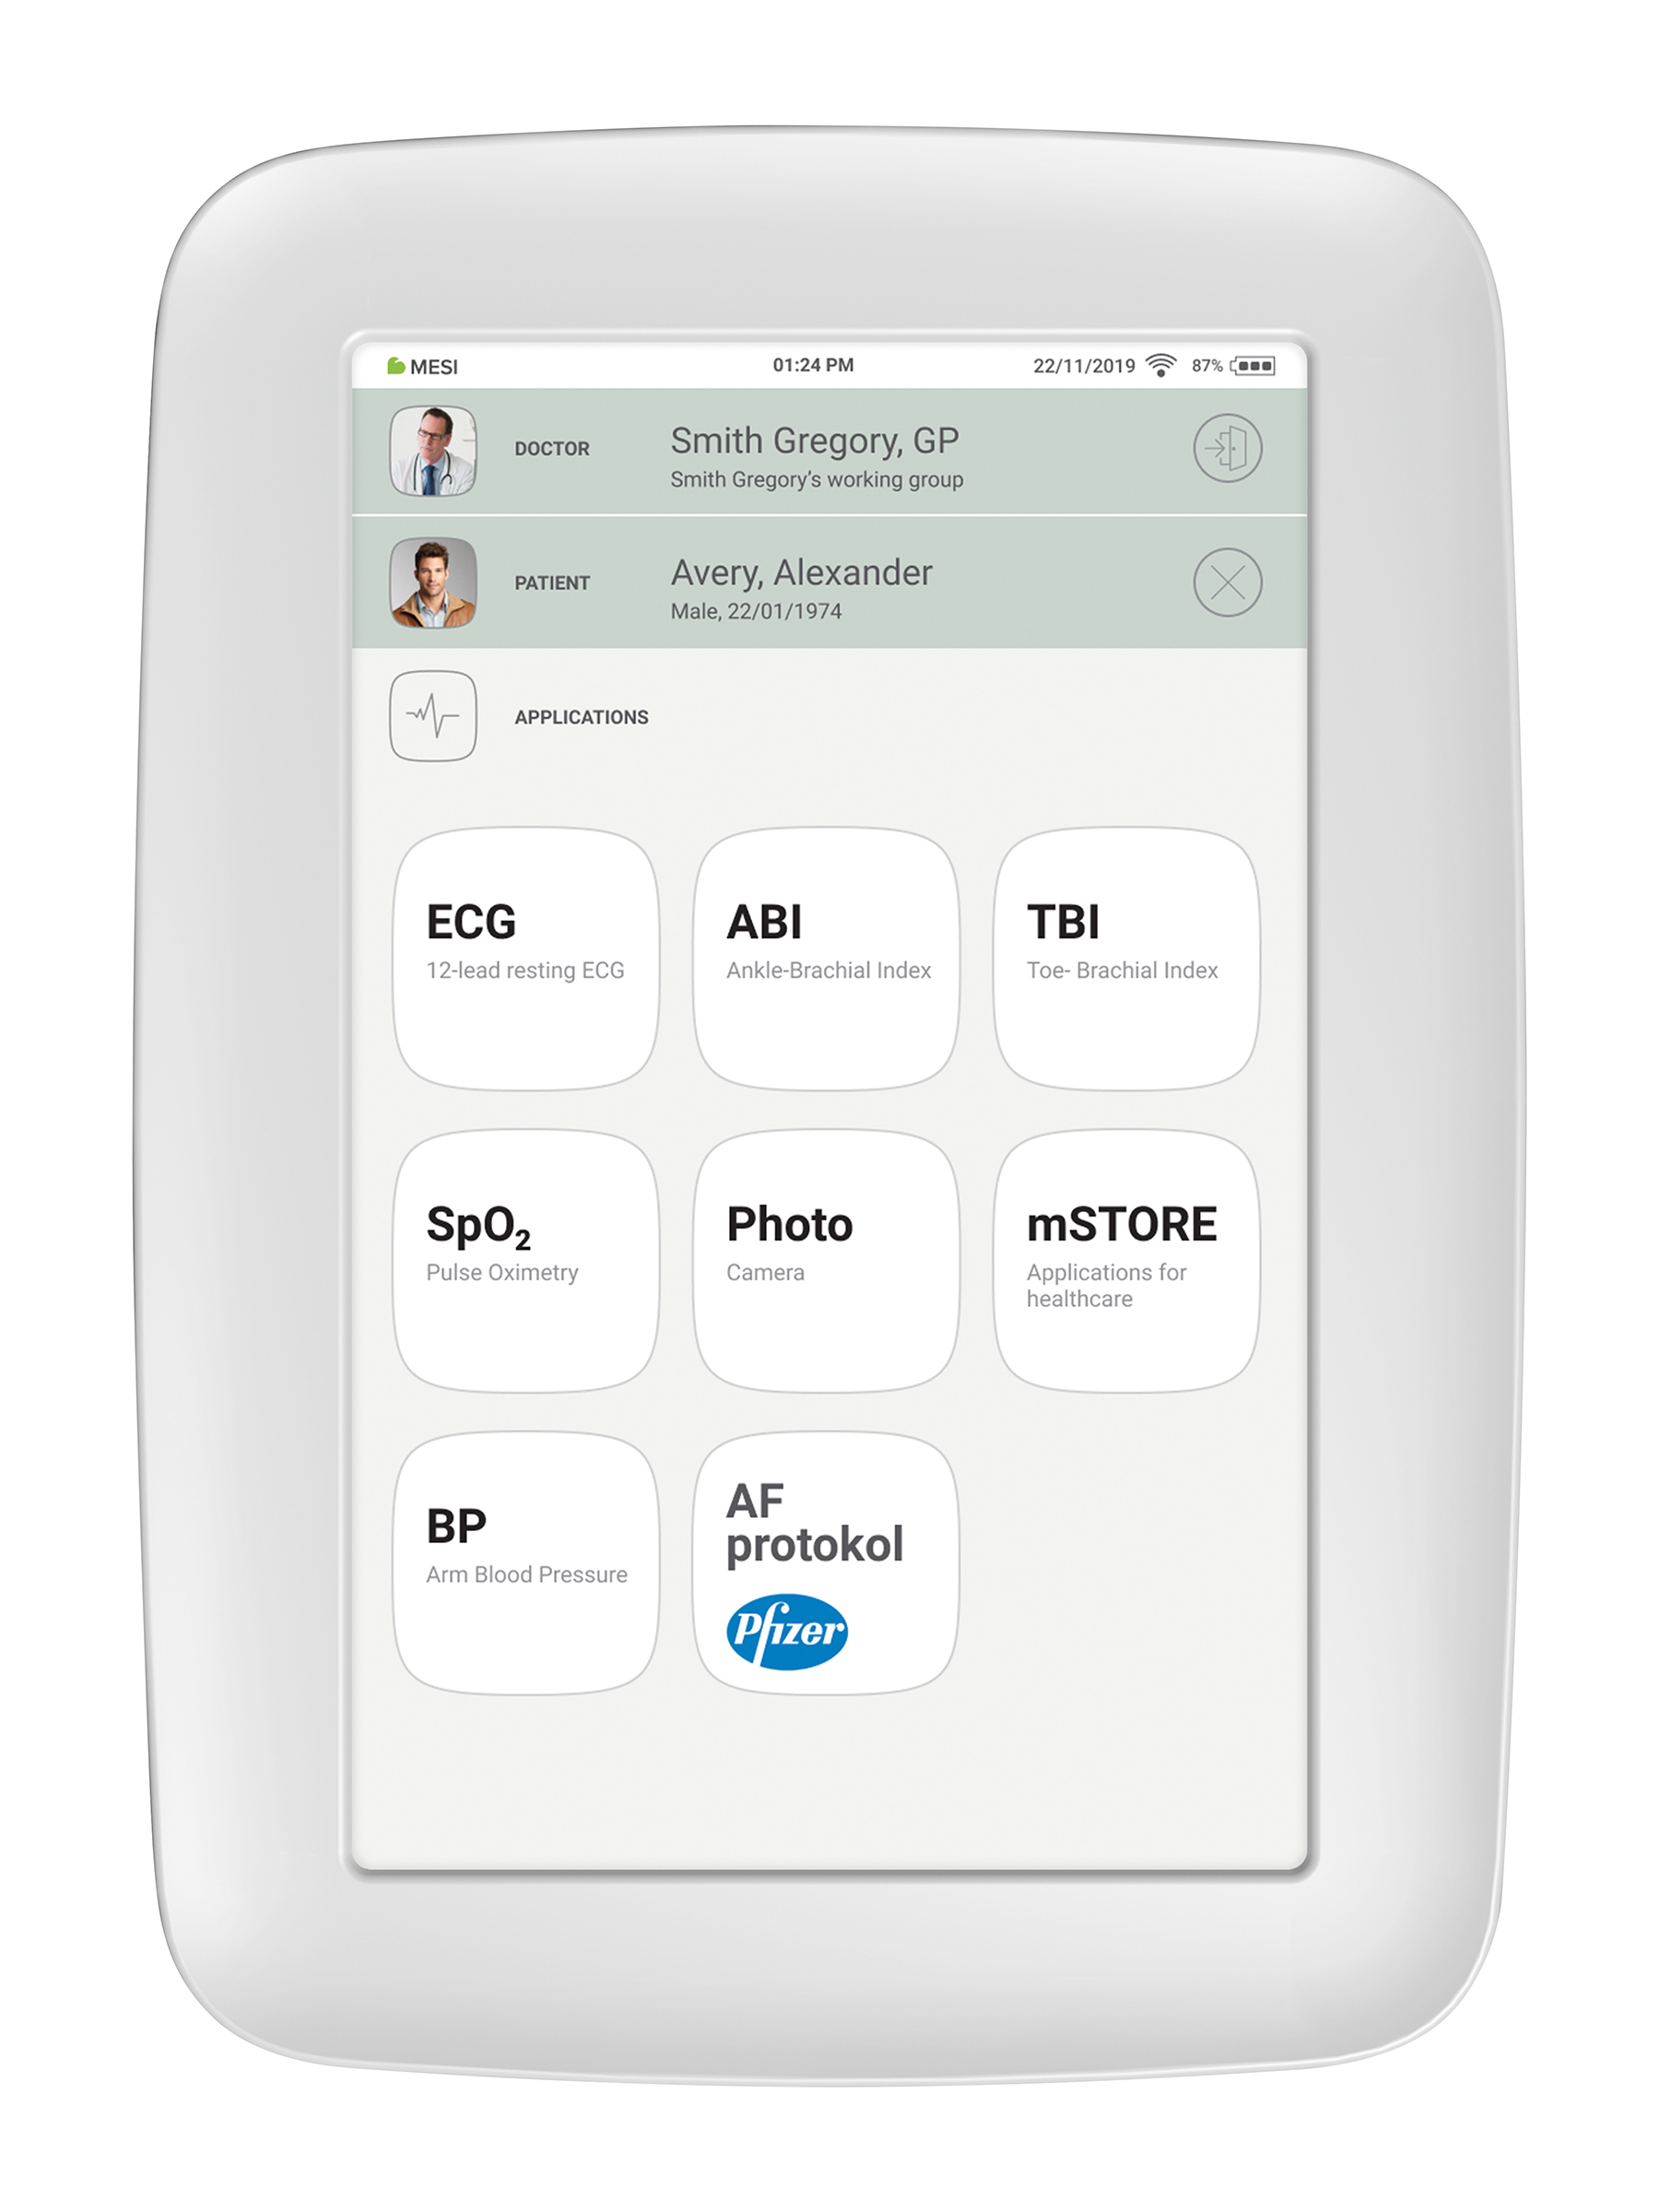
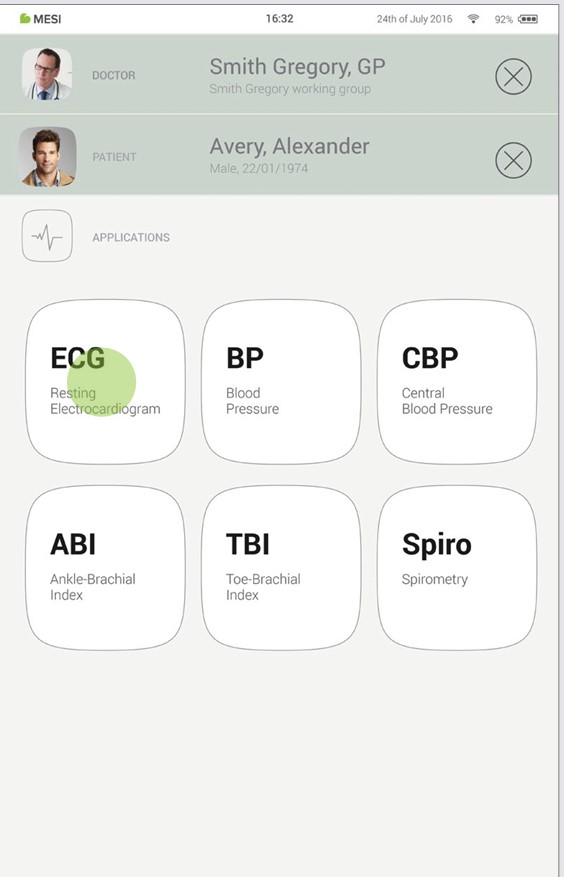
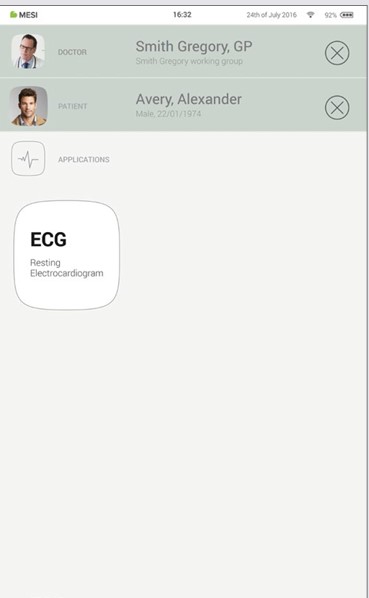
Step 3 - Select measurement
Once you have added the patient, tap the Applications tab (lower part of the screen) to bring up the home screen. Each measurement has its own icon and you choose one by tapping it.
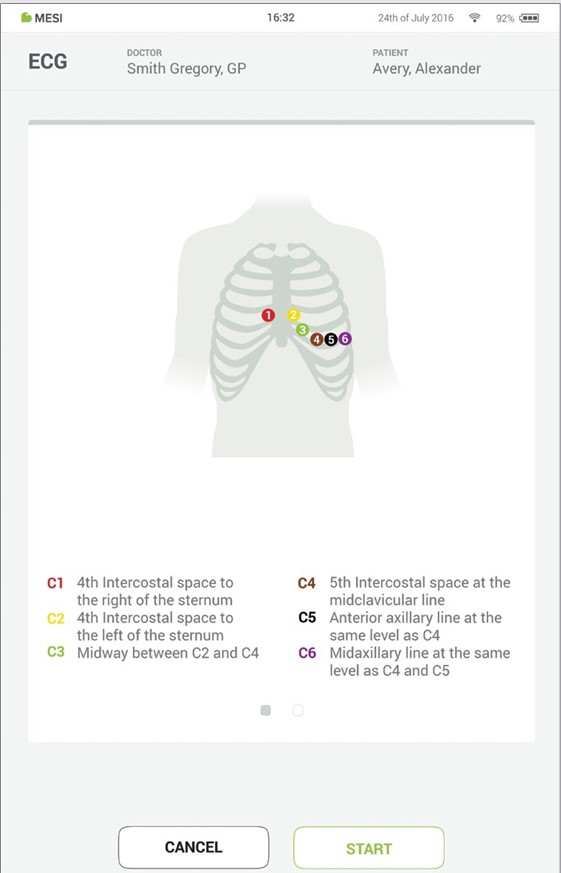
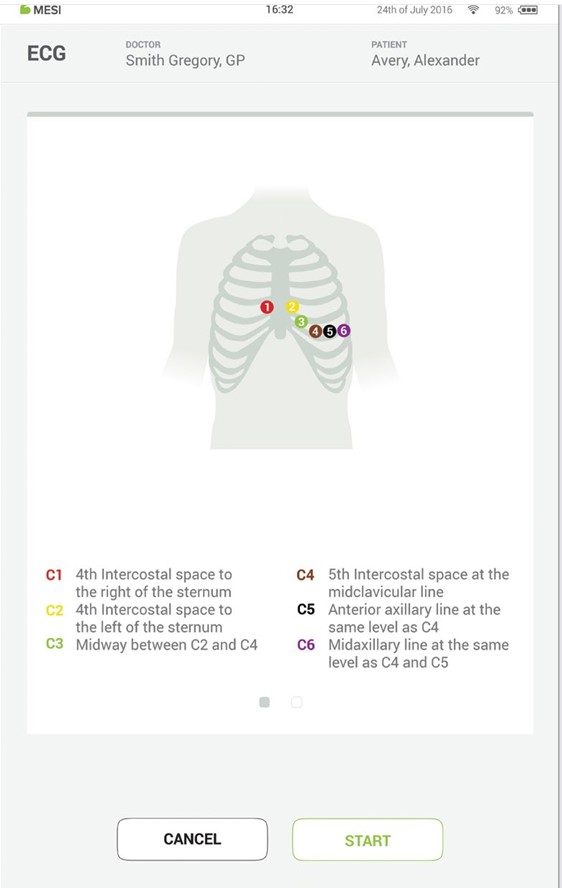
Step 4 - Prepare diagnostic module
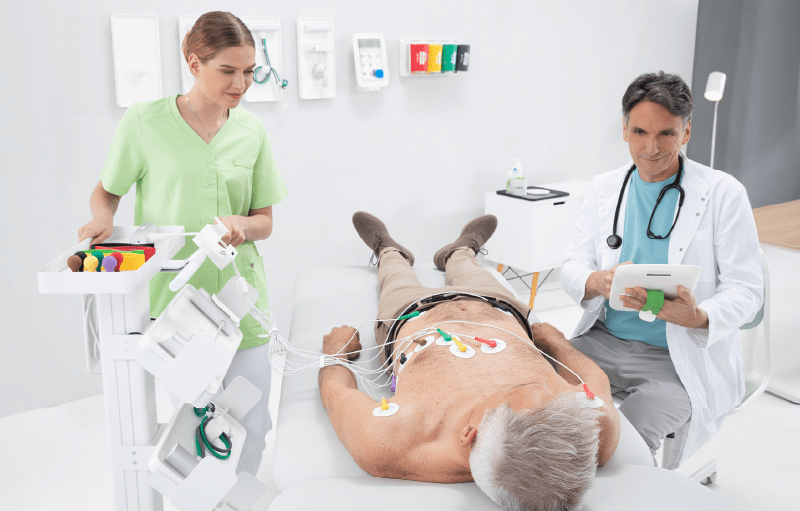
When you access the desired measurement, there will be instructions on screen on how to apply the wireless module in the right way. Swipe left or right to see all instruction steps. When the START button becomes green, you can start the measurement.
Step 5 - Measurement
The measurement screens depend on the type of measurement being performed. Most measurements will have some graphic representations of measurement in real time (graphs or progress bar) and other parameters specific to the measurement (consult the specific diagnostic module user manual for more details).
Step 6 - Results
When the measurement process is completed, the MESI mTABLET UNIT screen displays the result. It consists of five different areas: navigation area, numerical result with interpretations, visual representations, patient’s history of measurement and comments on the result.
All the buttons and information placed in the navigation area are there to help you f ind your way around the application. You can toggle between previous results of the patient. If you are not satisfied with the recording for any reason, you can quickly discard it, or in the case of uncertainty you can consult with other doctors by simply entering their e-mail addresses. It also contains the names of both the doctor performing the recording and the patient.
The numerical result is a combination of the calculated results and measured values. Tap to show more in-depth interpretations.
Visual representations of the measurement depend on the measurement type. For more information please see the instructions for use that came with diagnostic module
History holds an overview of recordings done by the same doctor on the same patient. It shows the trend of the patient’s results.
A comment can be added to every measurement. It will be stored and always available together with the recording report.
For more information on the specific result form, see the measurement user manual, which you will have received along with the diagnostic module.
User profile
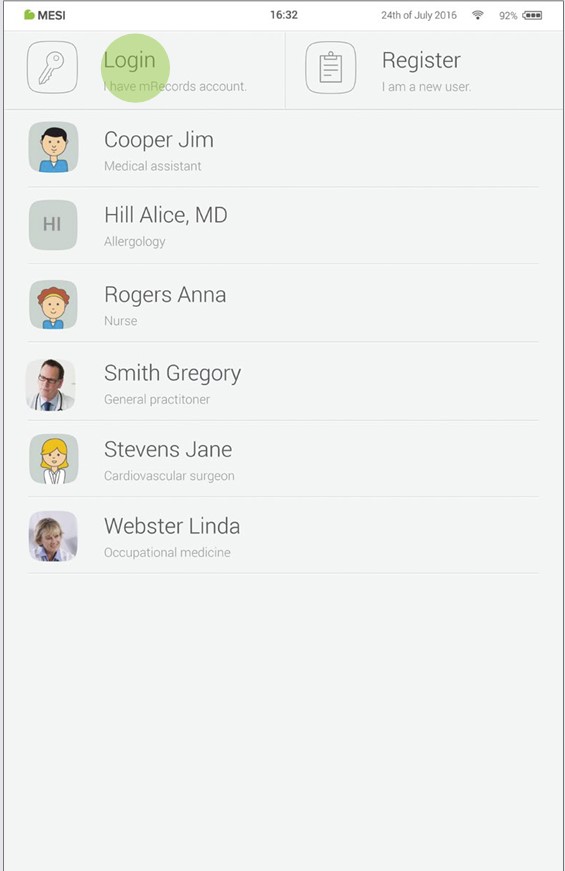
7.1 LOG IN AND REGISTRATION
To freely use the MESI mTABLET UNIT, you need to be listed as a tablet user. This can be done in two ways:
Registration
Log in with existing account
Registration
If you want to register as a new user, tap in the right upper corner of the lock screen (Register). It will lead you to the registration form.
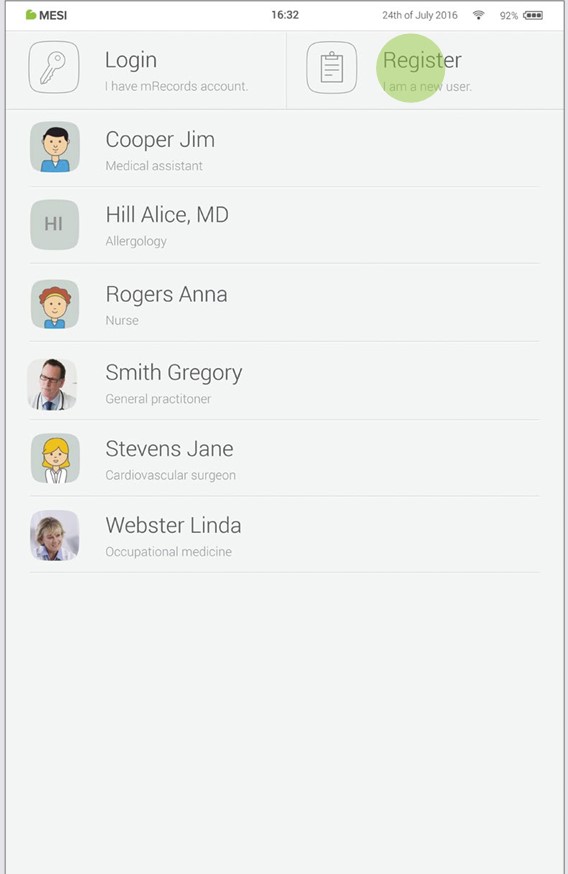
Log in with existing account
If you have registered online, you need to log in with your e-mail and password so the tablet can recognize you. Once you are listed as a tablet user, you will be able to access your data with your 4-digit lock code only.
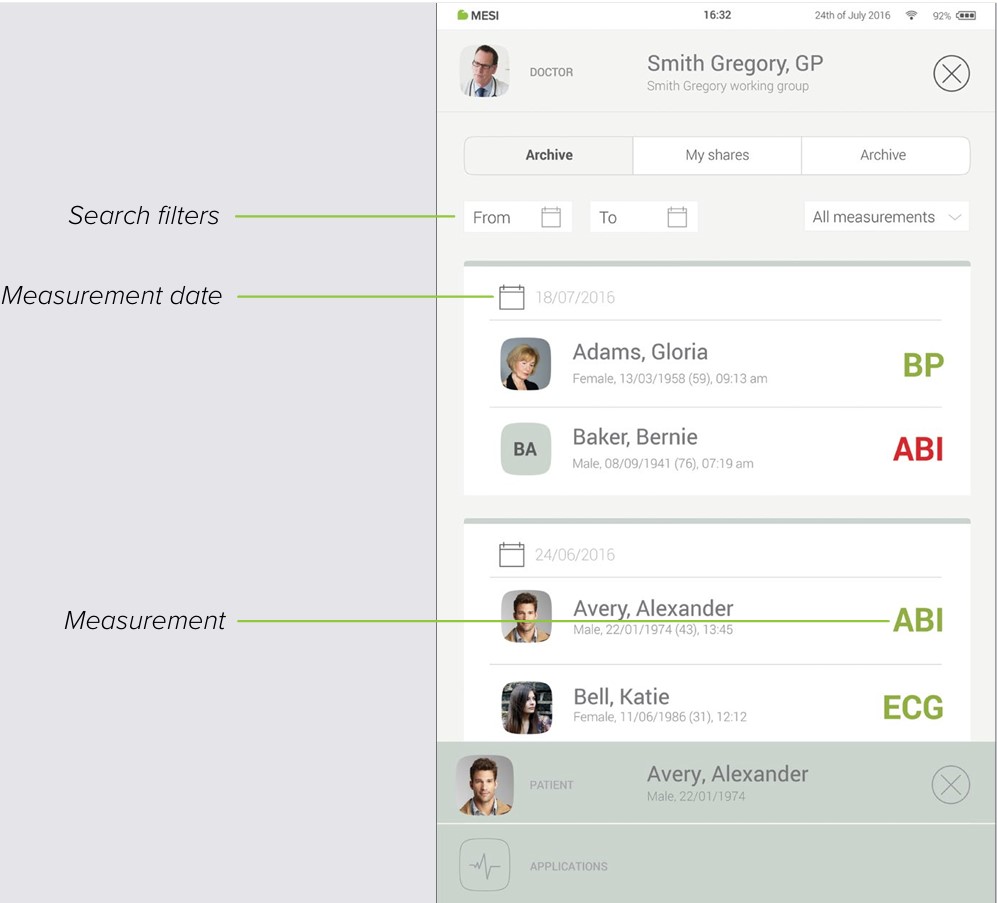
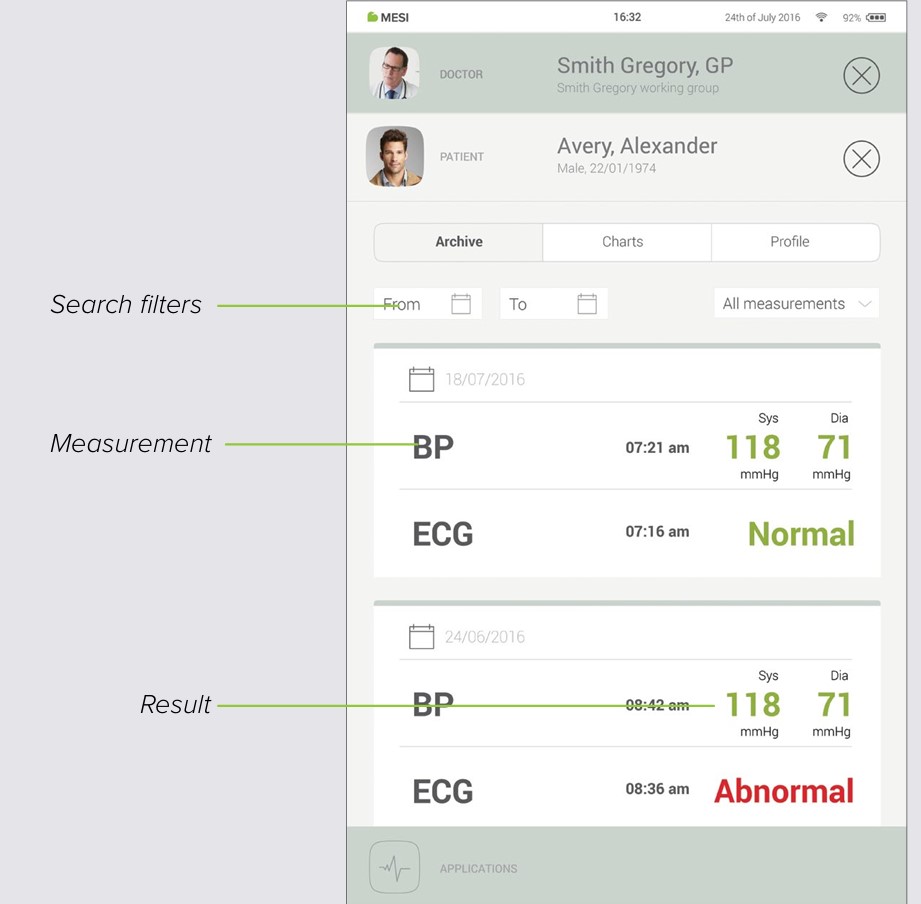
7.2 ARCHIVE
The Archive is the fastest way to reach your previous measurements. All measurements are chronologically sorted from the oldest to the newest.
Every date entry shows patients, time and type of measurement performed. Tapping the tile shows you the result.
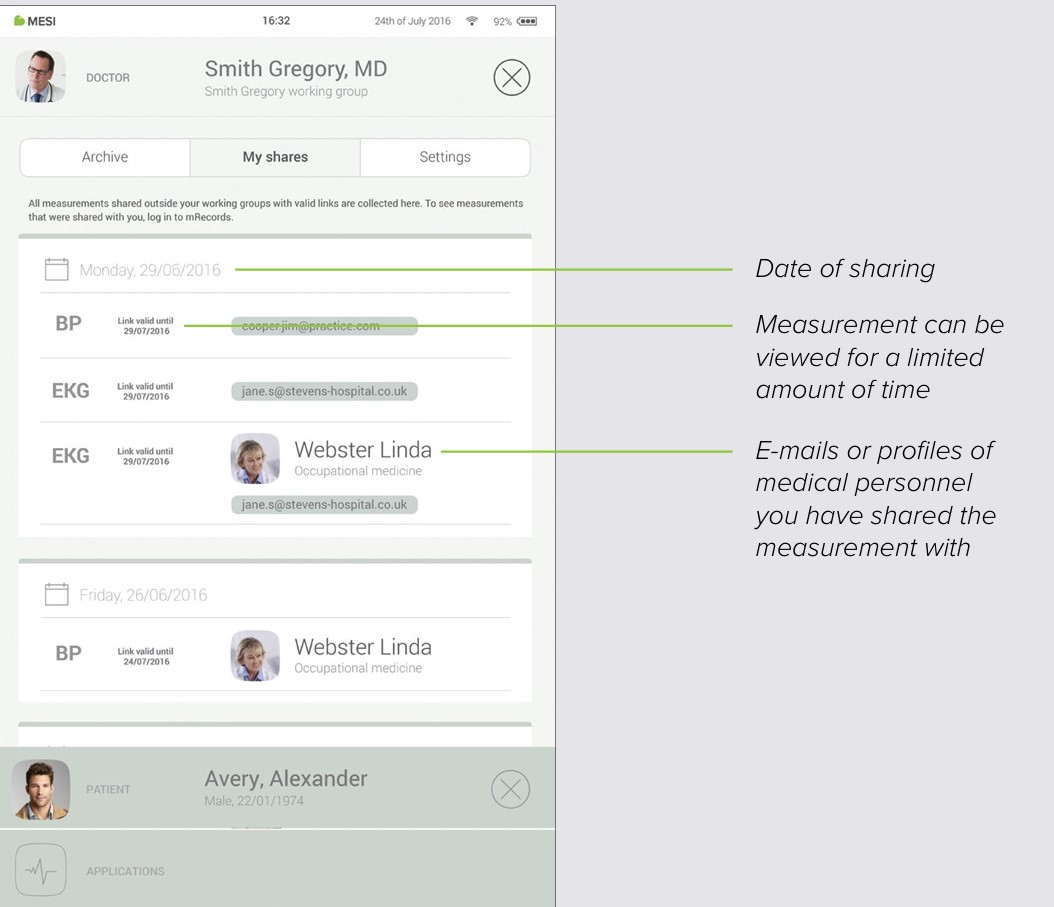
7.3 SHARED RESULTS
All measurements or recordings shared with specialists outside of your working group will be displayed here. Next to the measurement, you are presented with information such as when the measurement was sent, to whom it was sent and until when the access link is valid.
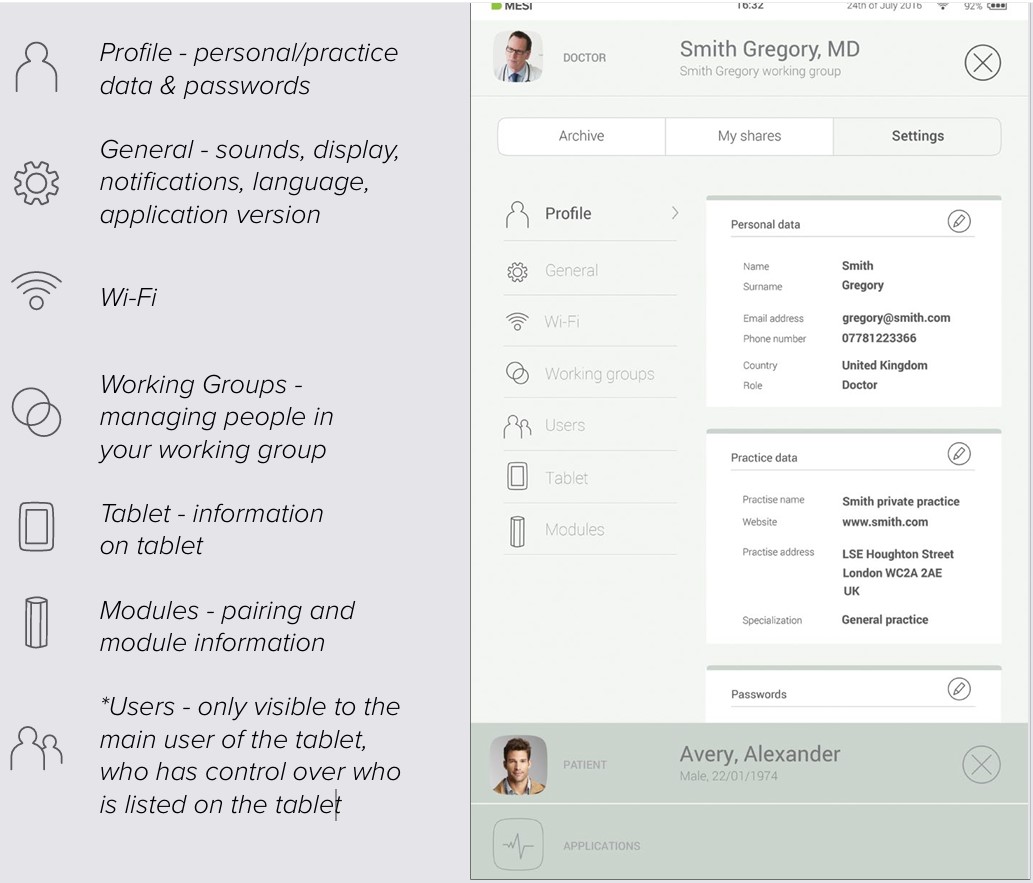
7.4 SETTINGS
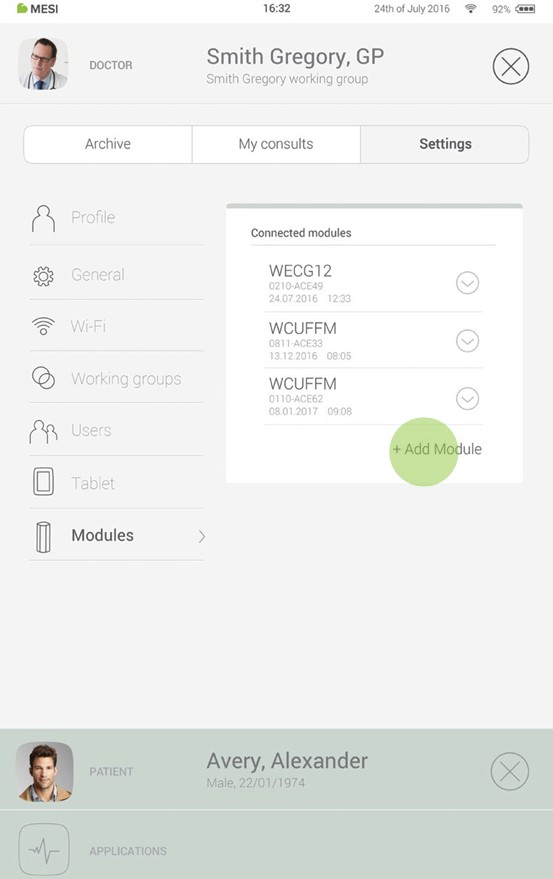
Settings is the place for all doctor’s/nurse’s information, passwords, serial numbers, module pairing, user management etc. Anything that is not directly connected to a measurement is found here.
Patient
8.1 PATIENT SELECTION
Since MESI mTABLET works as your medical cabinet, there is place to store patient information. Once you put it in, it will be there whenever you need it. You only need to fill out patient data form once. When you add the patient, they will appear on the patient list and you will be able to access their data with one tap.
8.1.1 ADDING THE PATIENT
Step 1
On your home screen, press the ➕ button in the Patient tab.
Step 2
Fill out required fields (Name, Surname, Date of Birth and Gender) and any additional information regarding the patient.
Step 3
Save the patient by pressing the ✔️ button.
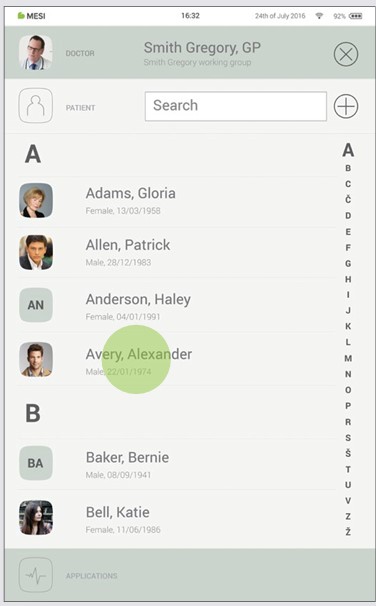
8.1.2 SELECTING THE PATIENT
Step 1
Press Patient tab button on your home screen.
Step 2
Use search bar (1) or scroll (2) to the patient who is having the ECG recorded.
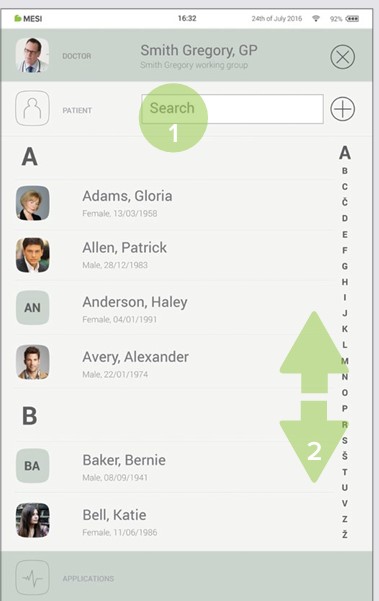
Step 3
Select the patient.
8.1.3 IMPORT EXISTING PATIENT LIST
To import an existing patient list from your EHR please visit MESI mRECORDS (mrecods.mesimedical.com) and log-in to your account. Once logged in access your profile settings and follow the instructions under the category: “Connectivity”.
Patients can also be imported directly from patient screen by clicking "Import patients" button.
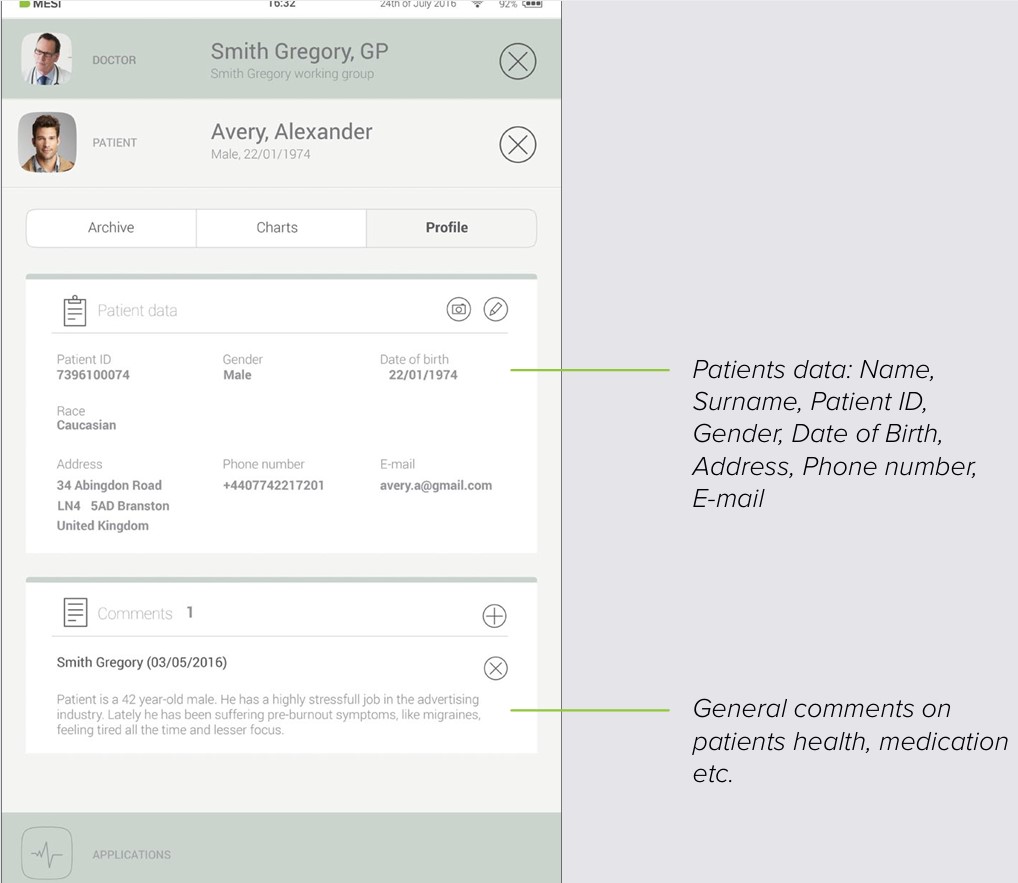
8.2 PATIENT PROFILE
You can edit your patient’s data in the Patient’s tab by choosing “Profile”. Name & surname, insurance ID, date of birth, gender and race – are all required.
If needed, their home address, telephone number and e-mail address can be added to their profile.
NOTE: Deleting a patient is only possible on mrecords.mesimedical.com.
8.3 PATIENT ARCHIVE
Similarly to the doctor’s, a patient’s profile also holds an archive of their measurements, chronologically arranged with the newest measurements at the top.
8.4 PATIENT CHARTS
You can check all of your patient measurements in “Charts”. Every measurement is put conveniently into a chart which shows trends in the patients results.
Managing users
9.1 ADDING & REMOVING USERS
The first account that is registered on the tablet (or the first user) holds the administrative rights. Under administrator profile settings there is another category called “Users”, where users can be removed from the MESI mTABLET (accounts are removed but not deleted).
A removed user can still access all his data through MESI mRECORDS and list themselves on the tablet by logging in again on the Lock screen.
9.2 PATIENT DATA SHARING PRIVILEGES
The MESI diagnostic system is built around real-life working relationships. The doctor is the owner of the working group and can share his/her patient data with the nurses added to his/her working group.
If you log in as a nurse, you first need to choose in which working group you want to perform measurements. Every member of a working group has access to the same data - patients, measurements, charts.
MESI mTABLET maintenance
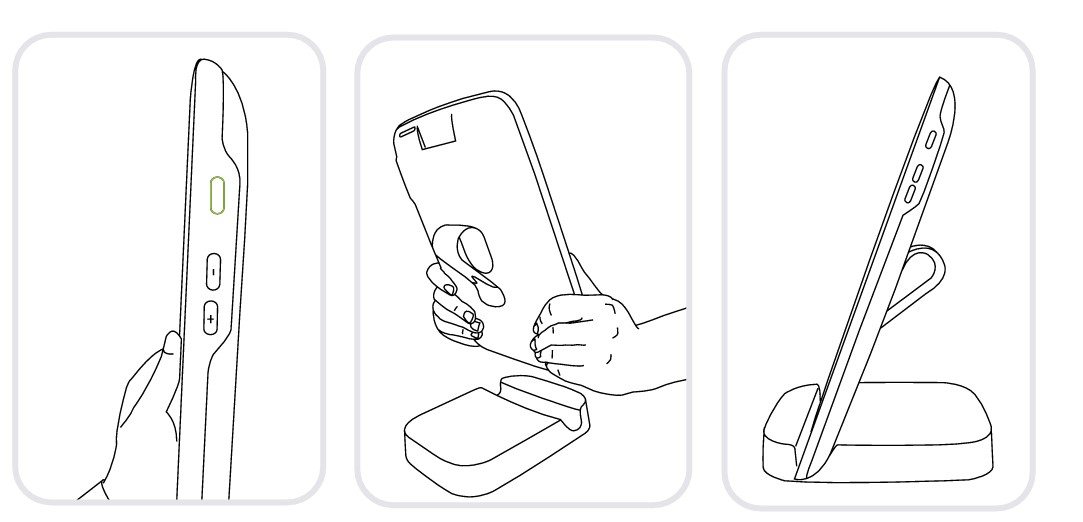
10.1 CHARGING THE BATTERY AND STORING
If you wish to use the device on battery power, you must ensure that MESI mTABLET MAINTENANCE the battery is charged regularly. Between use the MESI mTABLET UNIT should be placed on the MESI mTABLET WI-FI DOCKING UNIT to charge its battery.
If the capacity of the battery is significantly decreased after a certain period of intensive use, the battery is most likely worn out and you should contact your dealer or the manufacturer about replacing the battery.
When the device is charging the display on MESI mTABLET UNIT will be displaying charging status.
10.2 CLEANING INSTRUCTIONS
Cleaning the device regularly with a soft, dry or slightly damp cloth – is recommended. Do not use aggressive cleaning agents, volatile liquids or excessive force when cleaning the device.
10.3 PRODUCT LIFE AND STORAGE
If correctly used and maintained the device will have a minimum service life of 5 years. The device can be stored under suitable conditions for a maximum of 5 years. When using the device after storage, we recommend that you carry out a thorough maintenance check on the device.
10.4 NETWORK CONNECTIVITY AND INTEGRATION REQUIREMENTS
The mTABLET may be connected to an IT-NETWORK (e.g., hospital network or cloud infrastructure) to support integration with healthcare information systems, secure data transmission, and remote service access. This section outlines the technical and procedural requirements for safe and effective network integration.
a) Purpose of the mTABLET connection to an IT-NETWORK
The mTABLET connects to an IT-NETWORK to:
Synchronize data with cloud services (optional)
Exchange patient and measurement data with hospital information systems (HIS/EHR)
Enable secure remote maintenance and software updates (where applicable)
b) Required characteristics of the IT-NETWORK
The IT-NETWORK must fulfill the following characteristics:
Support for standard TCP/IP communication
2.4GHz or 5GHz Wi-Fi or Ethernet (mTABLET dock)
WPA2 or WPA3 encryption (Enterprise or PSK)
Sufficient bandwidth for low-latency medical data transmission
c) Required configuration of the IT-NETWORK
The IT-NETWORK should be configured with:
DHCP or Static IP assignment
Open ports for HTTPS (443), and DNS (53)
Allowed outbound access to MESI cloud services (if cloud is used)
Correct certificate and identity management (if WPA2-Enterprise or EAP is used)
d) Technical specifications of the network connection, including security specifications
Transport protocols: HTTPS over TLS 1.2 or higher
Application protocols: REST API, GDT, HL7, DICOM, XML, JSON or proprietary integration formats
Data encryption: all transmitted patient and system data is encrypted in transit
e) Intended information flow
| Source | Destination | Data Type |
|---|---|---|
| mTABLET | EHR/HIS systems | Patient data, test results |
| mTABLET | Cloud (MESI) | Patient data, test results |
| Cloud (MESI) | mTABLET | Device sync, software updates |
| HIS/EHR | mTABLET | Patient demographics, worklist |
Information is routed via secure channels and does not traverse public networks unless explicitly configured for cloud operation.
f) Hazardous Situations from IT-NETWORK Failures
The following hazardous situations may arise if the IT-NETWORK does not meet required characteristics:
Loss or delay of critical medical data
Incomplete synchronization leading to outdated records
Unauthorized data access due to misconfigured firewalls or certificates
Network downtime causing delayed diagnostics or workflow disruptions
NOTE: In the event of IT-NETWORK failure, the mTABLET continues to operate in standalone mode. All locally stored measurement results and patient data remain accessible to the user directly on the device, ensuring continuity of care even when network connectivity is lost.
Information for the Responsible Organization
The responsible organization (e.g., hospital IT department) is accountable for ensuring that the network environment where the mTABLET operates complies with the following:
Proper segmentation and access control for medical devices
Secure and reliable wireless or wired infrastructure
Routine patching and monitoring of the network and access points
Risk assessment when modifying the network or adding new devices
Changes to the network that may impact device performance include:
Reconfiguration of switches, firewalls, or Wi-Fi access points
Network topology changes or bandwidth limitations
Introduction of new connected devices that may overload the infrastructure
NOTE: The mTABLET is validated by the MANUFACTURER for operation over standard networks but is not validated for all possible IT-NETWORK configurations. The final network design and integration remain under the responsibility of the healthcare organization or integrator.
Summary of Network Risks
The MESI mTABLET system depends on secure network communication for functions such as cloud synchronization, analytics, remote configuration, and integration with third-party systems. The following network-related risks have been identified during the cybersecurity threat modeling process:
| Risk | Threat Category | Potential Impact | Mitigation Type |
|---|---|---|---|
| Loss or delay of data transmission | Denial of Service | Delayed synchronization or data upload systems | Local caching of data, retry mechanisms, offline-first app logic |
| Incomplete data transfer or interrupted workflows | Denial of Service | Temporary loss of remote features (e.g., cloud backup, PDF export) | Device retains full functionality and data access offline |
| Unauthorized access to network endpoints | Spoofing / Elevation of Privilege | Potential for data leakage or control hijacking | TLS 1.2+ encryption, JWT token expiration, API key authentication |
| Data interception or tampering | Tampering / Information Disclosure | Compromised data integrity during transmission | HTTPS for all traffic, hashing, replay protection, CSRF mitigation |
| Audit trail or log integrity compromise | Repudiation | Difficulty tracking incidents or user actions | Logging with timestamped source validation, Sentry monitoring |
| Weak authentication or impersonation | Spoofing / Information Disclosure | Bypass of security controls or unauthorized access | Strong credential handling, 2FA, certificate pinning, no USB debug |
| Analytics or error reporting unavailability | Denial of Service | Temporary loss of insights or usage data | Does not affect patient care; app continues operating normally |
NOTE: Even in the case of full IT-NETWORK failure, the MESI mTABLET remains operational in standalone mode. All locally stored patient data and test results remain accessible directly on the device, ensuring uninterrupted use at the point of care.
General warnings
Before using the device for the first time, read the user manual carefully and follow the recommendations and suggestions.
⚠️ MESI mTABLET users must be adequately trained to use the device. Before first use of the device, users must carefully read the entire usage instructions and follow the instructions for use of the connected equipment.
⚠️ MESI mTABLET complies with EMC regulations for medical products, which gives details about protection against emissions and electrical interference. However, special care must be exercised when the unit is used with high frequency equipment.
⚠️ Use only accessories and other parts recommended or supplied by MESI. Use of other than recommended or supplied parts may result in injury, inaccurate information and/ or damage to the unit.
⚠️This product is not designed for sterile use.
⚠️Do not use this unit in areas where there is any danger of explosion or the presence of flammable gases such as anaesthetic agents.
⚠️Use only real patient data when creating new profiles, as certain patient data (date of birth, sex, race) impact the performance of different automated interpretive algorithms.
11.1 MAINTENANCE
⚠️If the device is used or stored outside the specified temperature and air humidity ranges, the accuracy specified within the technical specifications of the device is not guaranteed.
⚠️Before cleaning, disconnect from the mains.
⚠️Do not use the device when wet. After cleaning the device with a damp cloth, wait for it to dry. Only use the device when it is completely dry.
⚠️Do not, under any circumstances, immerse the unit or cable assemblies in liquid.
⚠️Only use non-aggressive cleaning agents to clean the device. The device may be wiped with a damp cloth.
⚠️Do not use high temperature sterilization processes (such as autoclaving). Do not use e-beam or gamma radiation sterilization.
⚠️Make sure that the device does not come into contact with an electrical current while it is being cleaned.
⚠️Do not dispose of the device as unsorted municipal waste. Prepare it for recycling or separate waste collection in accordance with Directive 2002/96/EC on scrap electrical and electronic equipment (WEEE).
⚠️To prevent electric shock hazards due to current leakage, only use AC/DC power supplies that are compliant with the technical specifications of the device. The AC/DC power supply must be connected to an easily accessible socket (the AC/ DC power supply also serves as galvanic isolation).
⚠️The AC/DC power supply must be connected to an easily accessible socket (the AC/ DC power supply also serves as galvanic isolation).
⚠️To prevent electric shock, do not disassemble the unit. There are no serviceable parts inside. Refer servicing to qualified personnel only.
11.2 FUNCTIONING OF THE DEVICE
⚠️The device must only be operated using battery power if the earth connection is suspect or if the mains lead is damaged or suspected of being damaged.
⚠️Protect the device from moisture and liquids and extremely high/low temperatures. Also, protect the device from mechanical stress and do not expose it to direct sunlight, as this may cause the device to not function properly.
⚠️Never carry out repairs of any kind yourself. Do not open the device. The device does not contain any parts which can be replaced by the user. Do not alter or adapt the device. If a defect occurs, consult your dealer or distributor.
⚠️Important information on electromagnetic compatibility (EMC). As the number of electronic devices such as computers and mobile phones in the room increases, medical devices can become sensitive to the electromagnetic influences of other devices. Electromagnetic interference can cause medical devices to malfunction, which can potentially lead to dangerous situations. Furthermore, medical devices must not interfere with other devices. The IEC/EN 60601-1-2 standard was introduced due to the necessity to establish electromagnetic compatibility (EMC) requirements for the prevention of dangerous situations in the use of medical devices. The standard defines the level of resistance to electromagnetic interference for medical devices. This medical device is compliant with the IEC/EN 60601-1-2 standard in terms of resistance to electromagnetic interference and electromagnetic emissions. Nevertheless, do not use mobile phones and similar devices which create strong electromagnetic fields in the vicinity of the device. This can cause the device to malfunction, which can potentially cause a dangerous situation.
⚠️Portable RF communications equipment including peripherals such as antenna cables and external antennas should be used no closer than 30 cm (12 inches) to any part of the device including cables specified by the manufacturer. Otherwise degradation of the performance of this equipment could result.
⚠️Use of this equipment adjacent to or stacked with other equipment should be avoided because it could result in improper operation. If such use is necessary, this equipment should be observed to verify that they are operating normally.
⚠️ The 4-port charging station, 2-port charging station and MESI mTABLET WI-FI DOCKING UNIT are intended for use only in dry, indoor environments. These components must be kept away from water, moisture, and liquids at all times. They are not designed for use in wet areas (such as bathrooms or kitchens) and must not come into direct contact with the patient. Use only as instructed to avoid the risk of electric shock or malfunction.
⚠️ Do not position the ME EQUIPMENT so that it is difficult to operate the disconnection device.
⚠️ AC/DC power supply unit is considered as disconnecting device from the mains.
Warranty information
For the MTABSYS systems purchased from April 1, 2026 on, the company MESI Ltd. hereby ensures a warranty period of two years, which begins with the date of purchase (delivery date shown on the invoice). The warranty is valid with an invoice or a copy of the invoice. The Company MESI Ltd. also guarantees that the MTABSYS system you have purchased is free from defects in materials and is made from suitable materials. In the warranty period the company MESI Ltd. guarantees a free repair of defective device or parts covered by this warranty. If the defective device in the warranty period cannot be repaired, a free replacement will be provided. The company MESI Ltd. will ensure maintenance and supply spare parts for a period of ten years from the date of purchase as long as (spare) parts are available from suppliers.
The warranty does not cover:
The cost of repairs and/or damage done by an unauthorized person. If you wish to make a warranty claim, please contact your local distributor or the manufacturer of the MTABSYS system, whose contact details can be found at the company’s website.
Regular inspections (at the customer’s request) and/or maintenance (replacement of worn parts).
Deterioration of accessories and other additions other than the main device.
Costs incurred due to disagreement with the warranty conditions (it shall be charged).
Any damage caused by accidents, misuse, neglect, abrasion, exposure to extreme temperatures, solvents, acids, water, normal wear and tear or damage in transit, theft or loss.
Use of the device for purposes other than its intended use.
Damage caused by airline or freight company mishandling.
Improper use or abuse of MTABSYS system, including but not solely limited to the failure to use this product for its normal purposes or in accordance with company’s instructions on usage and maintenance.
Defects resulting from usage of the product in conjunction with accessories that are not approved by company MESI Ltd. for use with the MTABSYS system.
Defects or deficiencies of the MTABSYS system arising from incorrect installation or use not consistent with the instructions and technical or safety standards prescribed in the device’s user manual.
Accidents, Acts of God, lightning, water, fire, public disturbances, improper ventilation, voltage fluctuations or any cause beyond the control of company MESI Ltd.
Damage to the battery caused by failing to charge the empty battery regularly, or failure to use in accordance with the instructions of user manual.
Replacement or repair of defective device or it’s parts, if the serial number on the product has been altered, deleted, removed or made illegible.
Loss of data. You must regularly back up the data stored on your product to a separate storage product (i.e. mRECORDS).
Software that is sold as part of the equipment.
| Column A | Column B |
|---|---|
| Parts included in the two-year warranty | MTABMD and MTABDSW device |
| Parts included in the one-year warranty | AC/DC power supply (FW8030M/05) |
All of the above is the sole and exclusive warranty for the MTABSYS system.
We state:
That during the warranty period the MTABSYS system will work flawlessly, if handled as stated in the instructions for use and if maintained regularly.
That the warranty period commences on the date of purchase.
That in the warranty period the defects and technical deficiencies of the MTABSYS system that are generated during normal use will be eliminated at company’s own expense.
That the MTABSYS system will be fully operational, if optimum conditions for the operation of the product, ranging from 10-40 °C, max. 80% humidity, non-condensing and without excessive amounts of dust and dirt, are fulfilled.
That the warranty is not applicable to cases other than defects in material and workmanship.
That the warranty is void if the MTABSYS system is used in a rental capacity and damaged at the same time.
That the repair or replacement under the terms of this warranty does not provide the right to extension or renewal of the warranty period.
That the warranty will be void if payments are not received by company MESI Ltd. in the period after any agreed upon credit terms expire.
Description of the warranty claim process:
The warranty is valid only if the MTABSYS system and its parts are returned during the applicable warranty period, together with original invoice or its copy issued by the manufacturer of the device. If necessary, give a description of the problem. In case the invoice is not presented, the company MESI Ltd. holds the right to void the warranty.
Standard compliance
Product development was carried out in accordance with the Medical Device Regulation (EU) 2017/745, All relevant standards listed in the table below were also met.
| Reference number | Description |
|---|---|
| EN 60601-1:2006 + A1:2013 + A12:2014 + A2:2021 | Medical electrical equipment - Part 1: General requirements for basic safety and essential performance |
| EN 60601-1- 2:2015+A1:2021 | Medical electrical equipment - Part 1-2: General requirements for basic safety and essential performance - Collateral Standard: Electromagnetic disturbances - Requirements and tests |
| EN 62304:2006/ A1:2015 | Medical device software - Software life-cycle processes |
| EN ISO 15223-1:2021 | Symbols for use in the labelling of medical devices |
| EN 303 446-1:2017 | Electromagnetic Compatibility (EMC) standard for combined and/or integrated radio and non-radio equipment; Part 1: Specific conditions for equipment in residential locations. |
| EN ISO 14971:2019+A1:2021 | Medical devices – Application of risk management to medical devices |
| 13485:2016/A11:2021 | Medical devices – Quality management systems – Requirements for regulatory purposes |
| EN 301 489-17 | ElectroMagnetic Compatibility (EMC) standard for radio equipment and services; Part 17: Specific conditions for Broadband Data Transmission Systems; Harmonised Standard for ElectroMagnetic Compatibility |
| EN 301 489-3 V2.3.2 | ElectroMagnetic Compatibility (EMC) standard for radio equipment and services; Part 3: Specific conditions for Short Range Devices (SRD) operating on frequencies between 9 kHz and 246 GHz; Harmonised Standard for ElectroMagnetic Compatibility |
13.1 MANUFACTURER DECLARATION ON EMC
The MESI mTABLET is intended for use in the electromagnetic environment specified below. The customer or the user of the above models should ensure that they are used in such environment.
| Emissions Test | Compliance | Electromagnetic Environment - Guidance |
|---|---|---|
| RF emissions CISPR 11 | Group 1 | The models listed above use RF energy only for their internal function. Therefore, their RF emissions are very low and are not likely to cause any interference in nearby electronic equipment. |
| RF Emissions CISPR 11 | Class B | The models listed above use RF energy only for their internal function. Therefore, their RF emissions are very low and are not likely to cause any interference in nearby electronic equipment. |
| Harmonic emissions IEC 61000-3-2 | N/A | The models listed above use RF energy only for their internal function. Therefore, their RF emissions are very low and are not likely to cause any interference in nearby electronic equipment. |
| Voltage fluctuations / flicker emissions IEC 61000-3-3 | Complies | The models listed above use RF energy only for their internal function. Therefore, their RF emissions are very low and are not likely to cause any interference in nearby electronic equipment. |
The MESI mTABLET is intended for use in the electromagnetic environment specified below. The customer or the user of the above models should assure that they are used in such environment.
Enclosure Port
| Immunity Test | Test Condition | IEC 60601 Compliance Level | Electromagnetic environment – guidance |
|---|---|---|---|
| Electrostatic discharge (ESD) IEC 61000- 4-2 | ± 8 kV contact ± 2,4,8,15 kV air | ±8 kV contact ± 15 kV air | Floors should be wood, concrete or ceramic tile. If floors are covered with synthetic material, the relative humidity should be at least 30%. |
| Radiated RF EM fields and Proximity fields from RF wireless communications equipment IEC 61000-4-3 | 3 V/m 80 MHz – 2.7 GHz 80% AM 1kHz | 3 V/m 80 MHz – 2.7 GHz | The mains power quality should be that of a professional healthcare facility environment and home healthcare environment. |
| Radiated RF EM fields and Proximity fields from RF wireless communications equipment IEC 61000-4-3 | 385 MHz (18 Hz Pulse Modulation) | 27 V/m | The mains power quality should be that of a professional healthcare facility environment and home healthcare environment. |
| Radiated RF EM fields and Proximity fields from RF wireless communications equipment IEC 61000-4-3 | 450 MHz (FM+/–5 KHz deviation 1 kHz sine or 18 Hz pulse modulation) | 28 V/m | The mains power quality should be that of a professional healthcare facility environment and home healthcare environment. |
| Radiated RF EM fields and Proximity fields from RF wireless communications equipment IEC 61000-4-3 | 710 MHz (217 Hz PM) | 9 V/m | The mains power quality should be that of a professional healthcare facility environment and home healthcare environment. |
| Radiated RF EM fields and Proximity fields from RF wireless communications equipment IEC 61000-4-3 | 745 MHz (217 Hz PM) | 9 V/m | The mains power quality should be that of a professional healthcare facility environment and home healthcare environment. |
| Radiated RF EM fields and Proximity fields from RF wireless communications equipment IEC 61000-4-3 | 780 MHz (217 Hz PM) | 9 V/m | The mains power quality should be that of a professional healthcare facility environment and home healthcare environment. |
| Radiated RF EM fields and Proximity fields from RF wireless communications equipment IEC 61000-4-3 | 810 MHz (18 Hz PM) | 28 V/m | The mains power quality should be that of a professional healthcare facility environment and home healthcare environment. |
| Radiated RF EM fields and Proximity fields from RF wireless communications equipment IEC 61000-4-3 | 870 MHz (18 Hz PM) | 28 V/m | The mains power quality should be that of a professional healthcare facility environment and home healthcare environment. |
| Radiated RF EM fields and Proximity fields from RF wireless communications equipment IEC 61000-4-3 | 930 MHz (18 Hz PM) | 28 V/m | The mains power quality should be that of a professional healthcare facility environment and home healthcare environment. |
| Radiated RF EM fields and Proximity fields from RF wireless communications equipment IEC 61000-4-3 | 1720 MHz (217 Hz PM) | 28 V/m | The mains power quality should be that of a professional healthcare facility environment and home healthcare environment. |
| Radiated RF EM fields and Proximity fields from RF wireless communications equipment IEC 61000-4-3 | 1845 MHz (217 Hz PM) | 28 V/m | The mains power quality should be that of a professional healthcare facility environment and home healthcare environment. |
| Radiated RF EM fields and Proximity fields from RF wireless communications equipment IEC 61000-4-3 | 1970 MHz (217 Hz PM) | 28 V/m | The mains power quality should be that of a professional healthcare facility environment and home healthcare environment. |
| Radiated RF EM fields and Proximity fields from RF wireless communications equipment IEC 61000-4-3 | 2450 MHz (217 Hz PM) | 28 V/m | The mains power quality should be that of a professional healthcare facility environment and home healthcare environment. |
| Radiated RF EM fields and Proximity fields from RF wireless communications equipment IEC 61000-4-3 | 5240 MHz (217 Hz PM) | 9 V/m | The mains power quality should be that of a professional healthcare facility environment and home healthcare environment. |
| Radiated RF EM fields and Proximity fields from RF wireless communications equipment IEC 61000-4-3 | 5500 MHz (217 Hz PM) | 9 V/m | The mains power quality should be that of a professional healthcare facility environment and home healthcare environment. |
| Radiated RF EM fields and Proximity fields from RF wireless communications equipment IEC 61000-4-3 | 5785 MHz (217 Hz PM) | 9 V/m | The mains power quality should be that of a professional healthcare facility environment and home healthcare environment. |
| RATED power frequency magnetic fields IEC 61000-4-8 | 50 Hz or 60 Hz | 30 A/m | The power frequency magnetic fields should be at levels characteristic of a typical location in a typical commercial or hospital environment. |
| Proximity magnetic fields IEC 61000-4-39 | 30 kHz (CW) (a) | 8 A/m | a) This test is applicable only to ME EQUIPMENT and ME SYSTEMS intended for use in the HOME HEALTHCARE ENVIRONMENT. b) The carrier shall be modulated using a 50 % duty cycle square wave signal. c) r.m.s., before modulation is applied. |
| Proximity magnetic fields IEC 61000-4-39 | 134,2 kHz (2,1 kHz PM) | 65 A/m (c) | a) This test is applicable only to ME EQUIPMENT and ME SYSTEMS intended for use in the HOME HEALTHCARE ENVIRONMENT. b) The carrier shall be modulated using a 50 % duty cycle square wave signal. c) r.m.s., before modulation is applied. |
| Proximity magnetic fields IEC 61000-4-39 | 13,56 MHz (50 kHz PM) | 7,5 A/m (c) | a) This test is applicable only to ME EQUIPMENT and ME SYSTEMS intended for use in the HOME HEALTHCARE ENVIRONMENT. b) The carrier shall be modulated using a 50 % duty cycle square wave signal. c) r.m.s., before modulation is applied. |
The MESI mTABLET is intended for use in the electromagnetic environment specified below. The customer or the user of the above listed models should assure that they are used in such an environment.
Input a.c. power PORT
| Immunity Test | Test Condition | IEC 60601 Compliance Level | Electromagnetic environment – guidance |
|---|---|---|---|
| Electrical fast transient/ bursts IEC 610004-4 | ± 2 kV 100 kHz repetition frequency | ± 2 kV | Mains power quality should be that of a professional healthcare facility environment and home healthcare environment. |
| Surges IEC 61000- 4-5 | ± 0.5 kV, ±1 kV line(s) to line(s) ± 0.5 kV, ±1 kV, ± 2 kV line(s) to ground (a) | ± 1 kV, differential mode | Mains power quality should be that of a professional healthcare facility environment and home healthcare environment. |
| Conducted RF induced by RF fields IEC 61000- 4-6 | 3 Vrms 150 kHz – 80 MHz 6 Vrms in ISM bands between 150 kHz – 80 MHz c) 80% AM 1 kHz | 3 Vrms 150 kHz – 80 MHz 6 Vrms in ISM bands between 150 kHz – 80 MHz c) 80% AM 1 kHz | Mains power quality should be that of a professional healthcare facility environment and home healthcare environment. |
| Voltage dips, short interruptions and voltage variations on power supply input lines IEC 61000-4-11 | 0% UT; 0°,45°,90°,135°,180°, 225°,270°,315° 0% UT; 0° 0% UT; 70% 0% UT; 0% | 0.5 cycles 1 cycle 25/30 cycles (50/60 Hz) 250/300 cycles (50/60 Hz) (5s) | Mains power quality should be that of a professional healthcare facility environment and home healthcare environment. If the user of the models listed above requires continued operation during power mains interruptions, it is recommended that the MESI mTABLET is powered from an uninterruptible power supply or battery. |
Comment: a) Not applicable to CLASS II ME EQUIPMENT and ME SYSTEMS.
b) The ISM (industrial, scientific and medical) bands between 0.15 MHz and 80 MHz are: 6.765 MHz to 6.795 MHz; 13.553 MHz to 13.567 MHz; 26.957 MHz to 27.283 MHz; and 40.66 MHz to 40.70 MHz. The amateur radio bands between 0.15 MHz and 80 MHz are: 1.8 MHz to 2.0 MHz, 3.5 MHz to 4.0 MHz, 5.3 MHz to 5.4 MHz, 7 MHz to 7.3 MHz, 10.1 MHz to 10.15 MHz, 14 MHz to 14.2 MHz, 18.07 MHz to 18.17 MHz, 21.0 MHz to 21.4 MHz, 24.89 MHz to 24.99 MHz, 28.0 MHz to 29.7 MHz, and 50.0 MHz to 54.0 MHz.
The MESI mTABLET is intended for use in the electromagnetic environment specified below. The customer or the user of the above listed models should ensure that they are used in such environment.
Signal input/output parts PORT
| Immunity Test | Test Condition | IEC 60601 Compliance Level | Electromagnetic environment – guidance |
|---|---|---|---|
| Electrostatic discharge (ESD) IEC 61000-4-2 | ± 8 kV contact ± 2,4,8,15 kV air | ± 8 kV contact ± 15 kV air | Floors should be wood, concrete or ceramic tile. If floors are covered with synthetic material, the relative humidity should be at least 30%. |
| Electrical fast transient/bursts IEC 610004- 4 (a) | ± 1 kV 100kHz repetition frequency | ± 1 kV | Mains power quality should be that of a professional healthcare facility environment and home healthcare environment. |
| Conducted RF induced by RF fields IEC 61000-4-6 | ± 2 kV line(s) to ground | Not applicable. | Mains power quality should be that of a professional healthcare facility environment and home healthcare environment. |
| Conducted RF induced by RF fields IEC 61000-4- 6 (a) | 3 Vrms 150 kHz – 80 MHz 6 Vrms in ISM bands between 150 kHz – 80 MHz c) 80% AM 1 kHz | 3 Vrms 150 kHz – 80MHz 6 Vrms in ISM bands between 150 kHz – 80 MHz c) 80% AM 1 kHz | Mains power quality should be that of a professional healthcare facility environment and home healthcare environment. |
Comment: *Not applicable, unit, without Signal input/output parts PORT
a) SIP/SOPS whose maximum cable length is less than 3 m in length are excluded.
b) This test applies only to output lines intended to connect directly to outdoor cables.
c) The ISM (industrial, scientific and medical) bands between 0.15 MHz and 80 MHz are: 6.765 MHz to 6.795 MHz; 13.553 MHz to 13.567 MHz; 26.957 MHz to 27.283 MHz; and 40.66 MHz to 40.70 MHz. The amateur radio bands between 0.15 MHz and 80 MHz are: 1.8 MHz to 2.0 MHz, 3.5 MHz to 4.0 MHz, 5.3 MHz to 5.4 MHz, 7 MHz to 7.3 MHz, 10.1 MHz to 10.15 MHz, 14 MHz to 14.2 MHz, 18.07 MHz to 18.17 MHz, 21.0 MHz to 21.4 MHz, 24.89 MHz to 24.99 MHz, 28.0 MHz to 29.7 MHz, and 50.0 MHz to 54.0 MHz.
Guidance and manufacturer’s declaration – electromagnetic immunity
MESI mTABLET is intended for use in the electromagnetic environment specified below. The customer or the user of the above listed models should ensure that they are used in such environment.
| Immunity Test | IEC 60601 Test level | Compliance level | Electromagnetic environment – guidance |
|---|---|---|---|
| Conducted RF induced by RF fields IEC 61000-4-6 Radiated RF EM fields and Proximity fields from RF wireless communications equipment IEC 61000-4-3 | 3 Vrms 150 kHz – 80 MHz 6 Vrms in ISM bands between 150 kHz – 80 MHz c) 3 V/m 80 MHz – 2.7 GHz | 3 Vrms 150 kHz – 80 MHz 6 Vrms in ISM bands between 150 kHz – 80 MHz c) 3 V/m 80 MHz – 2.7 GHz | Portable and mobile RF communications equipment should not be used any closer to any part of the above listed models, including cables, than the recommended separation distance calculated from the equation applicable to the frequency of the transmitter. Recommended separation distance d = 1.2√P d = 1.2√P 80 MHz - 800 MHz d = 2.3√P 800 MHz - 2.7 GHz Where P is the maximum output power rating of the transmitter in watts (W) according to the transmitter manufacturer and d is the recommended separation distance in meters (m). Field strengths from fixed RF transmitters, as determined by an electromagnetic site survey a should be less than the compliance level in each frequency range. (b) Interference may occur in the vicinity of equipment marked with the following symbol: |
NOTE 1 At 80 MHz and 800 MHz, the higher frequency range applies.
NOTE 2: These guidelines may not apply in all situations. Electromagnetic propagation is affected by absorption and reflection from structures, objects and people.
a) Field strengths from fixed transmitters such as base stations for radio (cellular/cordless) telephones, land mobile radios, amateur radio, AM and FM radio broadcast and TV broadcast, cannot be predicted theoretically with accuracy. To assess the electromagnetic environment due to fixed RF transmitters an electromagnetic site survey should be considered. If the measured field strength in the location in which the MESI mTABLET is used, exceeds the applicable RF compliance level above, the above listed models should be observed to verify normal operation. If abnormal performance is observed, additional measures may be necessary, such as reorienting or relocating the above listed models.
b) Over the frequency range from 150 kHz to 80 MHz, field strength should be less than 3 V/m.
c) The ISM (industrial, scientific and medical) bands between 0.15 MHz and 80 MHz are: 6.765 MHz to 6.795 MHz; 13.553 MHz to 13.567 MHz; 26.957 MHz to 27.283 MHz; and 40.66 MHz to 40.70 MHz. The amateur radio bands between 0.15 MHz and 80 MHz are: 1.8 MHz to 2.0 MHz, 3.5 MHz to 4.0 MHz, 5.3 MHz to 5.4 MHz, 7 MHz to 7.3 MHz, 10.1 MHz to 10.15 MHz, 14 MHz to 14.2 MHz, 18.07 MHz to 18.17 MHz, 21.0 MHz to 21.4 MHz, 24.89 MHz to 24.99 MHz, 28.0 MHz to 29.7 MHz, and 50.0 MHz to 54.0 MHz.
Distanze di separazione consigliate tra le apparecchiature di comunicazione RF portatili e mobili e i modelli sopra elencati.
The MESI mTABLET is intended for use in the electromagnetic environment in which radiated RF disturbances are controlled. The customer or the user of the models listed above can help prevent electromagnetic interference by maintaining a minimum distance between portable and mobile RF communications equipment (transmitters) and the models listed above as recommended below, according to the maximum output power of the communication equipment.
| Rated maximum output power of transmitter W | Separation distance according to frequency of transmitter m: 150 kHz to 80 MHz d = 1.2√P | 80 MHz to 800 MHz d = 1.2√P | 800 MHz to 2.5 GHz d = 2.3√P |
|---|---|---|---|
| 0.01 | 0.12 | 0.12 | 0.23 |
| 0.1 | 0.38 | 0.38 | 0.73 |
| 1 | 1.2 | 1.2 | 2.3 |
| 10 | 3.8 | 3.8 | 7.3 |
| 100 | 12 | 12 | 23 |
For transmitters rated at a maximum output power not listed above, the recommended separation distance d in metres (m) can be determined using the equation applicable to the frequency of the transmitter, where P is the maximum output power rating of the transmitter in watts (W) according to the transmitter manufacturer.
NOTE 1: At 80 MHz and 800 MHz, the separation distance for the higher frequency range applies.
NOTE 4: These guidelines may not apply in all situations. Electromagnetic propagation is affected by absorption and reflection from structures, objects and people.
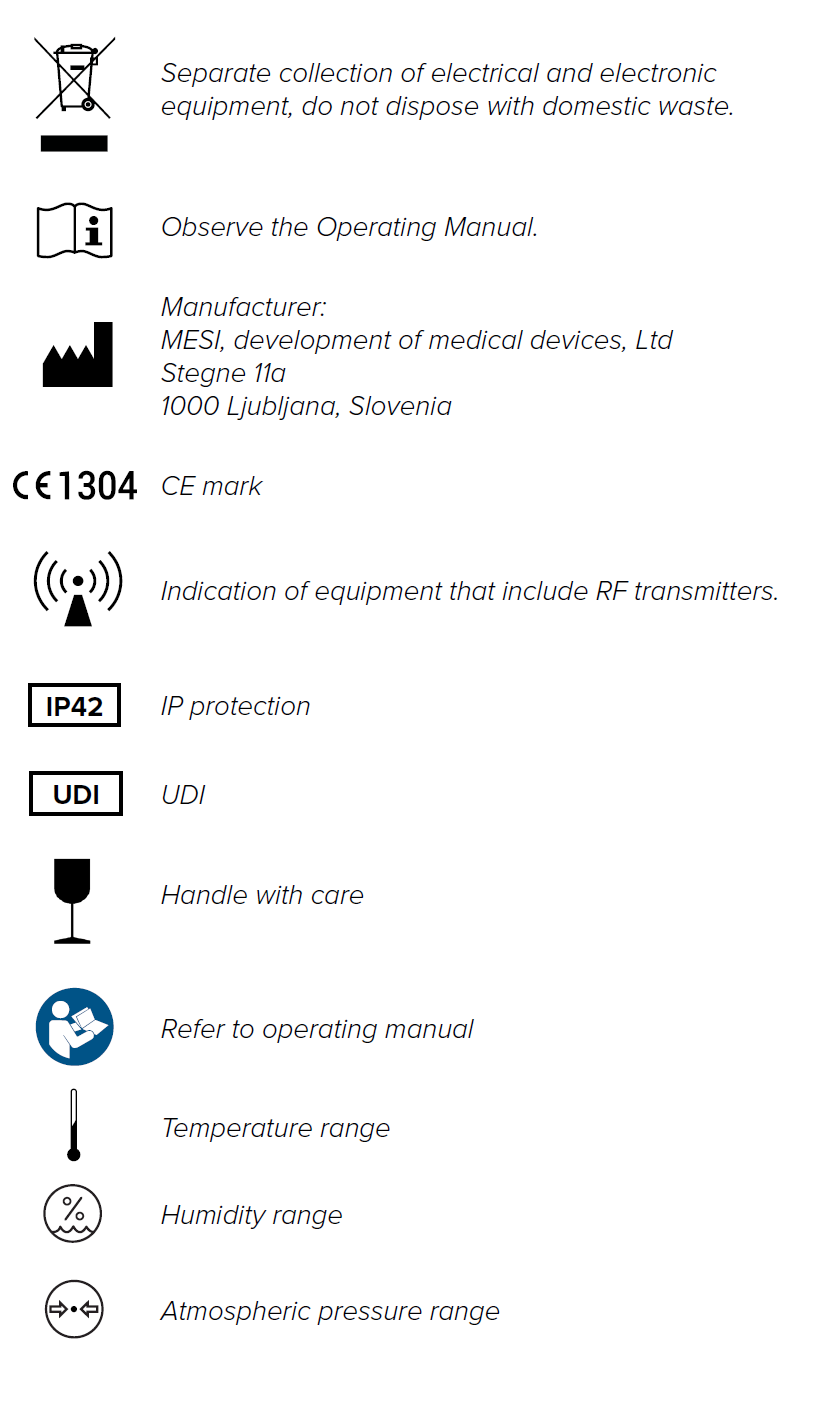
Important labels
The symbols on the labels on the bottom of the device, the packaging and the instructions provide important information about the device. The symbols are described below.
Performing your first measurement
Performing your first measurement is a straightforward task. As you are already signed in to your account, you will need to follow the steps below.
Step 1 - Add first patient
On your home screen, press the + button in the Patient tab.
Step 2 - Fill out patient’s data
Fill out required fields (Name, Surname, Date of Birth and Gender) and any additional information regarding the patient. Save the patient by pressing the ✅ button.
NOTE: There are also ways to import patients from your EHR to MESI mRECORDS, which will then sync with MTABMD. Please contact your local MESI representative.
NOTE: When creating your profile a "Test patient" is added to your working group to help with initial adjusting to MESI mTABLET interface. This patient will be automatically removed after 2 weeks or it can be removed by a user on MESI mRECORDS.
Step 3 - Select measurement
Once you have added the patient, tap the Applications tab (lower part of the screen) to bring up the home screen. Each measurement has its own icon and you choose one by tapping it.
Step 4 - Prepare diagnostic module
When you access the desired measurement, there will be instructions on screen on how to apply the wireless module in the right way. Swipe left or right to see all instruction steps. When the START button becomes green, you can start the measurement.
Step 5 - Measurement
The measurement screens depend on the type of measurement being performed. Most measurements will have some graphic representations of measurement in real time (graphs or progress bar) and other parameters specific to the measurement (consult the specific diagnostic module user manual for more details).
Step 6 - Results
When the measurement process is completed, the MESI mTABLET UNIT screen displays the result. It consists of five different areas: navigation area, numerical result with interpretations, visual representations, patient’s history of measurement and comments on the result.
All the buttons and information placed in the navigation area are there to help you f ind your way around the application. You can toggle between previous results of the patient. If you are not satisfied with the recording for any reason, you can quickly discard it, or in the case of uncertainty you can consult with other doctors by simply entering their e-mail addresses. It also contains the names of both the doctor performing the recording and the patient.
The numerical result is a combination of the calculated results and measured values. Tap to show more in-depth interpretations.
Visual representations of the measurement depend on the measurement type. For more information please see the instructions for use that came with diagnostic module
History holds an overview of recordings done by the same doctor on the same patient. It shows the trend of the patient’s results.
A comment can be added to every measurement. It will be stored and always available together with the recording report.
For more information on the specific result form, see the measurement user manual, which you will have received along with the diagnostic module.