


Detailed instructions
This chapter contains all the information required by users of the device for safe, correct and accurate measurement. This chapter includes a detailed and complete description of all the functions of the device, the safety instructions and all the information required to understand the operation of the device.
5.1 FIRST TIME USE
5.1.1 BASIC FUNCTIONALITIES
When using the MESI ABPI MD device for the first time, it’s necessary to set the language, time and date. It is mandatory to set the exact time and date because of the effect of warnings and reminders which ensure the proper conduct or calibration of the MESI ABPI MD device.
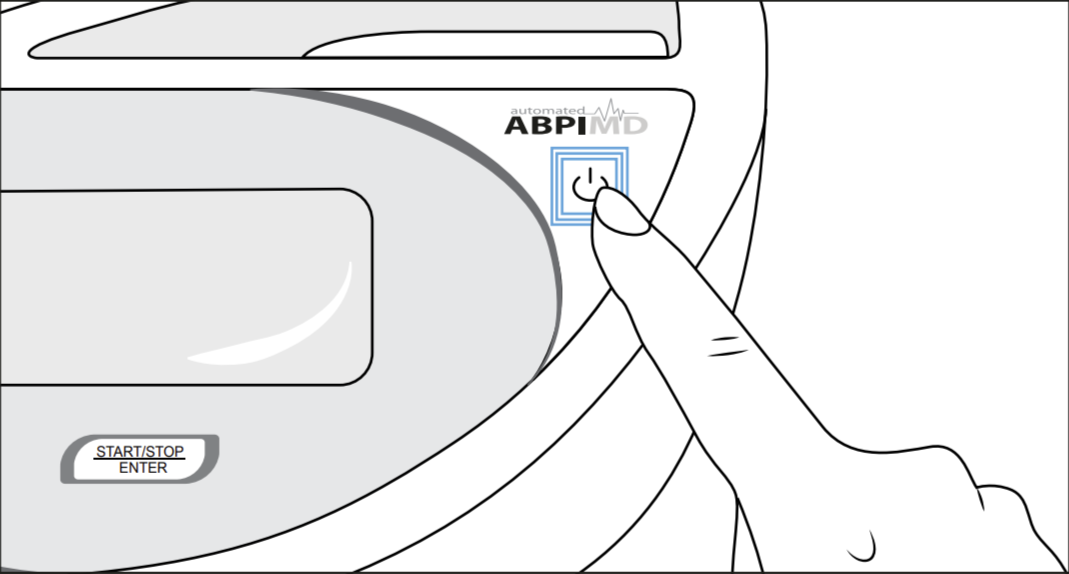
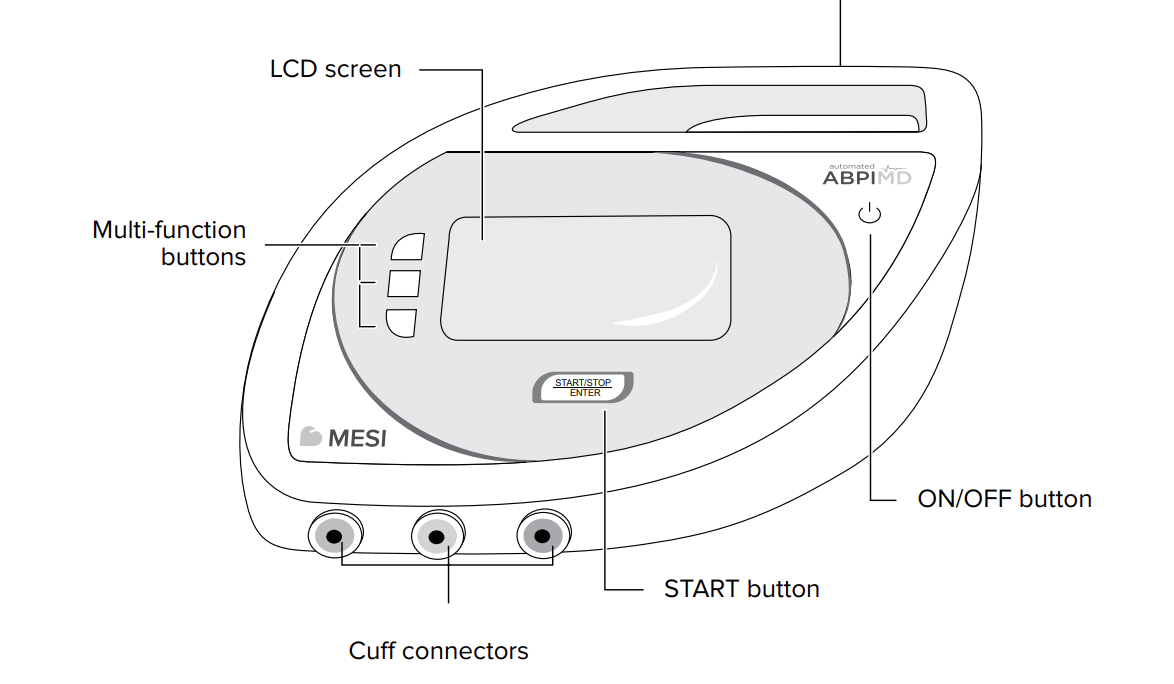
Turn the device on using the ON/OFF button. The display will show the initial screen with a greeting. To continue, press any key.
5.1.1 Language settings
Use the UP ⬆️ and DOWN ⬇️ buttons to select the language. Confirm your selection using the ENTER button. The device language will be changed and the time setting menu will appear. If you wish to return to the previous menu without confirming the changes, push the BACK button ⬅️.
5.1.2 Time settings
Use the UP ⬆️ and DOWN ⬇️ buttons to navigate through the hour and minute settings. Confirm your selection using the ENTER button.
The selected field will begin to flash. Use the UP ⬆️ and DOWN ⬇️ buttons to set a new value and confirm it using the BACK button .
If necessary, repeat the process for the other fields. When you are finished setting the time, use the UP ⬆️ and DOWN ⬇️ buttons to move to the Confirm field and confirm your selection using the ENTER button.
If you do not wish to apply your settings, return to the previous menu by pushing the BACK button ⬅️. The device time will be configured and the date setting menu will be displayed.
5.1.3 Date settings
Use the UP ⬆️ and DOWN ⬇️ buttons to navigate through the day, month and year settings. Confirm your selection using the ENTER button.
The selected field will begin to flash. Use the UP ⬆️ and DOWN ⬇️ buttons to set a new value and confirm it using the BACK button ⬅️.
If necessary, repeat the process for the other fields. When you are finished setting the date, use the UP ⬆️ and DOWN ⬇️ buttons to move to the Confirm field and confirm your selection using the ENTER button.
Before confirming, double-check the accuracy of the date because the settings will be saved after confirming and you won’t be able to return to the previous menu.
The display will show a thank you note. If an incorrect date was confirmed press the ON/OFF button. To continue to the main menu, press any key.
5.2 Device setup
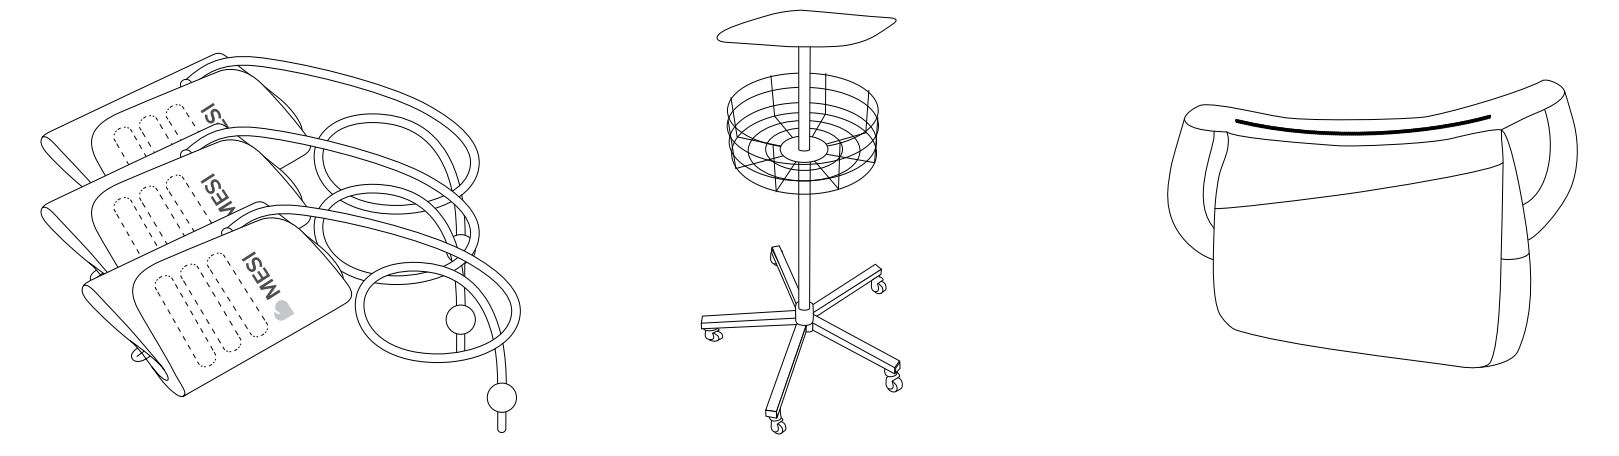
To ensure that the measurement accuracy is according to specifications, measurements must be carried out in an appropriate working environment. Place the device on a flat and stable surface. We recommend you to use the ABPI MD stand. During operation, the device must not be exposed to any mechanical stress or vibrations. Such disturbances can affect the measurement results, rendering the results invalid (if you set the device down on the patient’s bed, you cannot ensure the validity of the results).
The device can be used at temperatures raging between +10°C and +40°C and at a relative air humidity between 30% and 85%.
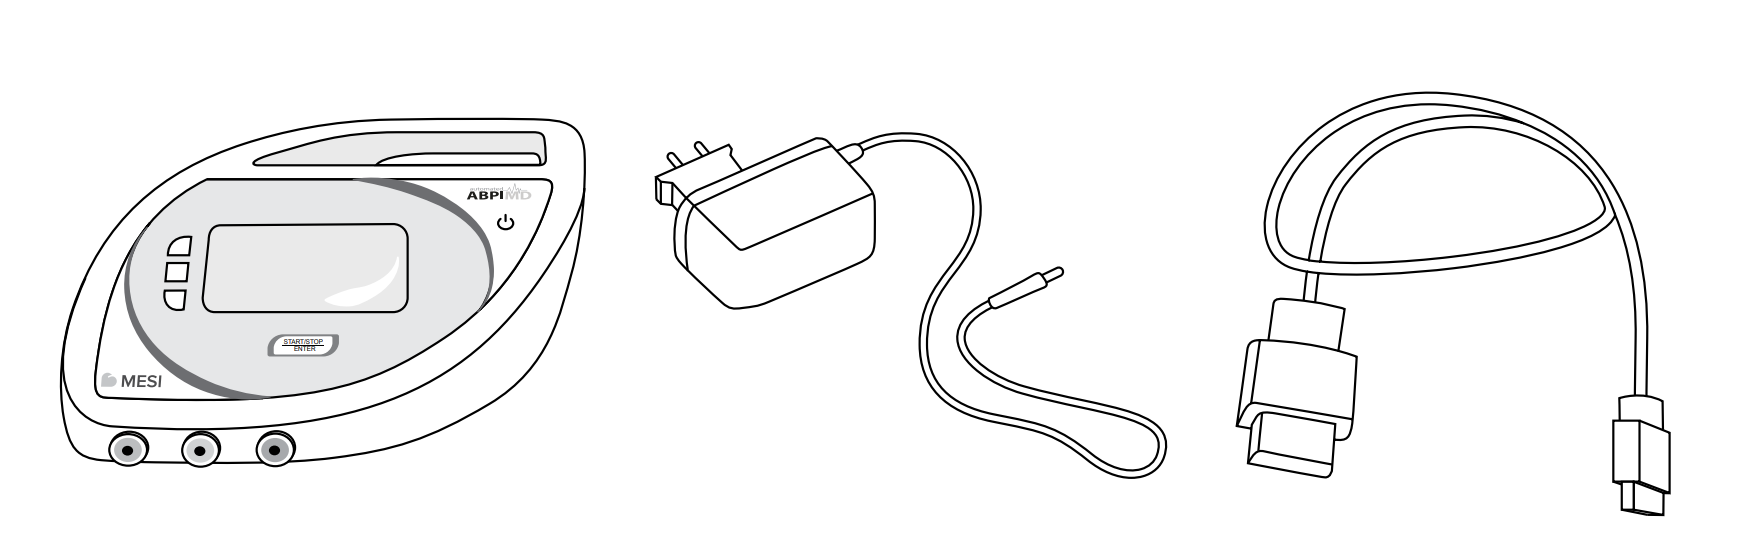
5.3 AC/DC power supply and battery
The MESI ABPI MD uses the following two power sources:
the mains electricity using an AC/DC power supply,
battery power.
Connect the AC/DC power supply to a wall socket with a mains voltage of 100-240V at 50-60Hz and to the connector at the back of the device. The device is now ready for use.
NOTE: Only use the AC/DC power supply included with the device; FRIWO FW8001M/5. Do not use other AC/DC power supplies. Using other AC/DC power supplies can cause serious injuries to the user and/or the patient and potential damage to the device and other equipment.
The MESI ABPI MD can also function without the AC/DC power supply. When the device is not connected to the mains electricity, it is powered by a battery. The required power is provided by a high-performance lithium polymer battery. The battery is not replaceable.
NOTE: The battery inside a completely new device is most likely not completely empty and can provide enough power to start the device up. Nonetheless, connect the device to the mains electricity using the AC/DC power supply.
The battery charging system works automatically. The battery begins to charge when the AC/DC power supply is connected, which is indicated by the battery status indicator. When the battery is charged, the charging process stops and the title bar displays the battery status indicator and the charging indicator.
The battery status indicator is displayed in the upper left corner of the screen.
The battery capacity is sufficient for approximately 50 measurements.
Power indicator light
Power indicator is a small LED positioned next to the ON/OFF button (see p.14). It indicates the power status of the MESI ABPI MD device. Possible statuses are shown in the table below.
| Power indicator light color | Power indicator status |
|---|---|
| No light | The MESI ABPI MD device is turned off + The battery is not charging |
| 🟩 Green | The MESI ABPI MD device is turned on + The battery is not charging (It means that the device is fully charged or the device operates on battery) |
| 🟧 Orange | The MESI ABPI MD device is turned on + The battery is charging |
| 🟥 Red | The MESI ABPI MD device is turned off + The battery is charging |
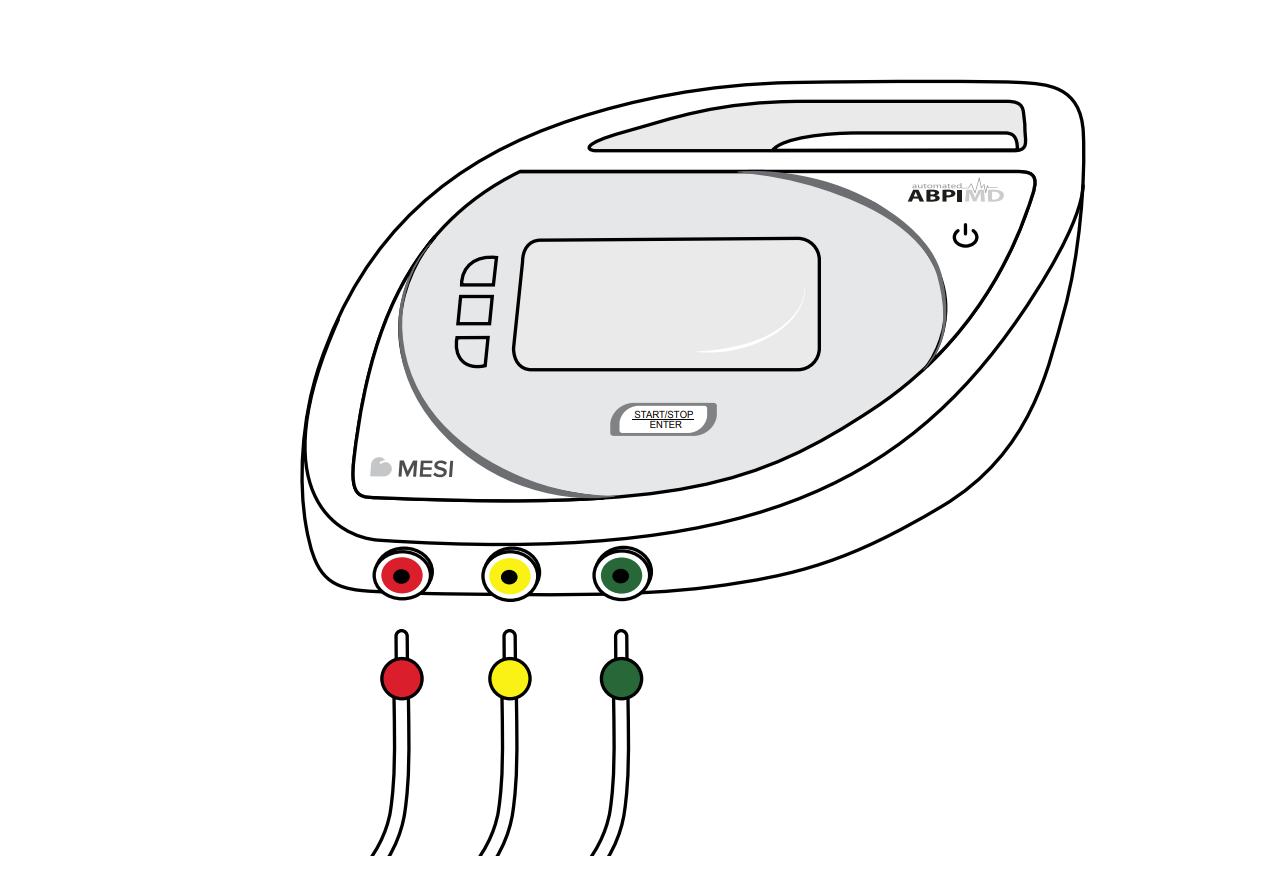
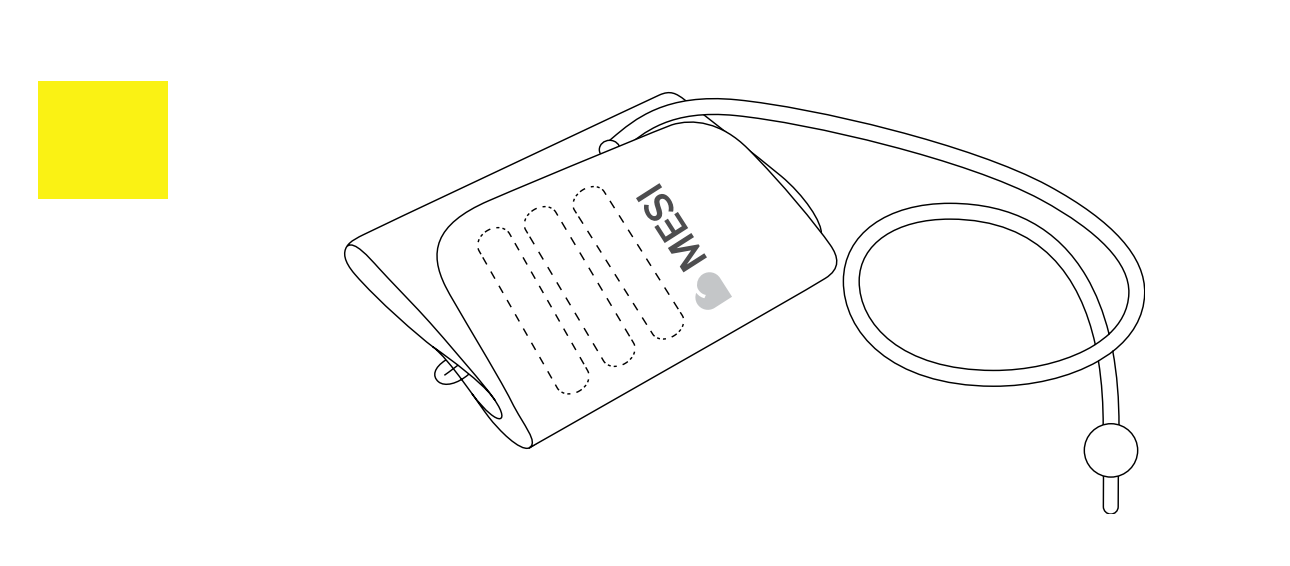
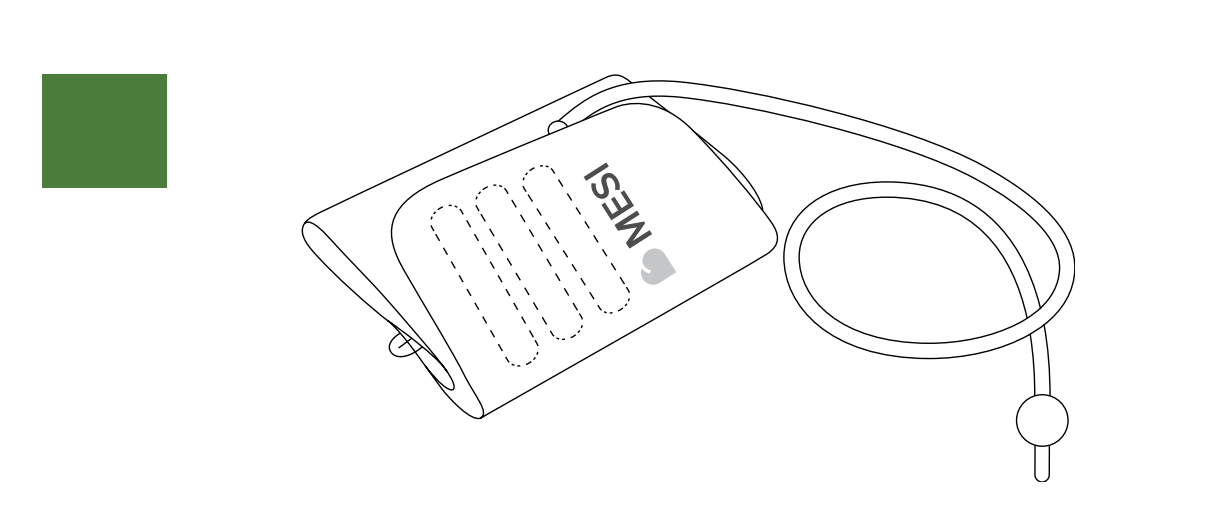
5.4 Cuff setup
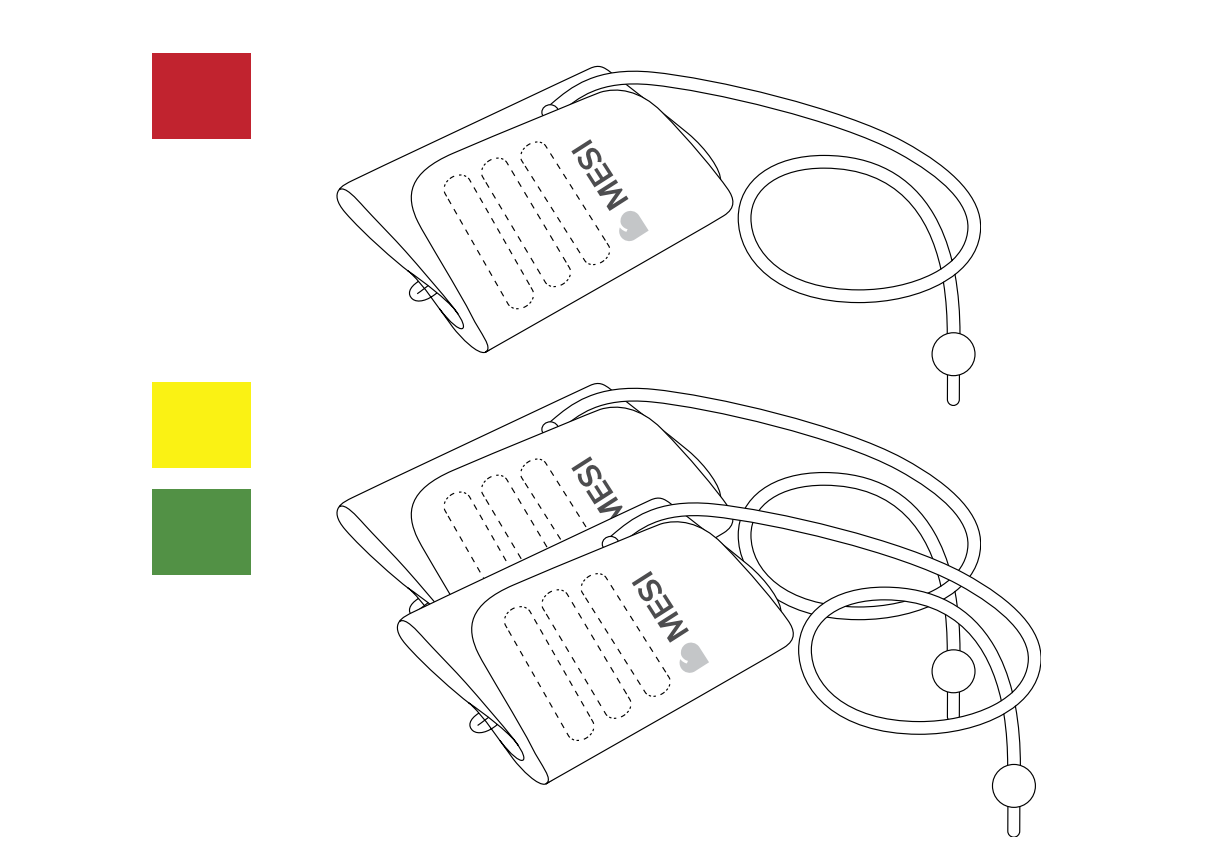
When the MESI ABPI MD is positioned correctly, i.e. on flat surface, you can connect the cuffs and begin the measurement. The cuffs, tubes and connectors are of different colours to enable the correct placement and connection of the cuffs. For a successful and correct measurement, all three cuffs must be connected and placed correctly on all three limbs in accordance with the instructions for use.
Colour markings on individual cuffs:
RED > left or right upper arm
YELLOW > lower left leg
GREEN > lower right leg
The proper placement of the cuffs is of vital importance to ensure valid measurement results.
NOTE: Use moderate force to attach and remove the cuffs.
NOTE: When you connect the tubes of the cuffs, make sure that the air flow is not obstructed in any way. Obstructing the air flow is as easy as accidentally placing an object on the tube.
Before using the cuffs, check the following:
the inflatable pocket must be fitted in the cuff correctly;
the inflatable pocket is not twisted or turned the wrong way;
the tube of the cuff is not twisted or otherwise inappropriately bent.
Connect each cuff to the device by connecting the plug on the tube to the corresponding socket. Remove it by pulling it out of the device – be careful to pull it by the plug, and not by the tube.
5.5 Choosing the appropriate cuf
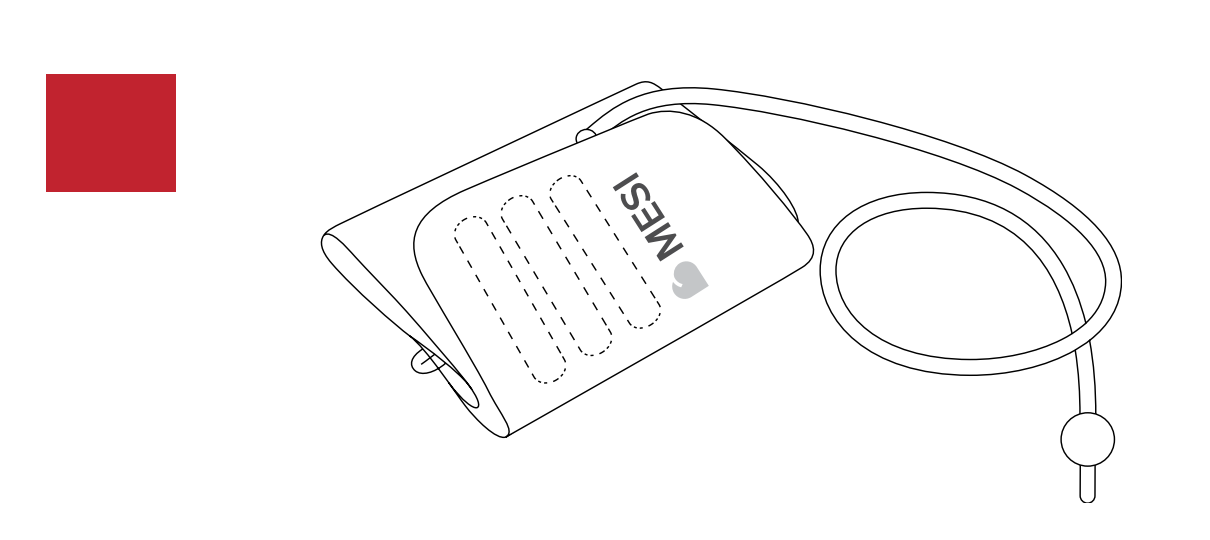
The basic package includes three different cuffs for placement on the upper arm and the lower left and right legs.
Model: ABPIMDACFFSM
Description: MESI ABPI MD Cuff Set M
Limb circumference: 22–32 cm
Additional cuffs are also available for measurement on limbs with a larger circumference. They are available only together in a set. It is possible to choose between different cuff model numbers.
Model: ABPIMDACFFSL
Description: MESI ABPI MD Cuff Set L
Limb circumference: 32–42 cm
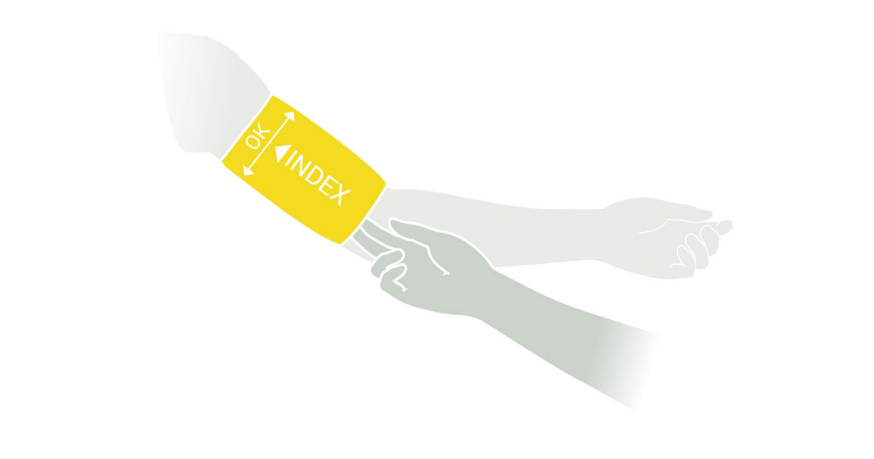
Check the markings on the cuffs to choose the correct cuff size. The cuff will fit the limb if the INDEX mark is within the area delineated by the arrows. If the cuff size is incorrect, choose a more appropriate size from the list above.
NOTE: Each cuff is intended for placement on a specific limb. By placing a cuff on the wrong limb, you can affect the accuracy of the measurement results.
5.6 Arm cuf
Ensure that the cuff fits by choosing the appropriate cuff size according to the circum ference of the patient’s arm. Use the table in Chapter 5.5 Choosing the appropriate cuff.
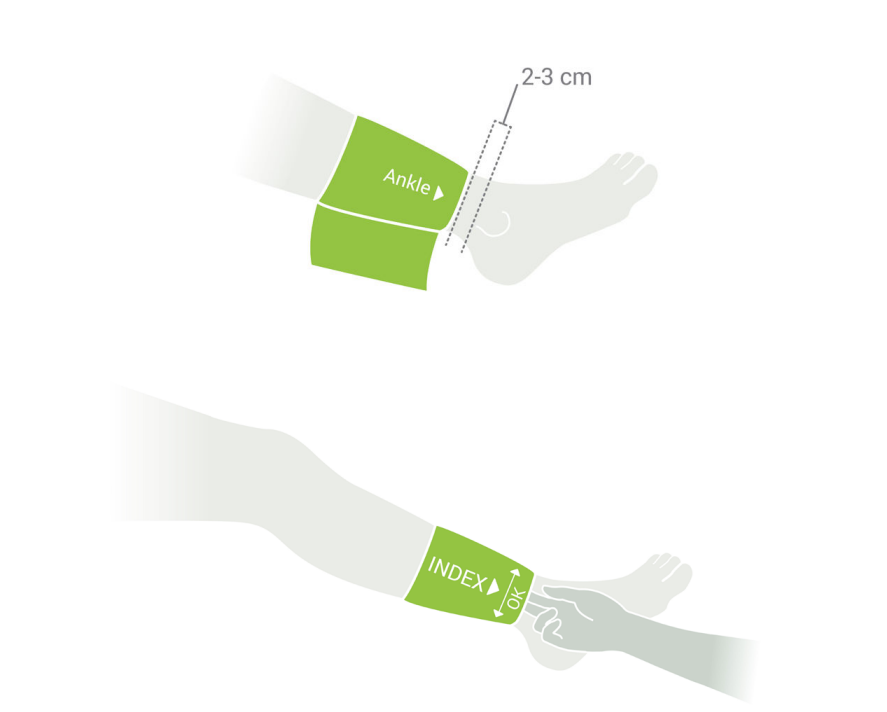
Choose a cuff labelled ARM CUFF of the appropriate size. Check that you have chosen the correct size using the INDEX marking and the OK area on the cuff.
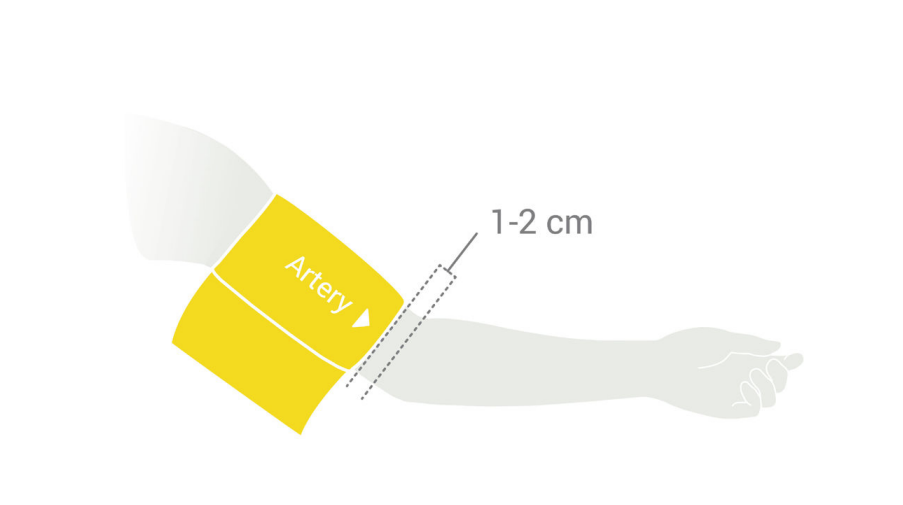
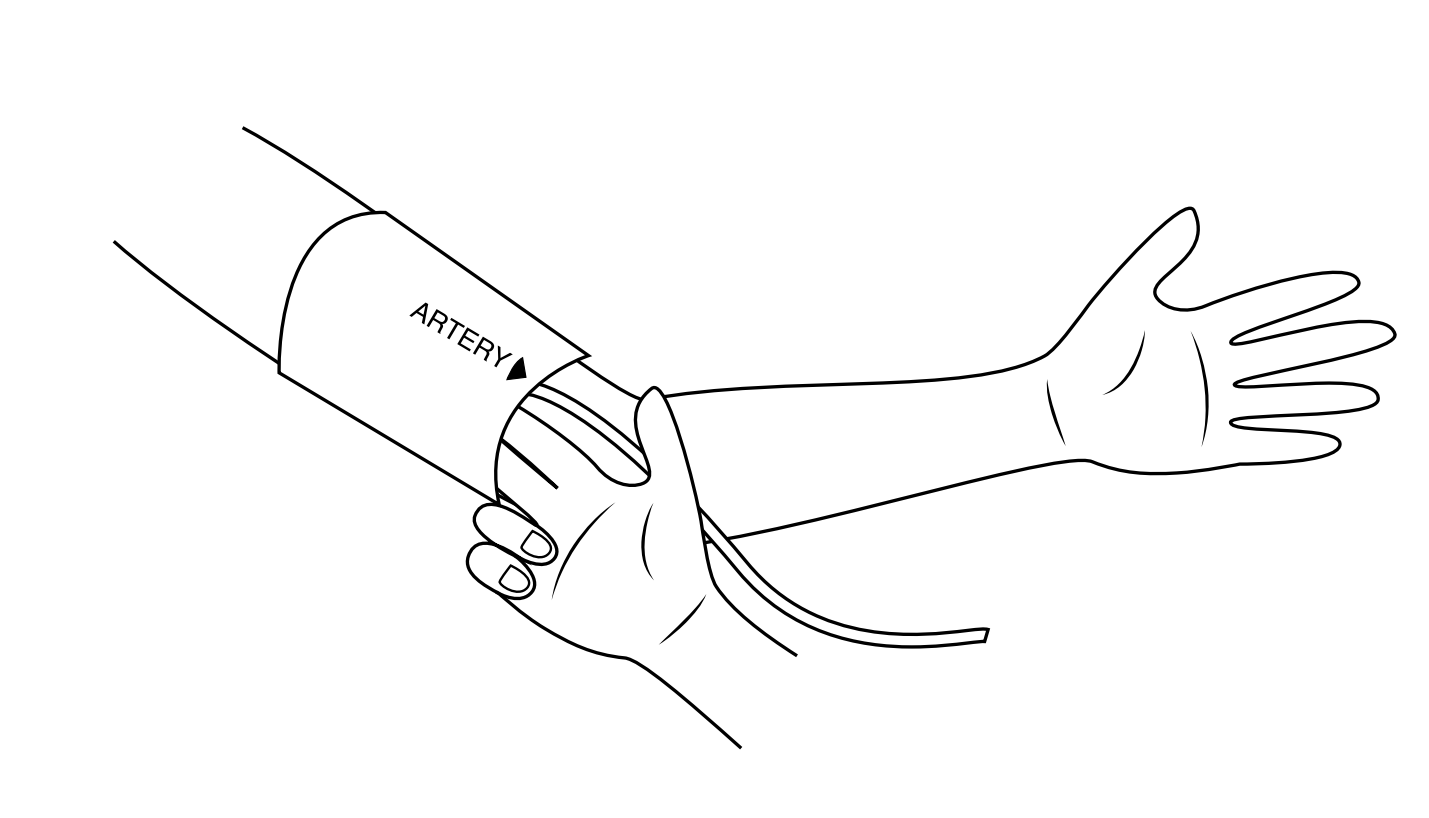
Place the cuff on the upper left or right arm. Make sure that the arrow shaped artery marking is in line with the brachial artery. The cuff tube should point towards the fingers.
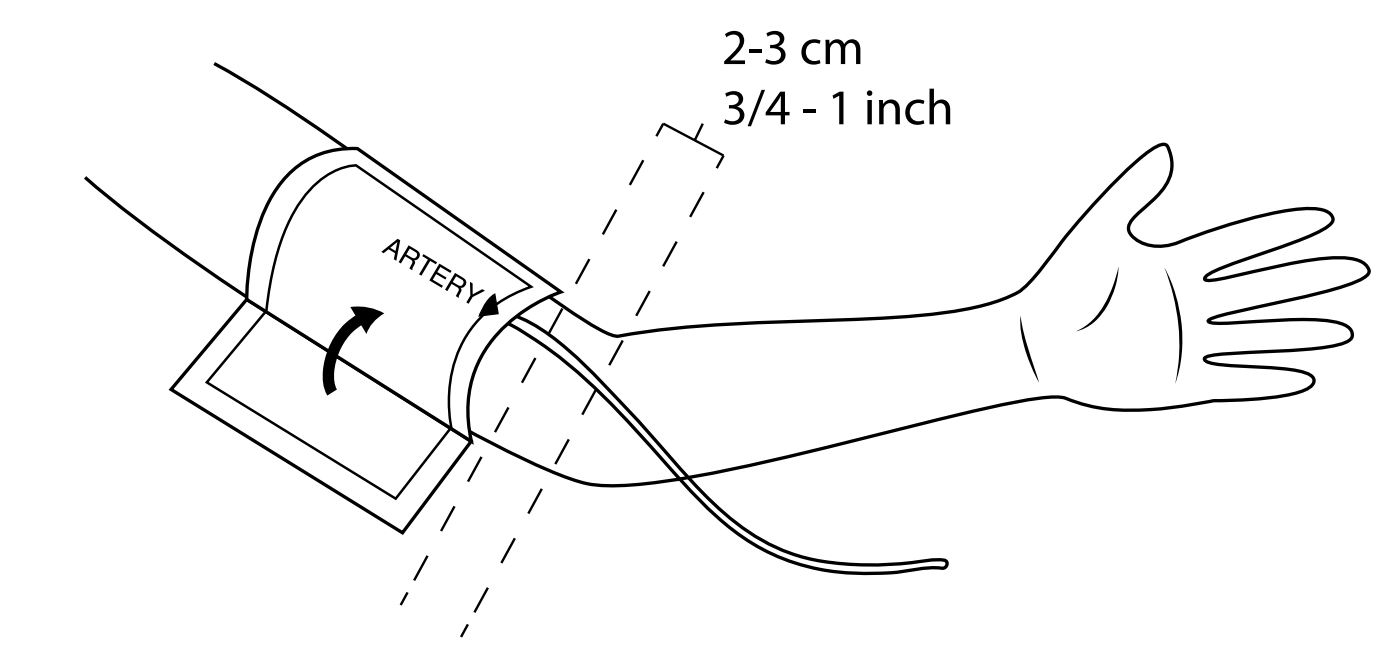
Wrap the cuff around the arm and fasten it. Make sure that the lower edge of the cuff is approximately 2 to 3 cm above the elbow. The cuff must not be obstructed by clothing. When fastening the cuff, make sure that there is a finger’s width of room between the cuff and the arm.
5.7 Left ankle cuff
Ensure that the cuff fits by choosing the appropriate cuff size according to the circumference of the patient’s lower left leg. Use the table in Chapter 5.5 Choosing the appropriate cuff.
Choose a cuff labeled LEFT ANKLE CUFF of the appropriate size. Check that you have chosen the correct size using the INDEX marking and the OK area on the cuff.
Place the cuff on the lower left leg. Make sure that the arrow-shaped MEDIAL ANKLE marking points towards the inner side of the ankle. The cuff tube should point towards the knee.
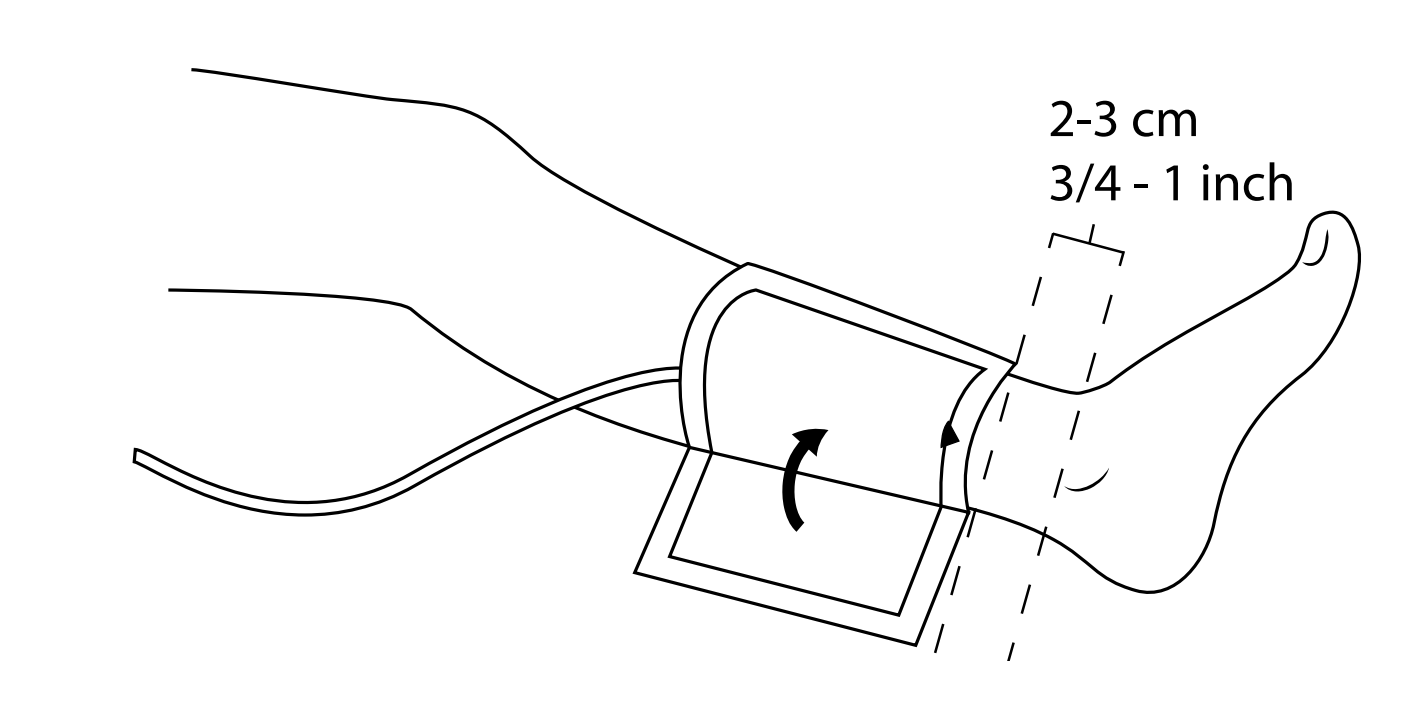
Wrap the cuff around the ankle and fasten it. Make sure that the lower edge of the cuff is approximately 2 to 3 cm above the ankle. The cuff must not be obstructed by clothing. When fastening the cuff, make sure that there is a finger’s width of room between the cuff and the leg.
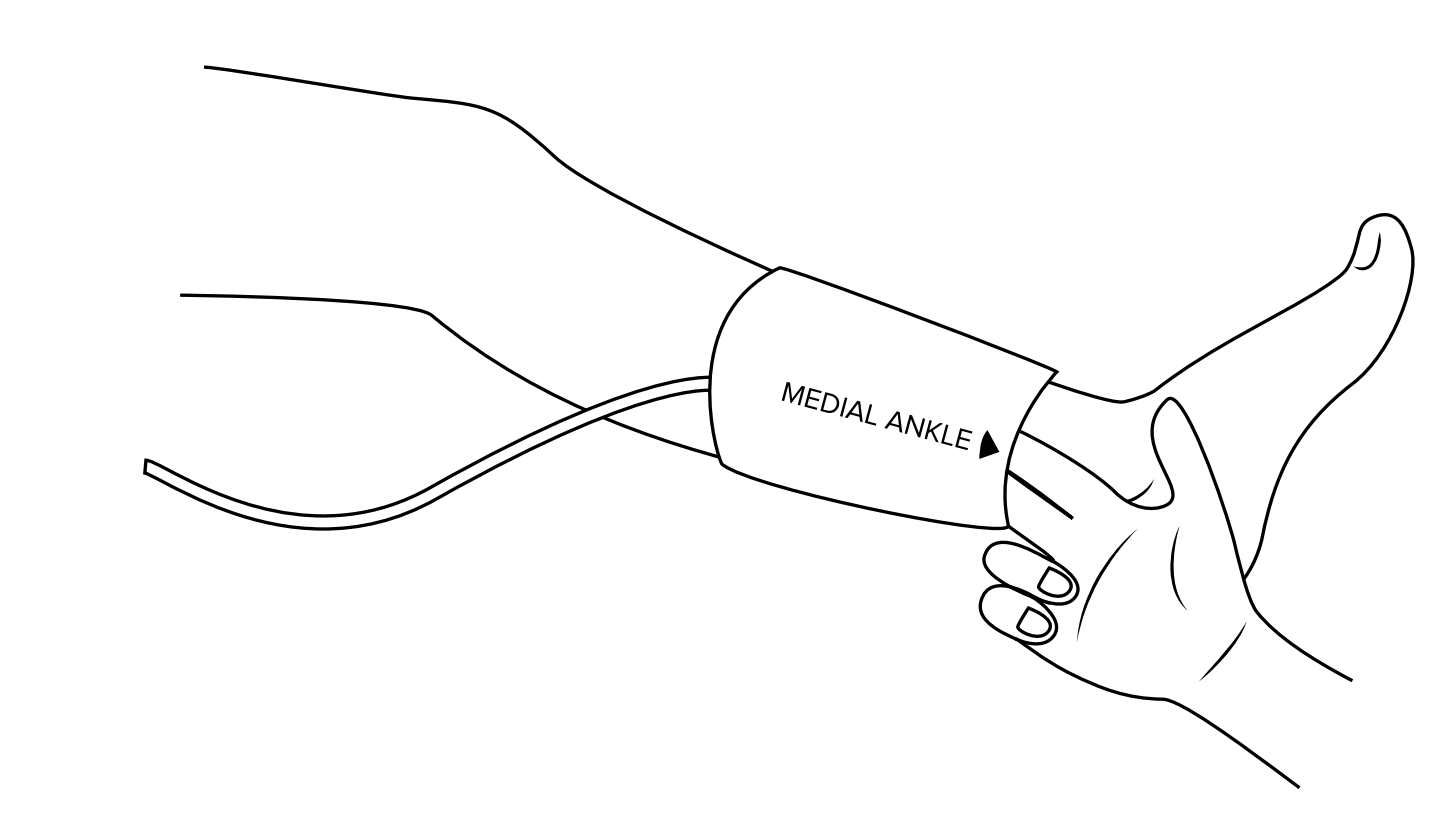
5.8 Right ankle cuff
Ensure that the cuff fits by choosing the appropriate cuff size according to the circumference of the patient’s lower right leg. Use the table in Chapter 5.5 Choosing the appropriate cuff.
Choose a cuff labelled RIGHT ANKLE CUFF of the appropriate size. Check that you have chosen the correct size using the INDEX marking and the OK area on the cuff.
Place the cuff on the lower right leg. Make sure that the arrow-shaped MEDIAL ANKLE marking points towards the inner side of the ankle. The cuff tube should point towards the knee.
Wrap the cuff around the ankle and fasten it. Make sure that the lower edge of the cuff is approximately 2 to 3 cm above the ankle. The cuff must not be obstructed by clothing. When fastening the cuff, make sure that there is a finger’s width of room between the cuff and the leg.
5.9 Ankle-Brachial Pressure Index measurement
NOTE: It is recommended for the patient to lie still for at least 5 minutes before starting the measurement process. During the measurement, the patient must lie completely flat, must be relaxed and must not talk. They must not cross their legs.
NOTE: The person carrying out the measurement should remain by the patient’s side at all times and closely monitor the measurement process.
NOTE: The measurement of the Ankle-Brachial Pressure Index can be affected by the placement of the cuffs, the position of the patient and their physical condition. The functioning of the device can also be affected by high temperatures, humidity and altitudes.
NOTE: If the results of the Ankle-Brachial Pressure Index measurement are very unusual, repeat the measurement three times.
You can begin measuring the Ankle-Brachial Pressure Index when the cuffs are correctly positioned on the patient lying down and when the connections have been checked and any potential air flow obstructions in the tubes have been eliminated.
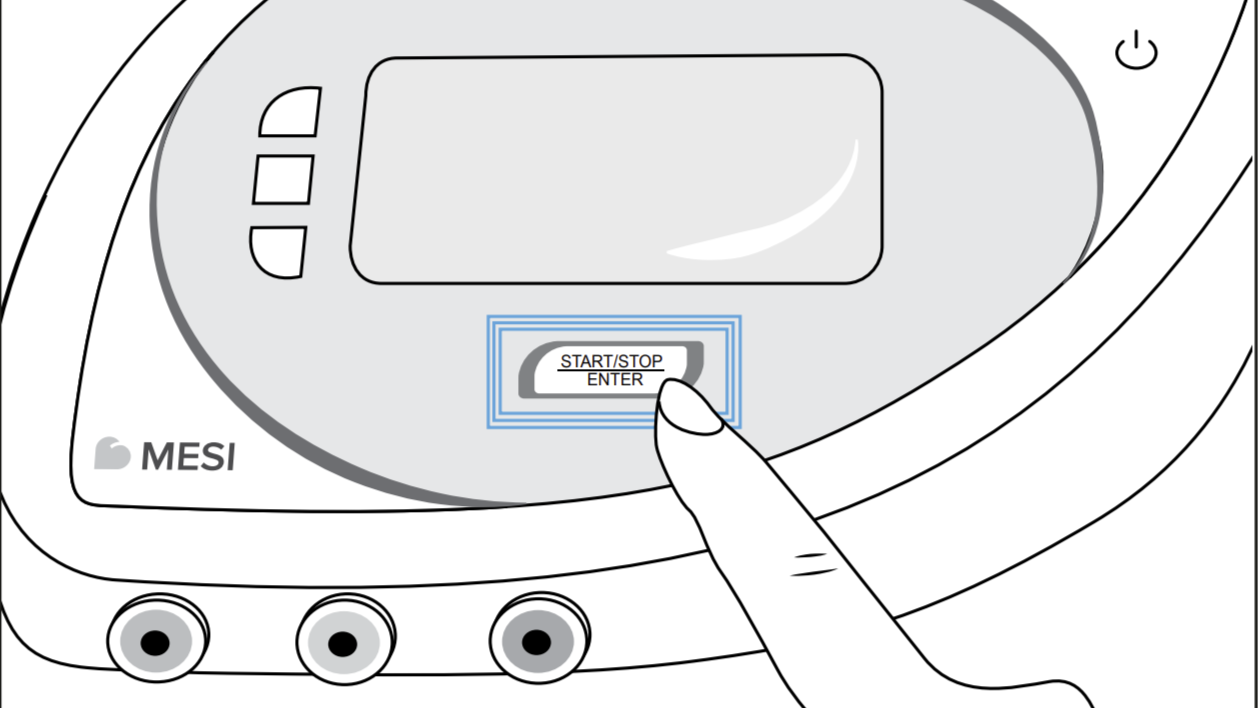
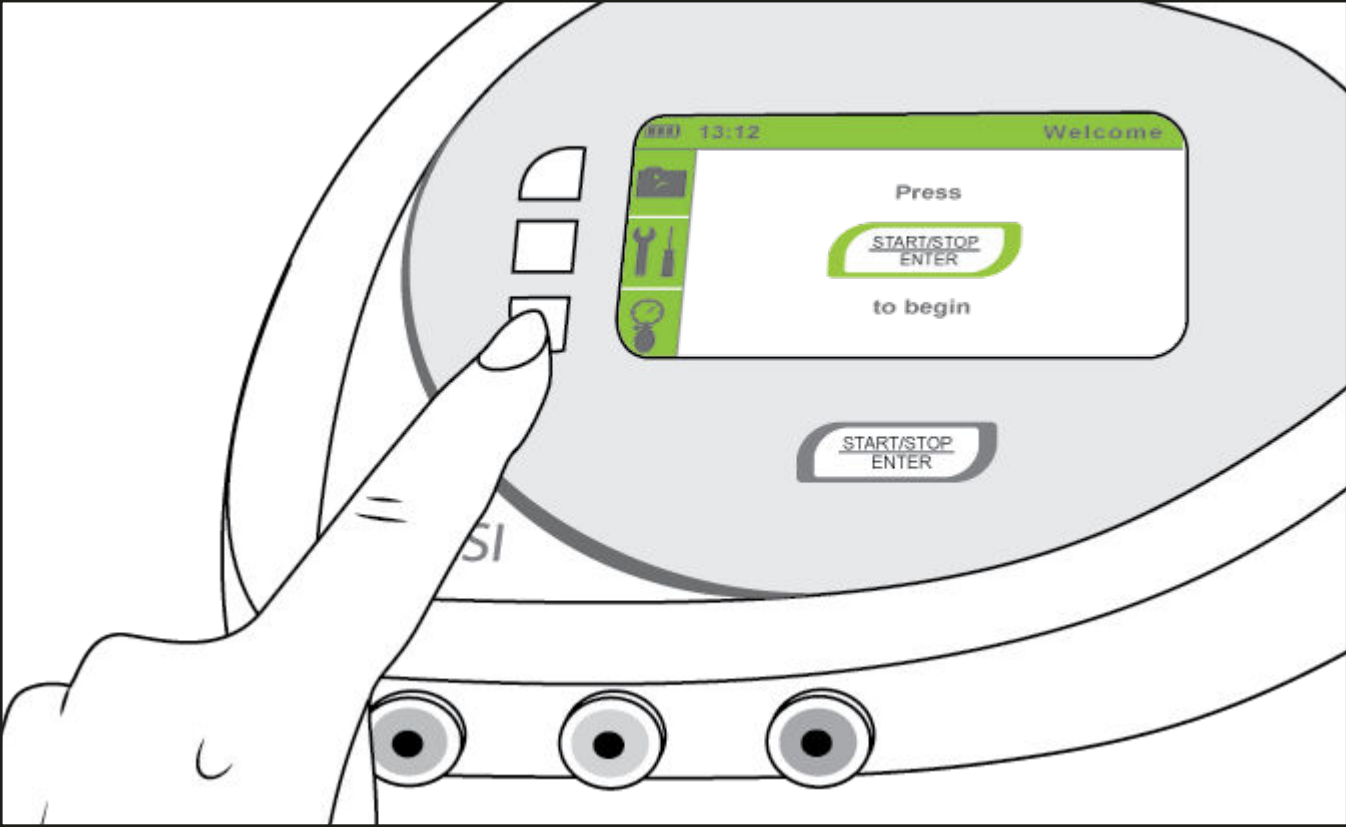
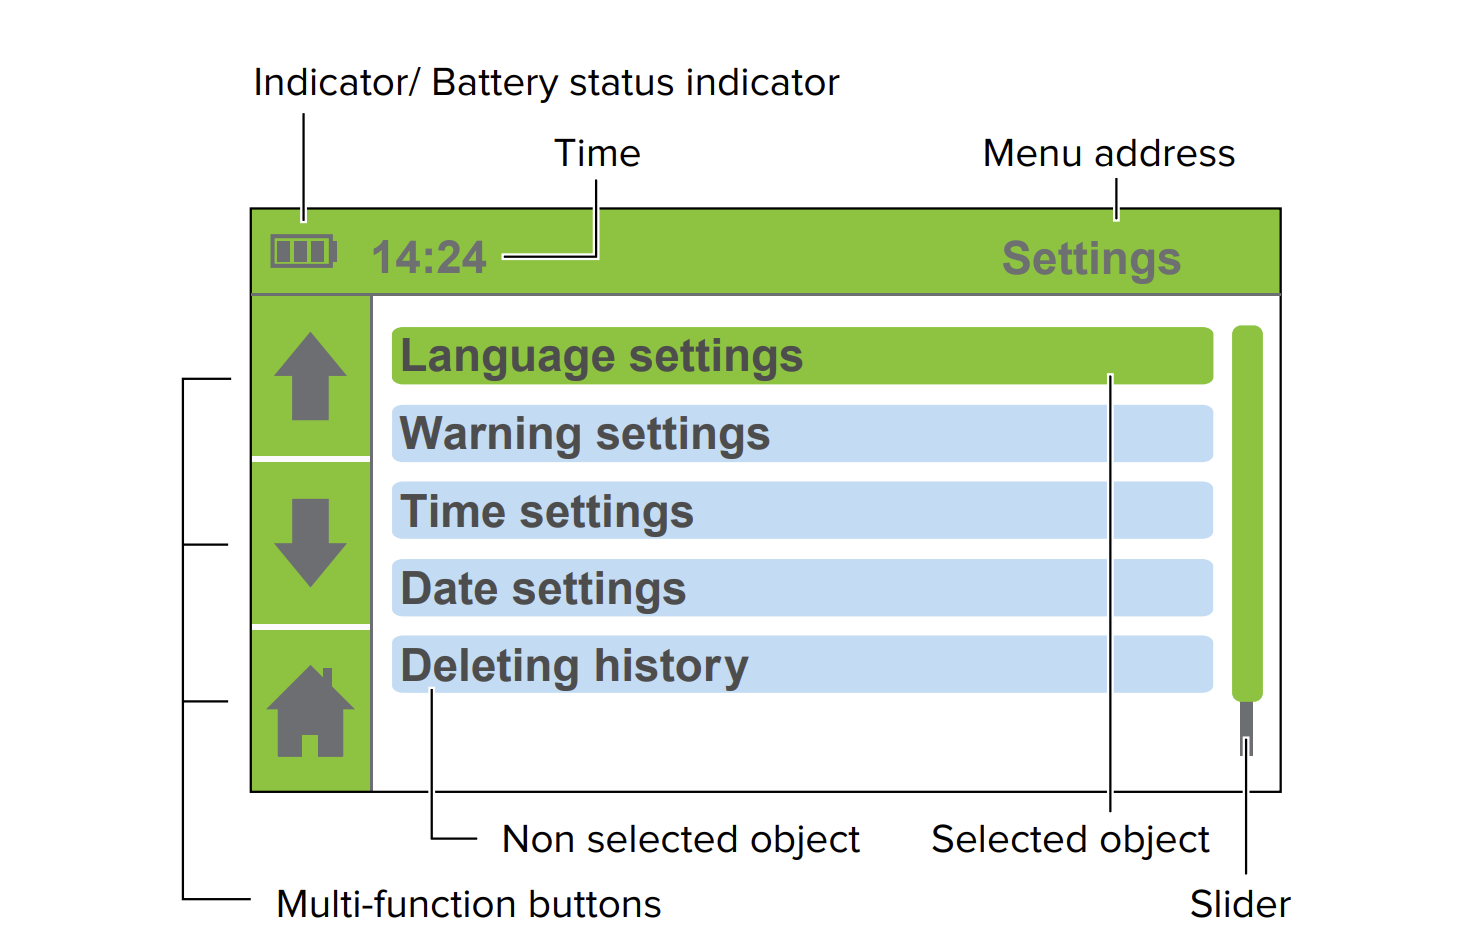
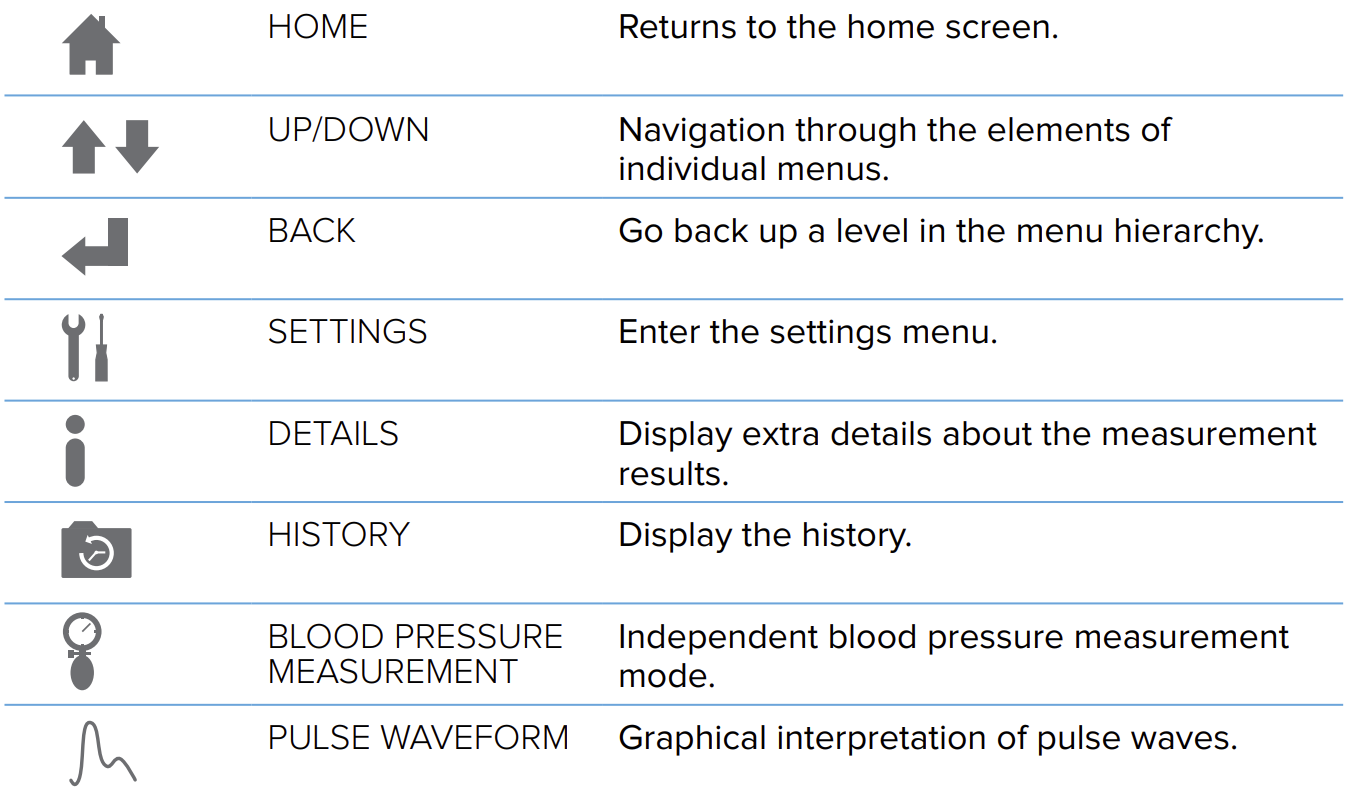
Turn the device on. The display will show the home menu. If the home menu is not displayed or if another menu is displayed, push the BACK or the HOME button until you get to the Start menu (right image). To begin the measurement process, push the START button.
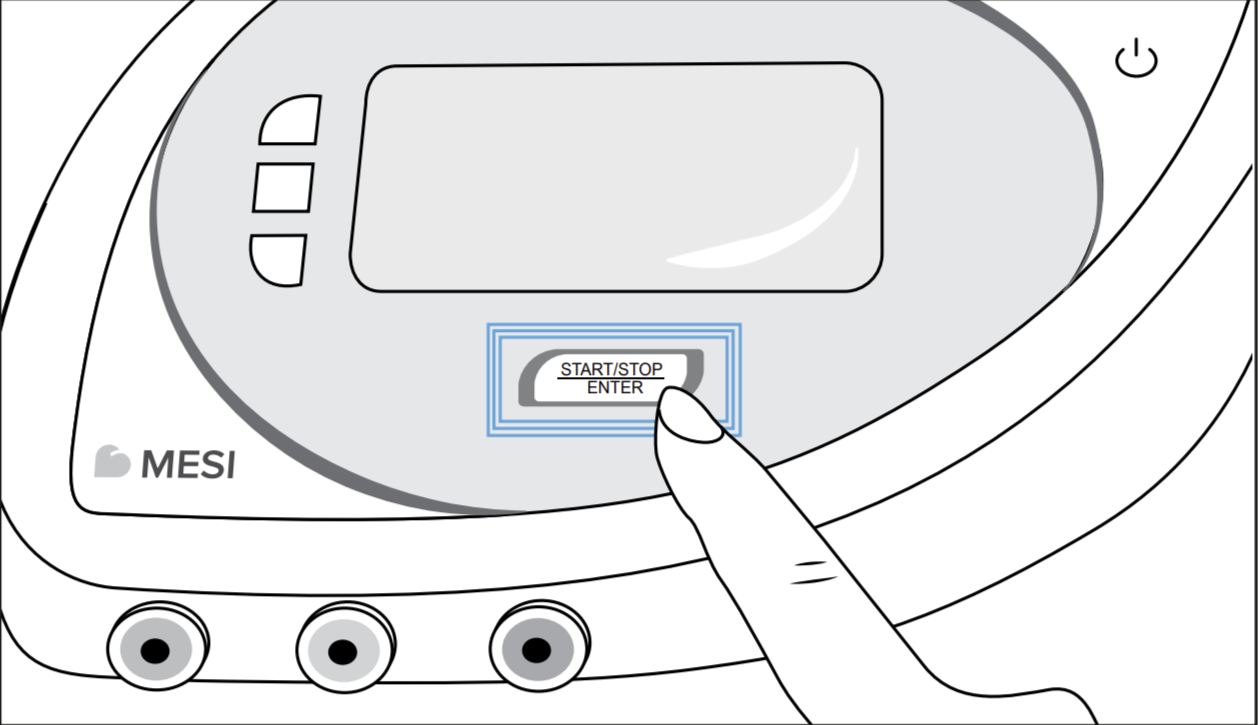
NOTE: If the measurement process must be interrupted for any reason (e.g. the patient is not feeling well), push the START/STOP button immediately. The measurement process will be stopped and the cuffs will be deflated. If the cuffs are not deflated despite the process being stopped, immediately disconnect the cuffs tubes from the device.
NOTE: Maximum allowed measurement time before displaying an error message is 180s.
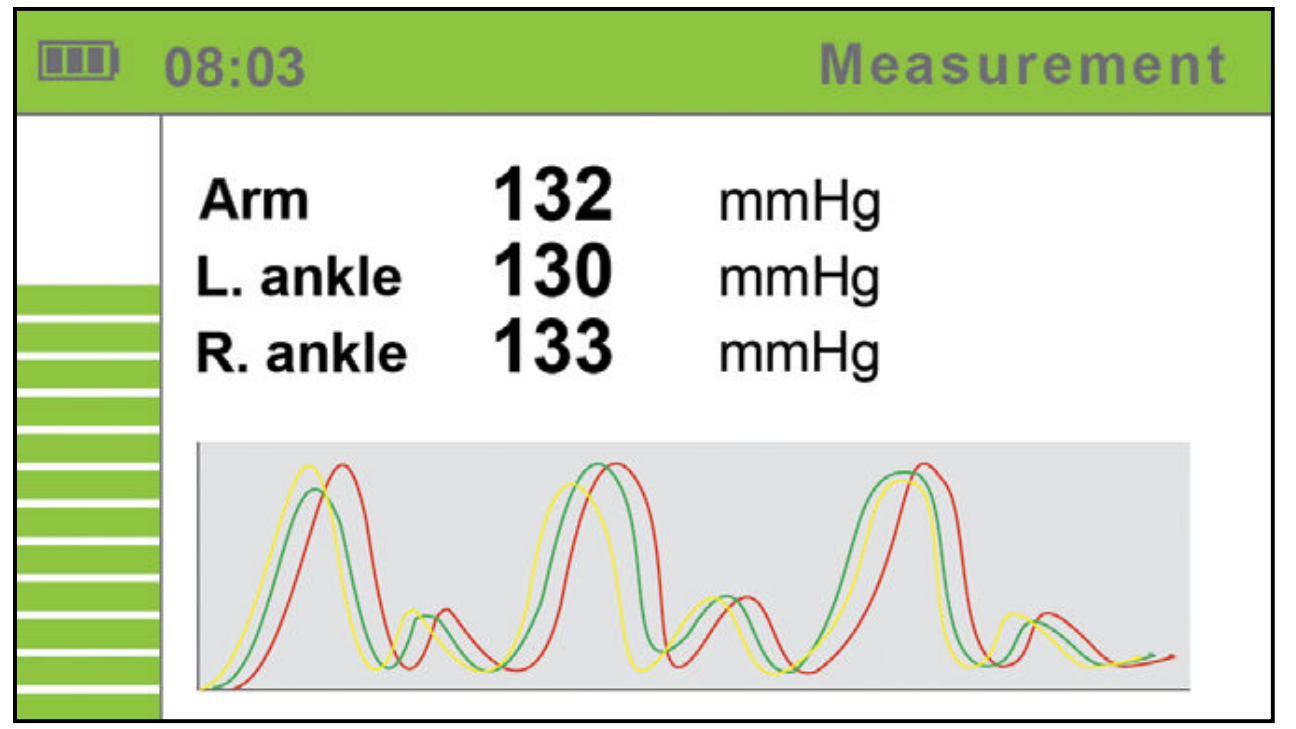
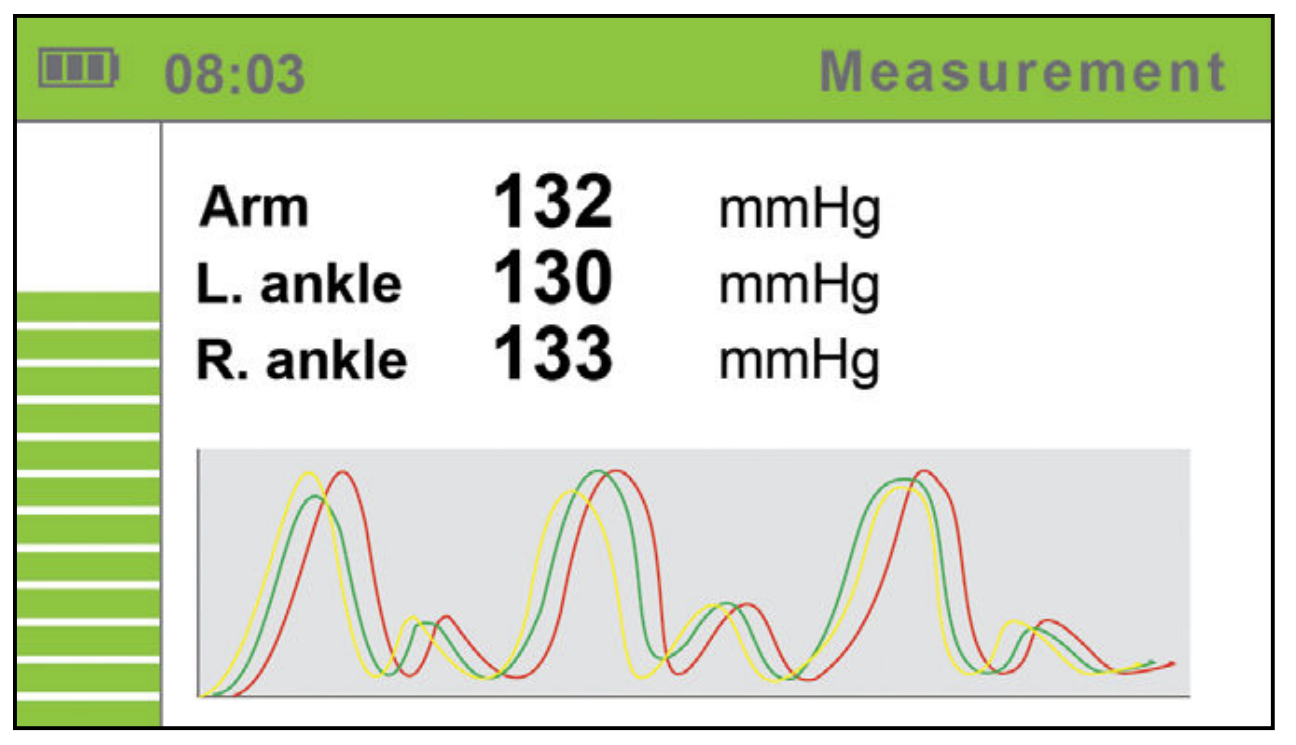
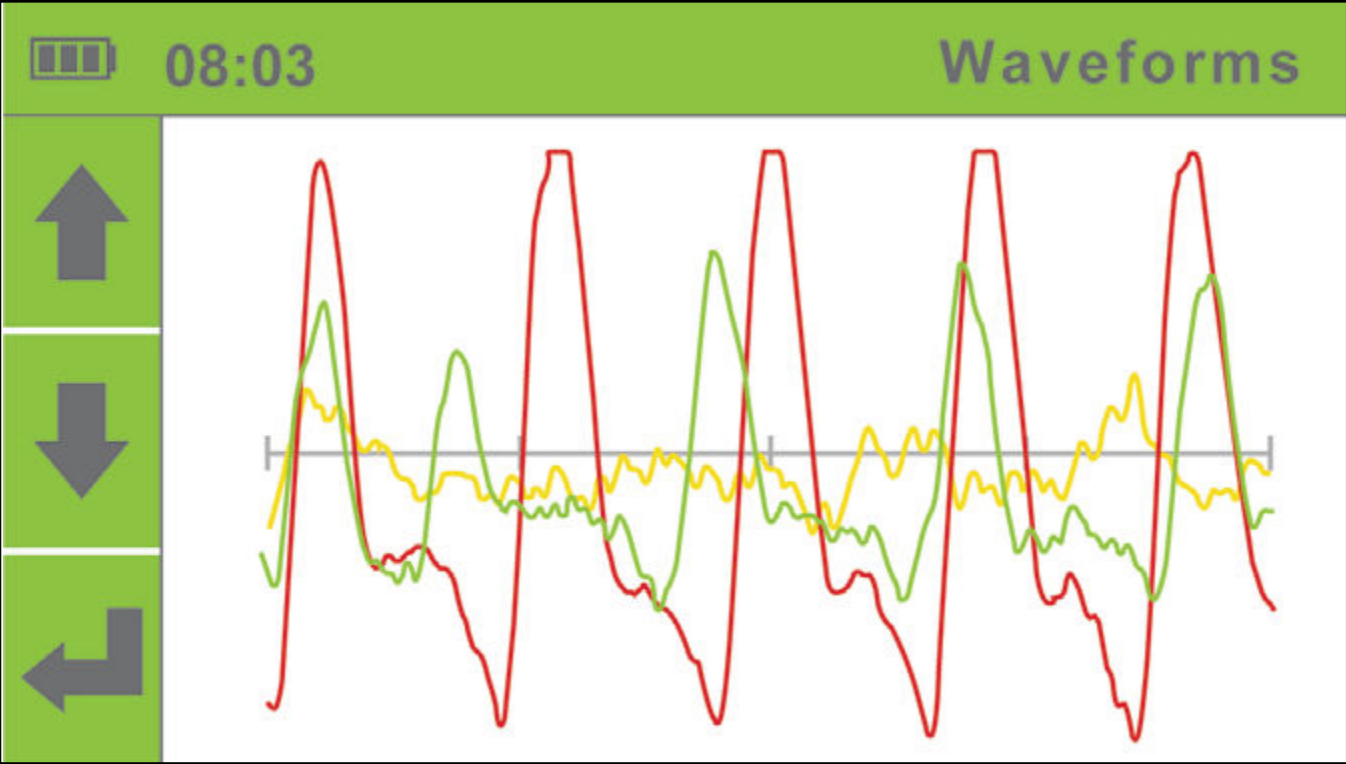
During measurement, the screen displays the current pressure in the cuff for each limb separately and the pressure waveforms on which the red curve shows the oscillation of pressure in the upper arm, the green curve shows the oscillation of the right ankle and the yellow curve shows the oscillation of the left ankle. The left side of the screen displays a bar with a timer which displays the remaining measurement time.
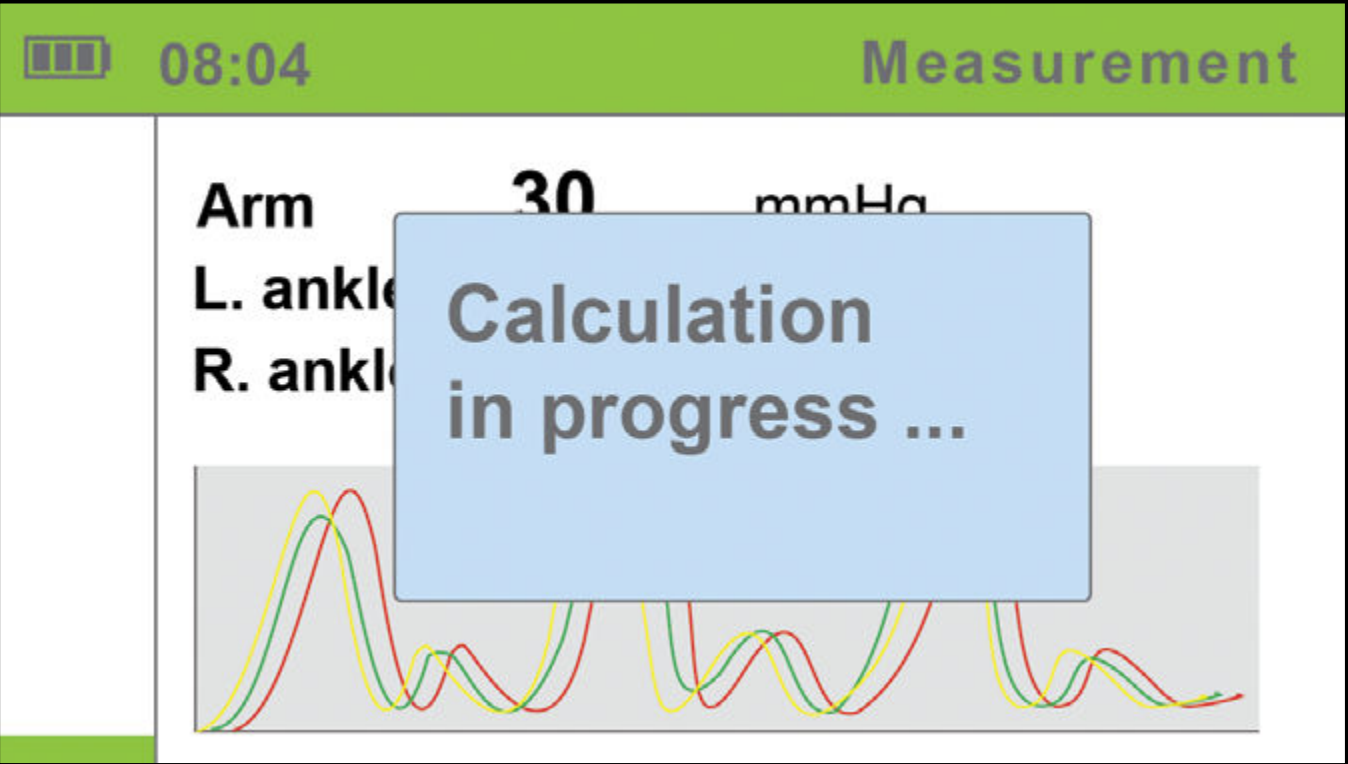
The device will determine the upper limit pressure for cuff inflation on the basis of the monitoring of the pressure dynamics during inflation. As pressure data is actively captured while the cuffs are deflated, the patient must remain still. The measurement result processing begins when the cuffs are deflated, i.e. when the screen displays the corresponding message (right image).
During the measurement or when the results are displayed, a warning can be displayed on the screen. If an error occurs during the measurement process, a warning will be displayed in a blue box and the measurement will stop automatically. The box will display the name of the warning or error with a short description. For detailed descriptions of warnings and errors, see Chapter 5.13 Error messages.
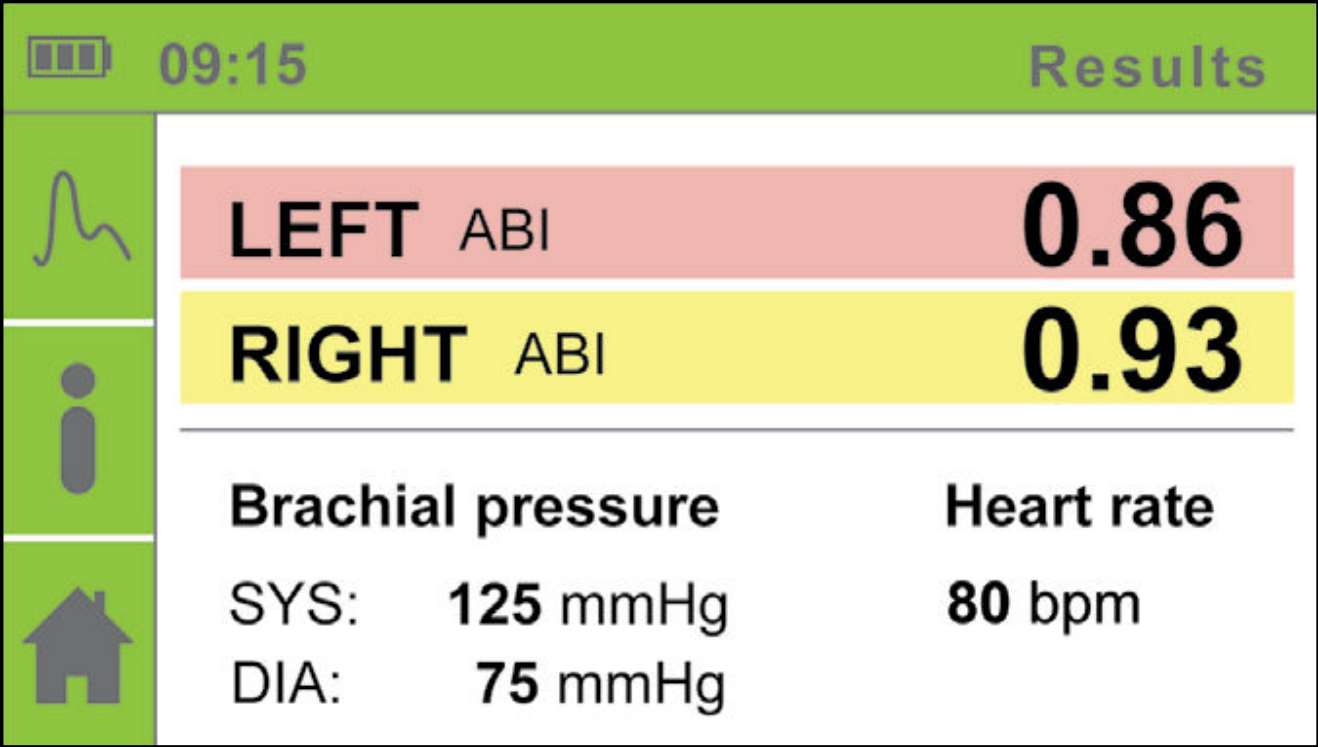
You may now remove the cuffs. The patient may move freely now. The calculation of the measurement results takes a couple of seconds, while the entire measurement process including the calculation process takes approximately a minute. After the calculation is completed, the device displays the results on the screen: the left and the right Ankle-Brachial Pressure Index, the upper arm pressure and the heart rate.
To prepare the device for further measurement, push the HOME button , or push the START button to immediately start a new measurement. The device stores the measurement data in its memory, and you can see it using the HISTORY menu.
In case of “Abnormally weak pulse” result, or in case of a calculation error, a warning will be displayed along with the measurement results. For a detailed description of the detection of severe PAD or incompressible arteries (medial calcinosis), please see chapter 5.9.1 Detection of severe PAD and incompressible arteries on page 27.
For a detailed description of warnings and errors, see Chapter 5.13 Error messages.
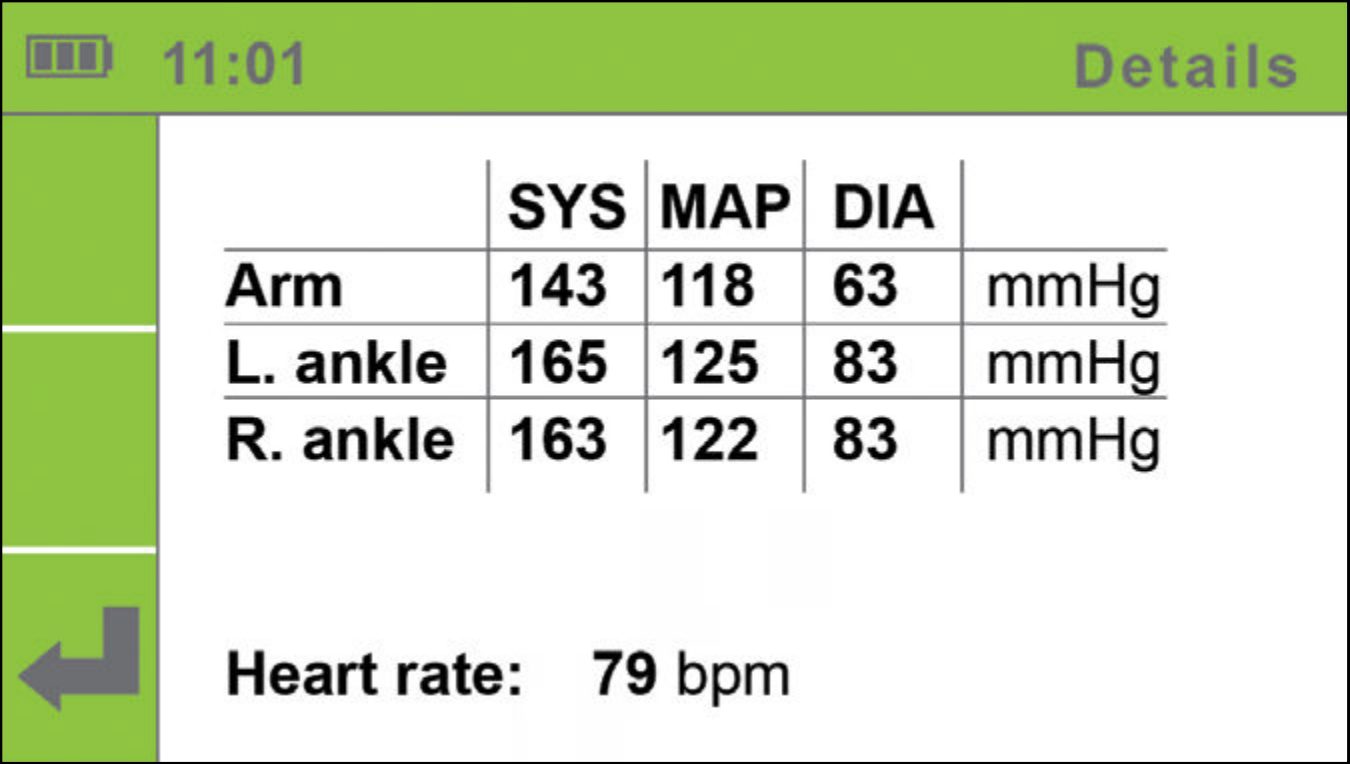
For additional information on the measurement results, push the DETAILS button ℹ️.
To display the pulse waveforms, push the PULSE WAVEFORM button.
5.9.1 Detection of severe PAD and incompressible arteries
When the result “Abnormally weak pulse” is displayed, there is a high probability of severe Peripheral Arterial Disease (PAD) or incompressible arteries (Medial Calcinosis).
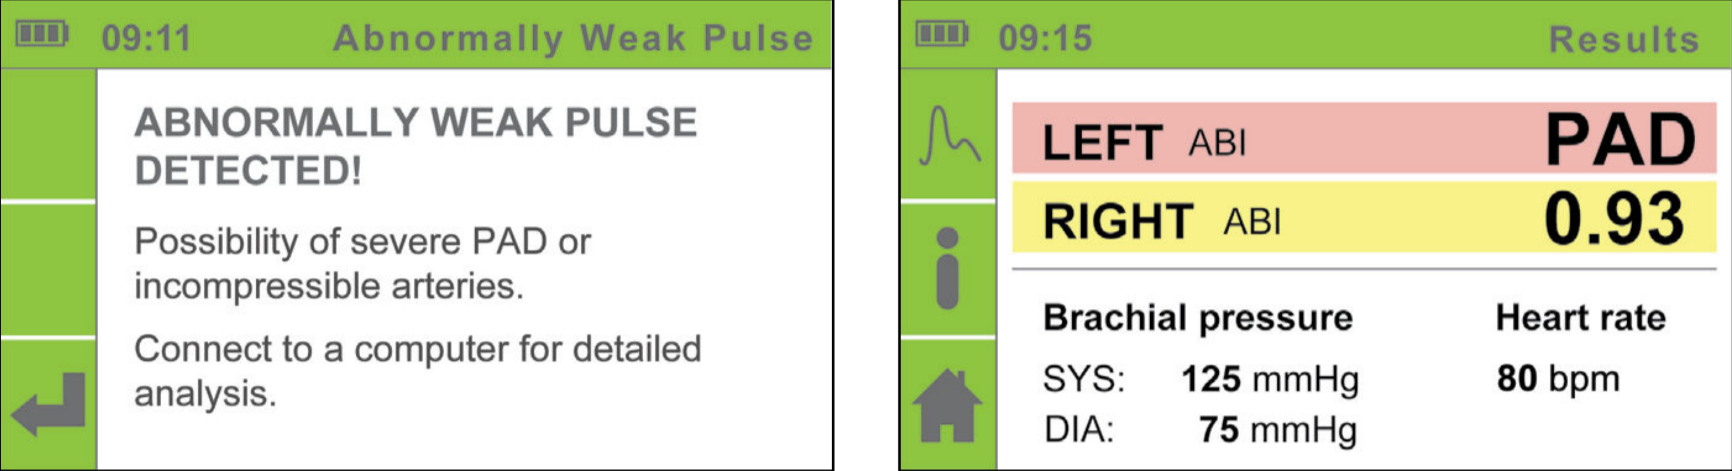
NOTE: The majority of the “Abnormally weak pulse” results describe the patients with ABPI around or lower than 0,5.
NOTE: If an “Abnormally weak pulse” message is displayed, it is recommended to repeat the measurement with the device connected to the computer using MESIresults software (see page 13). Such use will allow for an interpretation of full pulse waveforms (See example below).
NOTE: In case of Medial Calcinosis, the arteries cannot be compressed due to stiff arterial walls. The measurement of Blood Pressure with cuffs is not possible, and therefore the ABPI cannot be reliable. The patient should be referred for a Toe Brachial Index measurement.
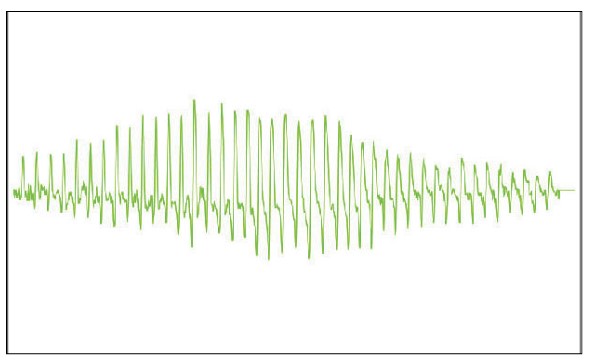
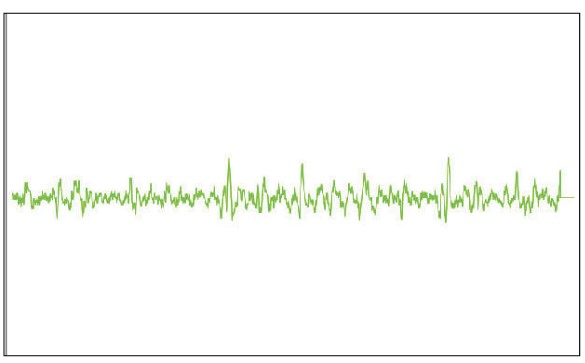
Pulse waveform example:
Normal pulse waveform example:
Severe PAD pulse waveform example:
Incompressible arteries pulse waveform example:
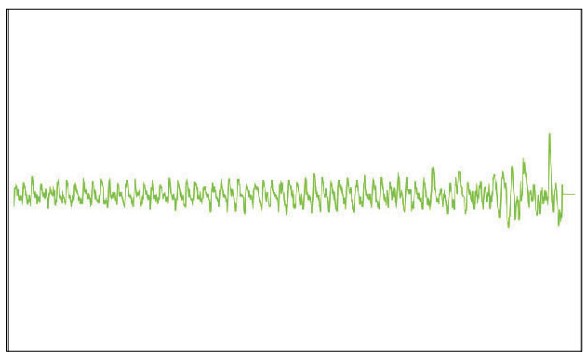
NOTE: When observing the the pulse waveform, the peaks representing the heartbeats should be equally spaced. Deviations can suggest patient movement or any abnormality, such as atrial fibrillation.
5.9.2 Simultaneous measurement
MESI ABPI MD utilizes a unique “simultaneous measurement”, where the cuffs are positioned on three limbs at the same time. The cuffs inflate and deflate simultaneously, in order to capture the blood pressure in all extremities in a specific moment.
NOTE: Simultaneous measurement with four cuffs instead of three would increase the risk for cardiac overload. (It not advisable to obstruct all four extremities at the same time.)
Three-cuff measurement is provided to allow safe simultaneous measurement of Ankle-Brachial Pressure Index. Simultaneous measurement is essential for the accuracy of the ABPI, because it eliminates the measurement error due to the natural change in human blood pressure.
NOTE: For general population, performing a three-cuff measurement is sufficient. When a difference in the arm blood pressures is suspected, it is advised to place the arm cuff on the other arm and repeat the measurement. The result considered should be the lower ABPI of the two.
NOTE: It is advised to perform the measurement on the right arm, due to lower incidence of subclavian stenosis.
5.10 Upper arm blood pressure measurement
NOTE: It is recommended that the patient sit still for at least 5 minutes before starting the measurement process.
NOTE: The person carrying out the measurement should remain by the patient’s side at all times and closely monitor the measurement process.
NOTE: The measurement of the upper arm blood pressure can be affected by the placement of the cuff, the position of the patient and their physical condition. The functioning of the device can also be affected by high temperatures, humidity and altitudes.
NOTE: If the results of the upper arm blood pressure measurement is not as expected, repeat the measurement three times. Upper arm blood pressure measurement 5.10
NOTE: Before attaching the cuff, remove any tight-fitting clothes or tightly rolled up sleeves on the upper arm. Do not place the cuff on top of thick clothing.
You can begin measuring the upper blood pressure when the cuff is correctly positioned on the sitting patient and when the connections have been checked and any potential air flow obstructions in the tubes have been eliminated.
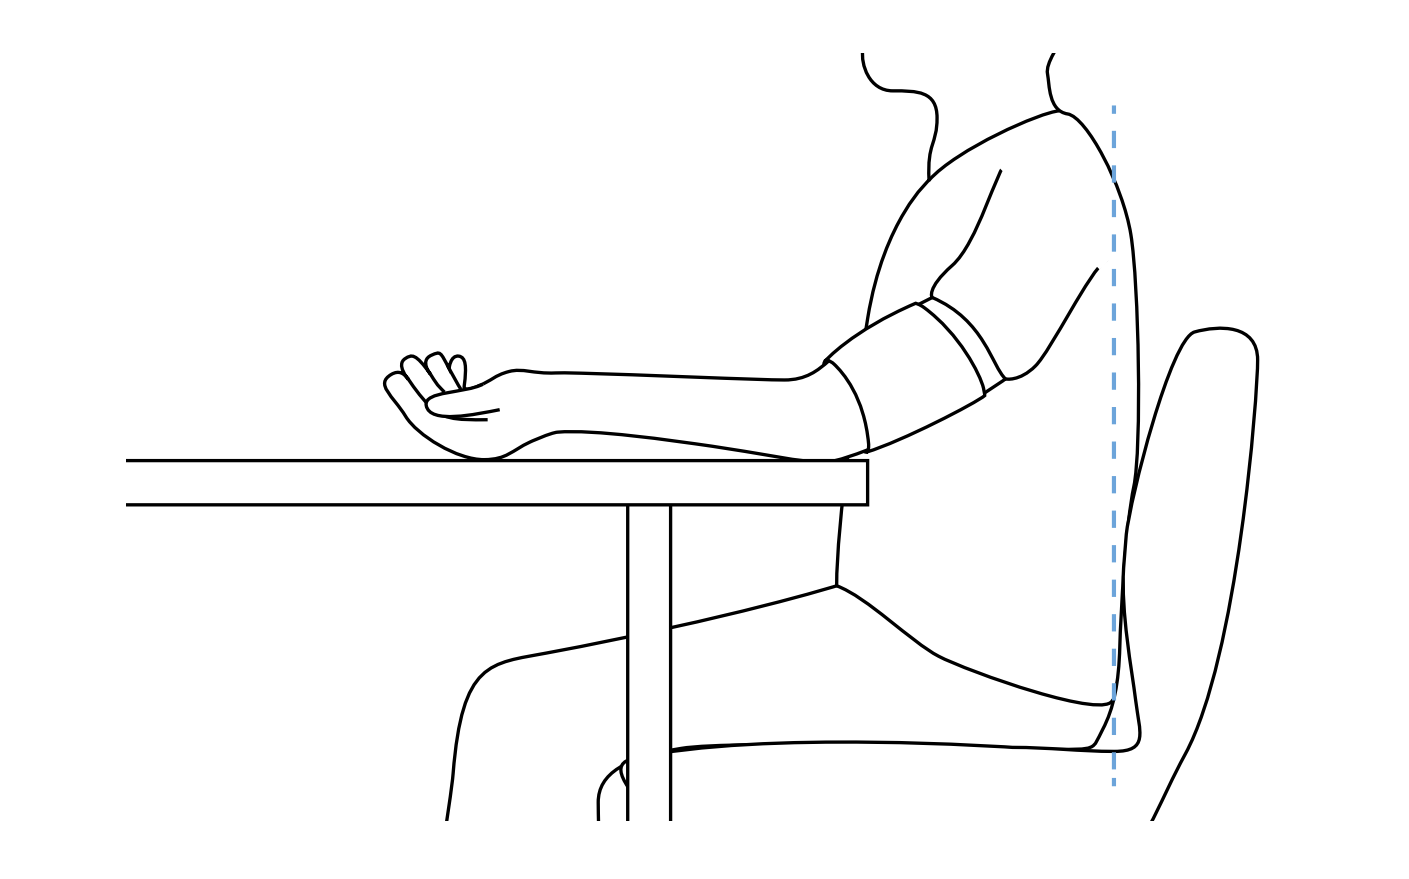
During the measurement, the patient must be correctly seated so that:
They are sitting on a chair with their feet resting flat on the floor.
They are sitting upright, keeping a straight back.
The cuff must be level with the patient’s heart.
For details on the placement of the cuff, see Chapter 5.6 Arm cuff.
NOTE: In the independent blood pressure measurement mode, only place the arm cuff on the patient. The other cuffs must not be attached.
Turn the device on. The display will show the home menu. For upper arm blood pressure measurement, change the operating mode by pushing the BLOOD PRESSURE MEASUREMENT button . A menu will be displayed as in the image below.
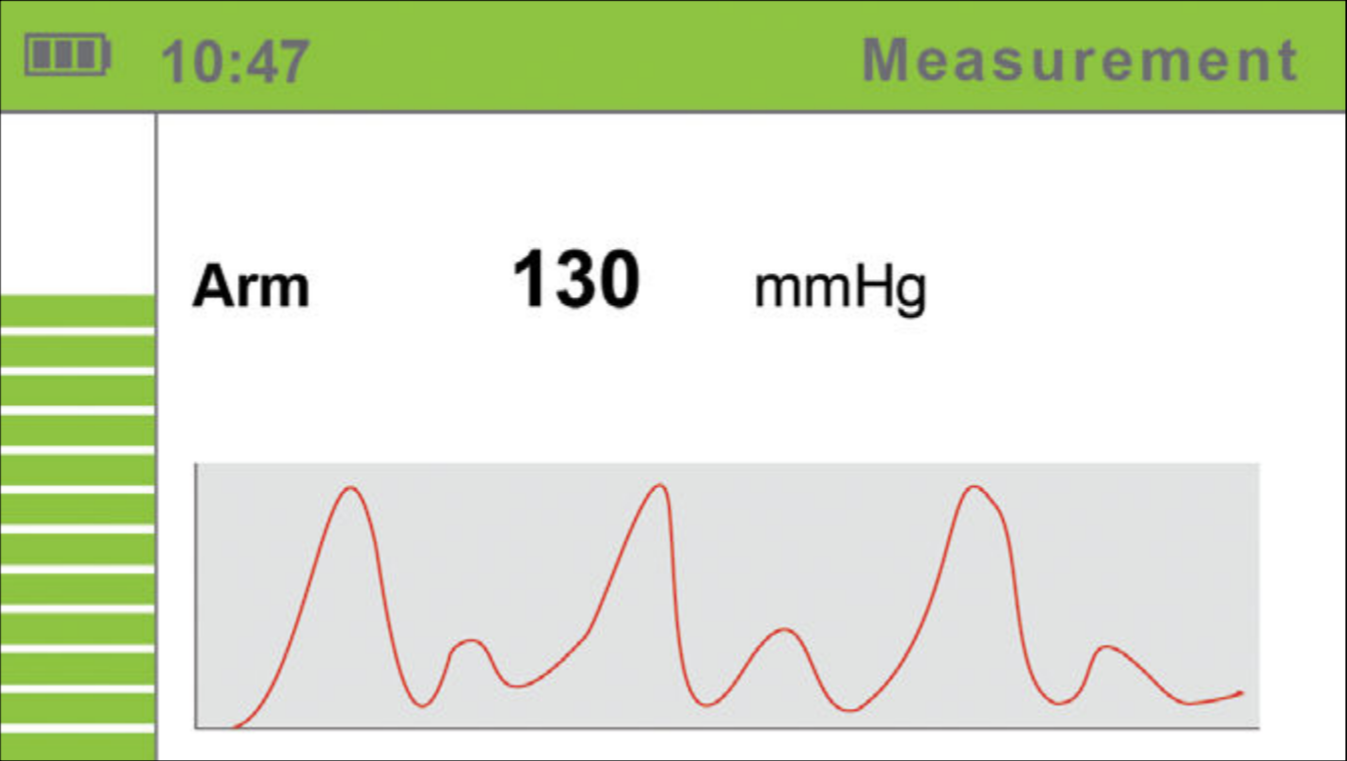
To begin the measurement process, push the START button. During measurement, the screen displays the current pressure in the cuff and the pressure waveform graph. The left side of the screen displays a bar with a timer which displays the remaining measurement time.
The device will determine the upper limit pressure for cuff inflation on the basis of the monitoring of the pressure dynamics during inflation. As pressure data is actively captured while the cuff is deflated, the patient must remain still. The measurement result processing begins when the cuff is deflated, i.e. when the screen displays the corresponding message.
You may now remove the cuff. The patient may move freely now. The calculation of the measurement results takes a couple of seconds, while the entire measurement process including the calculation process takes approximately a minute.
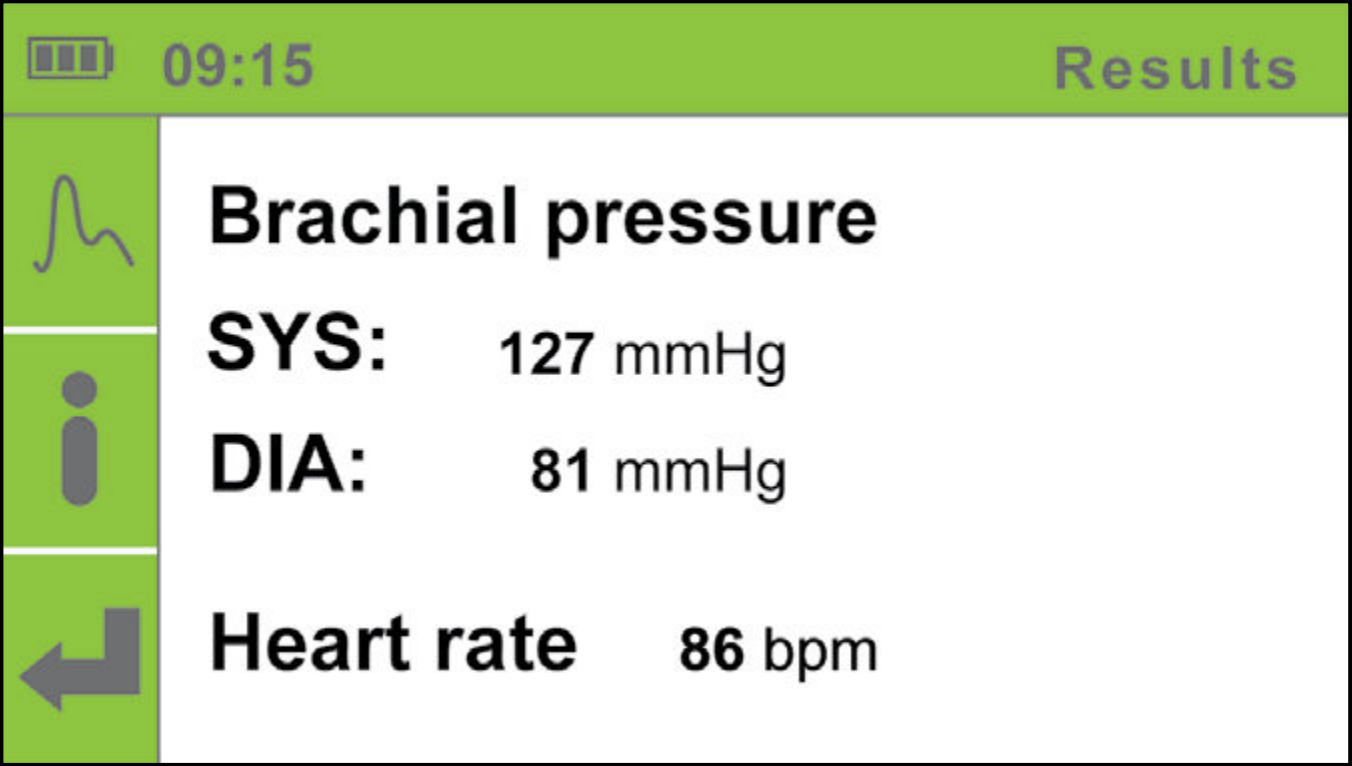
After the calculation is completed, the device displays the upper arm blood pressure and heart rate on the screen.
For additional information on the measurement results, press the DETAILS button .
To display the pulse waveforms, press the PULSE WAVEFORM button.

NOTE: If the measurement process must be interrupted for any reason (e.g. the patient is not feeling well), push the START button immediately. The measurement process will be stopped and the cuff will be deflated. If the cuffs are not deflated despite the process being stopped, immediately disconnect the cuff tubes from the device.
5.11 Measurement history
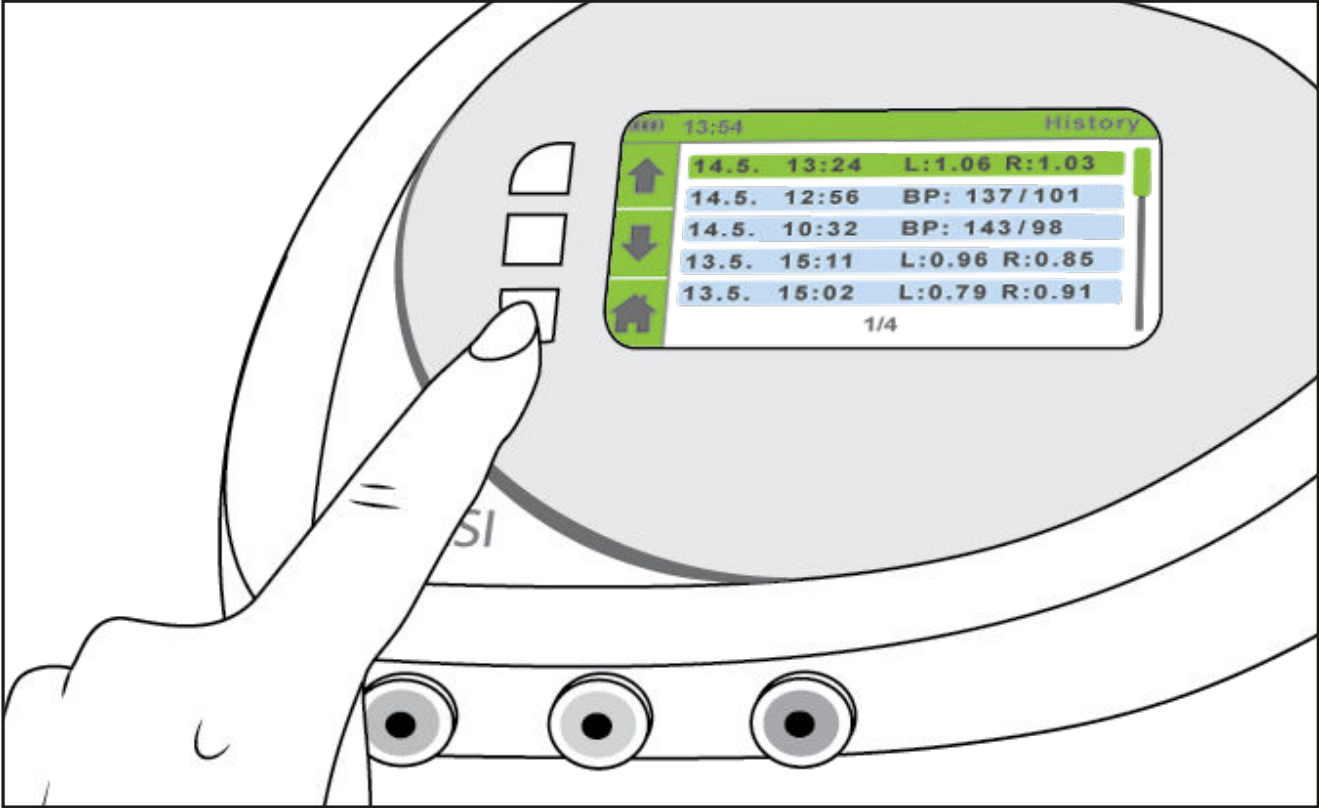
In the History menu, you can view the last measurements. To view the measurement history, push the HISTORY button.
Use the UP ⬆️ and DOWN ⬇️ buttons to navigate through the measurement history and choose the measurement you wish to view.
Push the ENTER button for details on the selected measurement.
Push the BACK ⬅️ button to return to the history selection menu and the HOME button to return to the home screen.
The History menu stores the Ankle-Brachial Index and upper arm blood pressure measurements:
L: 1.06 R: 1.03 - ankle brachial pressure index measurements;
BP: 137/101 - upper arm blood pressure measurements.
NOTE: The Measurement History memory can store approximately 30 measurements. The oldest measurements are automatically deleted for each additional measurement.
5.12 Changing device settings
You can access the Settings menu from the home menu.
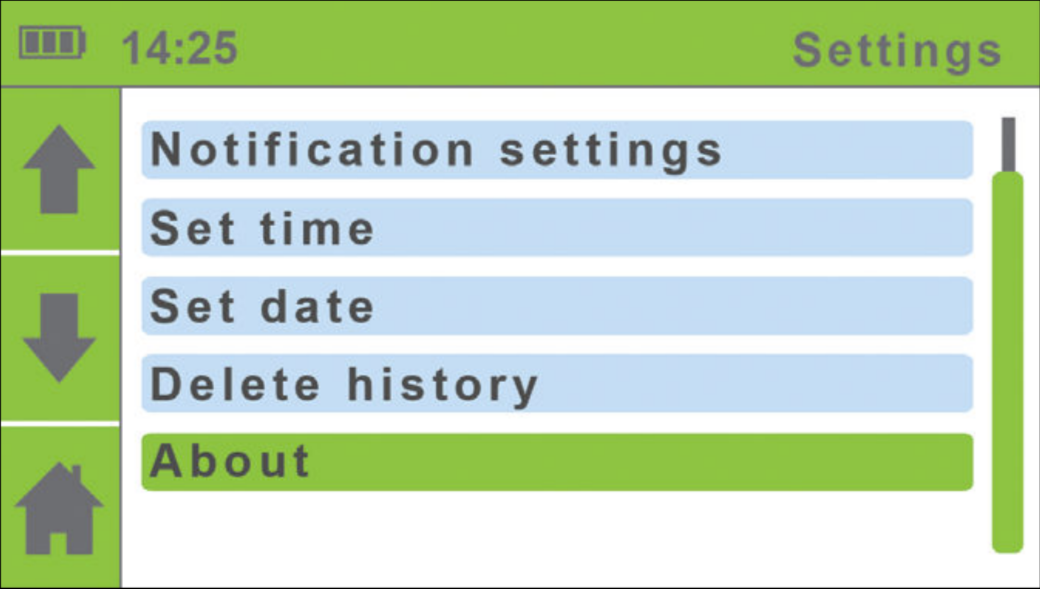
To change the settings of the device, push the SETTINGS button 🔧. The settings menu will be displayed.
Use the UP ⬆️ and DOWN ⬇️ buttons to select a setting. The selected settings menu will turn green.
Push the ENTER button to enter the selected menu. For descriptions of individual settings, see the chapters below.
To return to the home screen, push the HOME button .
5.12.1 Amputation Settings
If the patient has an amputated leg or is not compliant for ABPI measurement due to a presence of severe and/or painful wounds, the ABPI can be measured only on patient’s left or right leg.
Use the UP ⬆️ and DOWN ⬇️ buttons to select the amputation settings. Confirm your selection using the ENTER button. Select the leg that you will not be placing the cuff on. Confirm your selection using the ENTER button.
If you wish to return to the previous menu without confirming the changes, push the BACK button.
NOTE: Only one of the leg cuffs (either green - right, or yellow - left) should be used, when the amputation setting is selected.
5.12.2 Language settings
Use the UP ⬆️ and DOWN ⬇️ buttons to select the language. Confirm your selection using the ENTER button. The device language will be changed and you will return to the previous menu. If you wish to return to the previous menu without confirming the changes, push the BACK button.
5.12.3 Time settings
Use the UP and DOWN buttons to navigate through the hour and minute settings. Confirm your selection using the START button.
The selected field will begin to flash. Use the UP and DOWN buttons to set a new value and confirm it using the BACK button.
If necessary, repeat the process for the other fields. When you are finished setting the time, use the UP and DOWN buttons to move to the Confirm field and confirm your selection using the ENTER button.
If you do not wish to apply your settings, return to the previous menu by pushing the BACK button.
5.12.4 Date settings
Use the UP and DOWN buttons to navigate through the day, month and year settings. Confirm your selection using the ENTER button.
The selected field will begin to flash. Use the UP and DOWN buttons to set a new value and confirm it using the BACK button .
If necessary, repeat the process for the other fields. When you are finished setting the date, use the UP and DOWN buttons to move to the Confirm field and confirm your selection using the ENTER button.
If you do not wish to apply your settings, return to the previous menu by pushing the BACK button.
5.12.5 Notification settings
Push the ENTER button to turn the calibration reminder on or off. When you are finished changing the setting, use the UP and DOWN buttons to move to the Confirm field and confirm your selection using the ENTER button.
If you do not wish to apply your settings, return to the previous menu by pushing the BACK button.
NOTE: Calibration reminder appears one year after first use. If date is not correctly set, reminder may not appear correctly.
5.12.6 Deleting history
Use the UP and DOWN buttons to move to the “Delete History” entry.
To delete the entire measurement history, push the ENTER button.
5.12.7 Device information
Use the UP and DOWN buttons to move to the “Device Information” entry and confirm your selection by pushing the ENTER button.
To return to the home screen, push the HOME button.
You can view information about the device (Description, Model, REF, SN), information on the software version (Software), the date of the last device calibration (Calibrated) and the issue date of the device (Issue), which denotes the date of manufacture of the device.
5.13 Error messages
During measurement, the device can identify two types of errors:
measurement errors (a warning is displayed during measurement and the measurement is stopped) and
calculation errors (a warning is displayed along with the measurement results).
5.13.1 Measurement errors
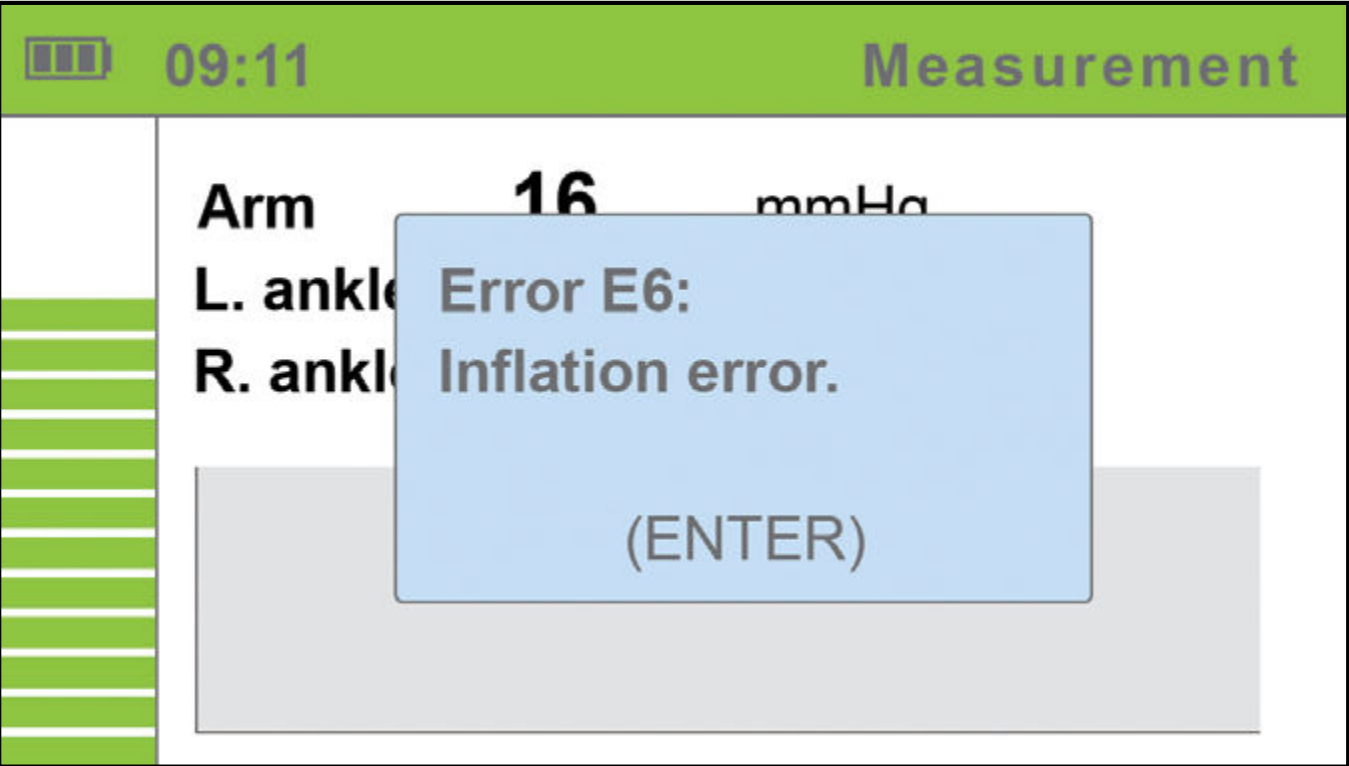
A warning is displayed in the form of a blue pop-up window during the inflation and deflation of the cuffs. The measurement is automatically stopped. To return to the home screen, push the ENTER button.
| Error | Description | Solution |
|---|---|---|
| ERROR 6 | Inflation error | Check the placement of the cuffs and repeat the measurement. |
| ERROR 7 | Deflation too fast. | The cuff is not attached or is not attached correctly. Attach the cuff correctly and repeat the measurement. |
NOTE: If an ERROR message is displayed, it is recommended to repeat the measurement with the device connected to the computer using MESIresults software (See page 13). Such use will allow for an interpretation of full pulse waveforms.
5.13.2 Calculation errors
A warning appears in a separate window when the measurement results are displayed. To view the measurement results, push the BACK button . The error identification number is displayed instead of the measurement results.
| Error | Description | Solution |
|---|---|---|
| ERROR 2 | An anomaly has been detected. The patient may have moved during the measurement process. | Remind the patient to remain still during measurement, and repeat the measurement. |
| ERROR 3 | The cuff was insuficiently inflated. | Check the placement of the cuffs and repeat the measurement. |
| ERROR 4 | An error occurred due to abnormal heart rate that could influence the accuracy of the Ankle-Brachial Index measurement. | Repeat the measurement. If the error reoccurs, the measured value is outside the measurement range of the device. For additional information regarding heart rate, please refer to the chapter 5.9.1. |
| ERROR 5 | An error occurred during Ankle-Brachial Pressure Index calculation. | Repeat the measurement. If the error is repeated, the measured value is outside the measurement range of the device. |
| ERROR 8 | An error occurred during systolic pressure calculation. | Repeat the measurement. If the error is repeated, the measured value is outside the measurement range of the device. |
| ERROR 9 | An error occurred during diastolic pressure calculation. | Repeat the measurement. If the error is repeated, the measured value is outside the measurement range of the device. |
| An error occurred during mean pressure calculation. | Repeat the measurement. If the error is repeated, the measured value is outside the measurement range of the device. | |
| A large pressure fluctuation was detected. The patient may have moved. | The results may be incorrect. Repeat the measurement. |
NOTE: For “Abnormally weak pulse” message, please see chapter 5.9.1 on page 27.