Safety and legal recommendations
⚠️ The MESI ABPI MD users must be adequately trained to use the device. Before the first use of the device, users must carefully read the entire instructions for use and follow the instructions for use of the connected equipment.
All rights reserved. This publication may not be reproduced, copied or stored on a memory device. Furthermore, this publication may not be used for any purpose other than as the instructions for the use of the MESI ABPI MD. This publication may not be translated into other languages or converted into other formats in any way without prior written permission of MESI Ltd.
The contents of the instructions for use may be altered without notice. The latest version of the instructions for use is available at https://www.mesimedical.com/support/mesi-abpi-md/.
To avoid personal injury and/or damaging the device or accessories, follow the safety recommendations given below.
1.2.1 SETUP AND TECHNICAL PERSONNEL
The device must be set up by authorised personnel with adequate professional training and experience who are aware of all the dangers in relation to the setup of the device and its use and who will take adequate risk prevention measures for themselves, users, other personnel and devices.
1.2.2 ACCESS TO THE DEVICE
Only authorized persons may be given access.
1.2.3 SAFETY MEASURES
The local safety requirements are to be complied with if so required by the regulations. In addition to the local safety regulations, the safety instructions in this document are also to be complied with. Should there be any conflict between the safety recommendations in this document and the recommendations stipulated by the local regulations, the local regulations take precedence.
Product description
The MESI ABPI MD (model name: ABPIMDD) is an automated device intended for use in the professional environment. It provides a fast, accurate and simple method for ABPI determination. The measurement can be performed with a 2-step (using 4 cuffs – one on each limb) or single step (using 3 cuffs – one cuff on the arm, the other two on the legs) process.
2.1 WHAT IS IN THE PACKAGE
The MESI ABPI MD package includes the following equipment:
2.1.1 ACCESSORIES
Contact your local distributor for more information about different cuff sizes and other accessories.
⚠️The MESI ABPI MD users must be adequately trained to use device. Before the first use of the device, users must carefully read the entire Instructions for Use and follow the Instructions for Use in full and follow the Instructions for Use for any connected equipment.
⚠️Use only accessories and other parts recommended or supplied by MESI. Use of other than recommended or supplied parts may result in injury, inaccurate information and/ or damage to the unit. Follow the instructions that are provided with the specific accessory.
2.2 INTENDED USE
The MESI ABPI MD is an automated Ankle-Brachial Index (ABI) measuring device for screening patients for Peripheral Arterial Disease/Lower Extremity Arterial Disease (PAD/LEAD). The de�vice is intended to perform, view and store ABI measurements of adult patients in the PAD risk group.
The MESI ABPI MD is intended to be used solely in the professional clinical environment by trained healthcare personnel who can correctly place blood pressure cuffs on the patient’s body, verify that these cuffs are inflating or deflating normally, and start the measurement process.
The MESI ABPI MD is intended to measure ABI by using a type of plethysmography – the oscillometric method. The ABI result (along with used blood pressure values used in calculating the ABI), the pulse wave and the oscillation graph are captured and displayed as numerical and graphical representations on the device.
The MESI ABPI MD supports automatic simultaneous ABI measurement of systolic, diastolic and mean arterial blood pressure on the upper arm and ankle locations to calculate the patients ABI. The device is recharged through the AC/DC power supply.
The MESI ABPI MD device is not intended to be used during patient transport and in emergency medical services.
Technical specifications
Listed below is the technical information regarding the MESI ABPI MD and its on-delivery specifications.
3.1 MESI ABPI MD
3.1.1 DIMENSIONS
DIMENSIONS| Column A | Column B |
|---|
| Width | 223 mm / 8.78 in |
| Height | 174 mm / 6.85 in |
| Depth | 86 mm / 3.38 in |
| Weight | 1000 g / 2.2 lbs |
3.1.2 POWER & BATTERY
Power & Battery| Column A | Column B |
|---|
| Battery type | Rechargeable Lithium-Polymer battery |
| Capacity | 4400 mAh |
| AC/DC adaptor | FRIWO FW8030M/05 or FOX NEO30-XM |
| Input | 100-240 V AC / 50-60 Hz / 600-300 mA |
| Output | 5V DC / 3.0 A |
| Examinations per battery charge | > 100 |
| Charge time for depleted battery | 2 hours |
3.1.3 CUFF SIZES
Cuff sizes| Column A | Column B |
|---|
| Medium size cuffs | ABPIMDACFFBRM, ABPIMDACFFBLM, ABPIMDACFFALM, ABPIMDACFFARM |
| Circumference | 22-32 cm |
| Large size cuffs | ABPIMDACFFBRL, ABPIMDACFFBLL, ABPIMDACFFALL, ABPIMDACFFARL |
| Circumference | 32-42 cm |
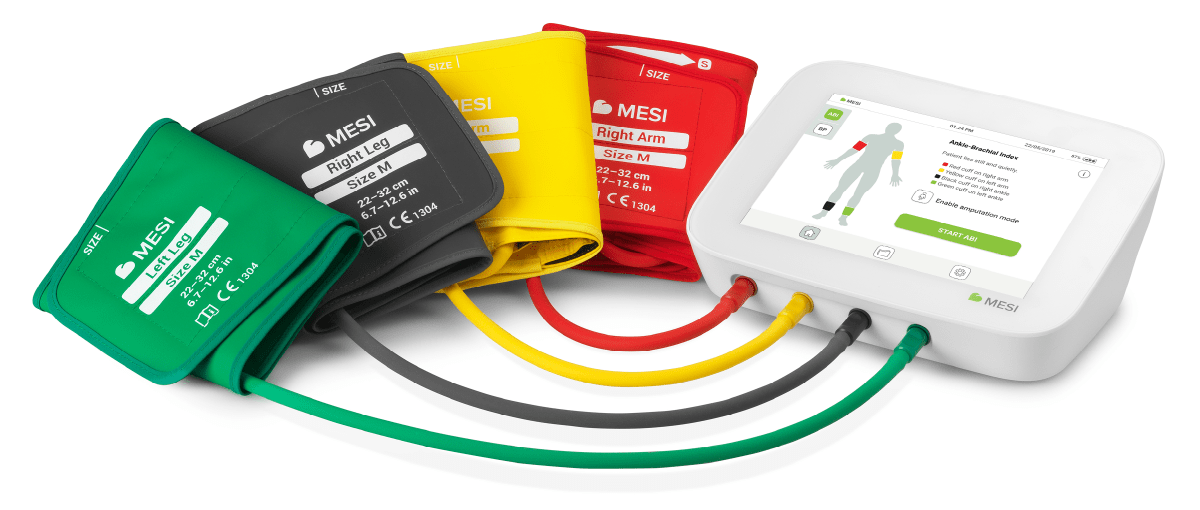
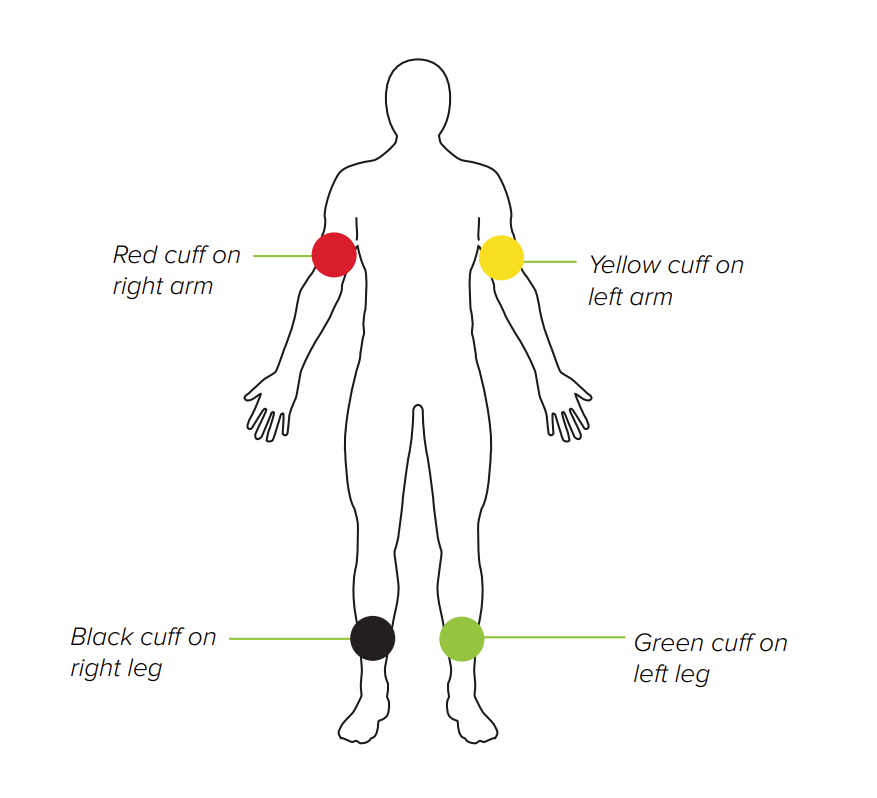
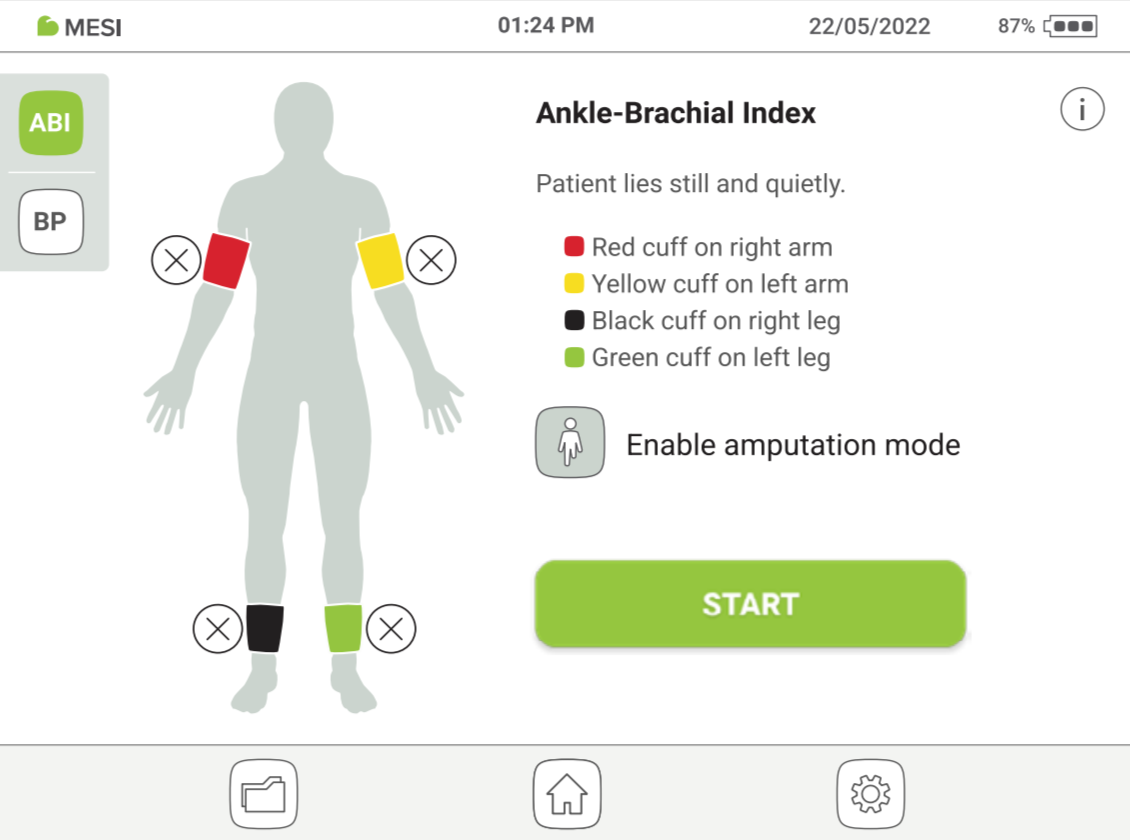
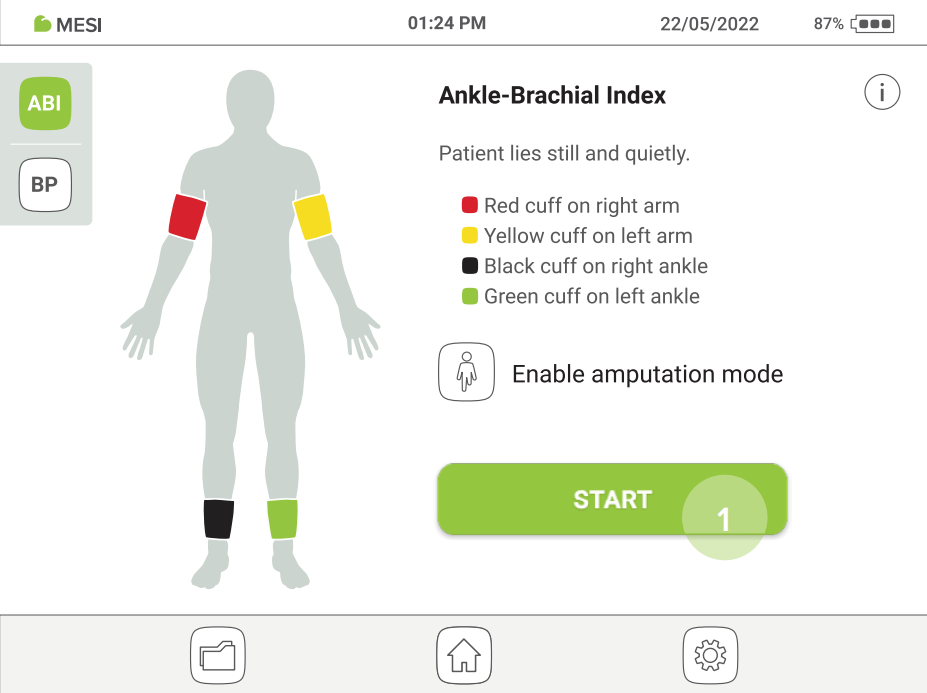
| RIGHT ARM | red |
| LEFT ARM | yellow |
| RIGHT ANKLE | black |
| LEFT ANKLE | green |
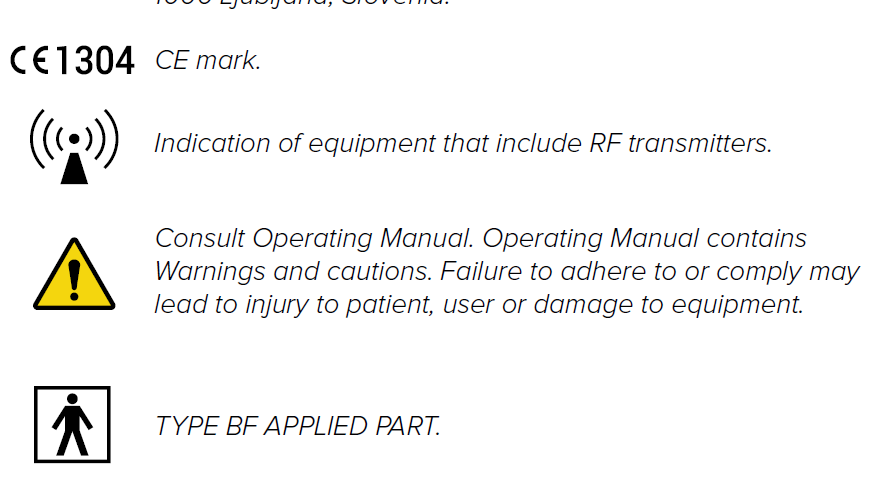
3.2 CLASSIFICATION
Protection against electric shock: Class II
Medical device classification: Class IIa
Applied parts (cuffs for arms and ankles): Type BF Applied part
Software classification: Class A
RF emissions (CIPSR 11): Group 1. Class B
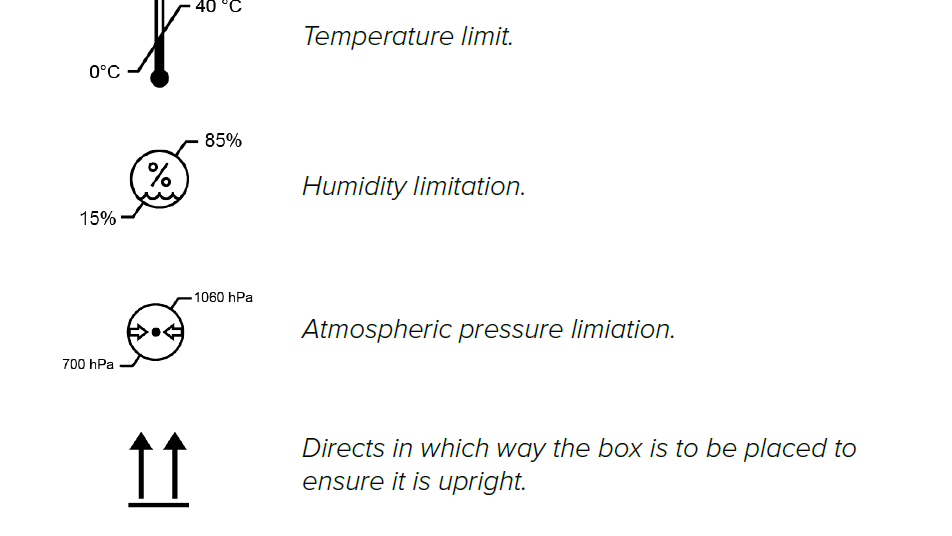
3.3 OPERATING, TRANSPORTING AND STORAGE CONDITIONS
Operating Conditions| Column A | Column B |
|---|
| Temperature, operating | 10° to 40°C ( 50° to 104°F) |
| Relative humidity | 30 to 80% (no condensation) |
| Pressure during operation | 700 to 1060 hPa |
| Ingress protection rating | IP2X rating |
Transport & Storage Conditions| Column A | Column B |
|---|
| Temperature | 0° to 40°C (32° to 104°F) |
| Relative humidity | 15 to 85% |
| Pressure during storage | 700 to 1060 hPa |
| Ingress protection rating | IP2X rating |
⚠️If the device is used or stored outside the specified environmental parameters, the accuracy specified within the technical specifications of the device is not guaranteed.
3.4 MEASUREMENT SPECIFICATIONS
Measurements using oscillometry and volume plethysmography:
Measurement range:
Max deviation:
3.5 CONNECTIVITY
The USB type C port is meant only for connecting the device to a PC (via the USB cable enclosed in the packaging box) in order to transfer of the measurement data. The port is not meant to be used for connecting it with other USB type C cables or chargers.
Quick measuring guide
NOTE: Before using the device for the first time, read the Instructions for Use carefully and follow the recommendations and suggestions. This Chapter only includes short instructions for the use of the MESI ABPI MD. For detailed description of short instructions on the device, see Chapter 5 DETAILED INSTRUCTIONS.
NOTE: When performing the ABI measurement, the patient must be in a supine position and remain still.
NOTE: The MESI ABPI MD is intended for use in the professional environment, where the measurements are carried out by adequately trained medical personnel. The MESI ABPI MD is not intended for home use.
NOTE: The MESI ABPI MD may be used on pregnant women.
NOTE: The MESI ABPI MD is not intended for use on new-borns or children under the age of 10 years.
NOTE: In case of the presence of intravenous cannulas or arteriovenous (AV) fistulas, the cuffs and measurement can cause injury to the limb.
The MESI ABPI MD has two modes of operation:
The primary mode is for ABI measurement. The result of the measurement is the left Ankle-Brachial Pressure Index (Left ABI), the right Ankle-Brachial Pressure Index (Right ABI), blood pressure in all limbs (SYS, DIA, MAP) and the heart rate.
The additional mode is for the independent measurement of the upper arm blood pressure. The result of the measurement is the upper arm blood pressure (SYS, DIA, MAP) and the heart rate.
4.1 PREPARATION FOR MEASUREMENT
MESI ABPI MD users must be adequately trained in use of the device. Must carefully read and follow the entire Instructions for Use prior to initial use of the device.
4.1.1 DEVICE PLACEMENT
The operational environment of the device should be appropriate to ensure accurate measurements. The main device must be placed on a steady, horizontal surface. The device must not be exposed to mechanical shocks and vibrations during operation. Such disturbances can significantly alter the measurement results or even render them useless. For instance, placing the device on a patient’s bed during the ABPI measurement cannot provide reliable results.
The device must be operated within the +10°C to +40°C temperature range and 30% to 80% RH humidity.
4.1.2 AIR TUBES
When the main device is adequately positioned, it can be connected to the cuffs. The cuffs, the tubes and the sockets are colour-coded to minimise the risk of improper connections.
The air tube connections are made by firmly inserting the plug into the appropriate socket. Pull out the plug to disconnect the tube. Hold the plug rather than the tube when disconnecting.
NOTE: A considerate force is needed to insert or pull out the plug.
NOTE: When connecting the tubes, please make sure that the airflow is in not obstructed in any kind of way.. For example, tube blockage can easily occur by placing objects over it.
4.1.3 PATIENT PREPARATION
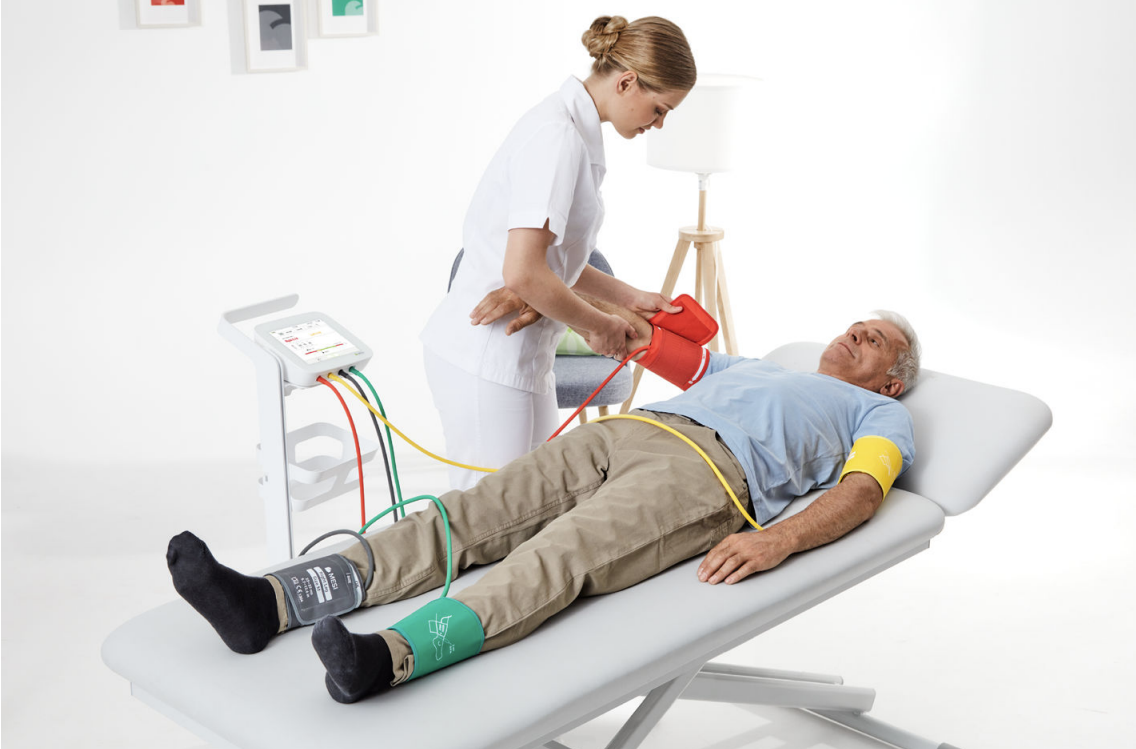
The patient must be in a supine position, lie still and remain quiet. It is recommended for the patient to lie still for at least 5 minutes before starting the measurement process. During measurement, the patient must lie completely flat, must be relaxed and must not talk. Their legs must not be crossed. The operator selects between a 3-cuff and 4-cuff measurement (when selecting the 3-cuff measurement, select the right or left arm).
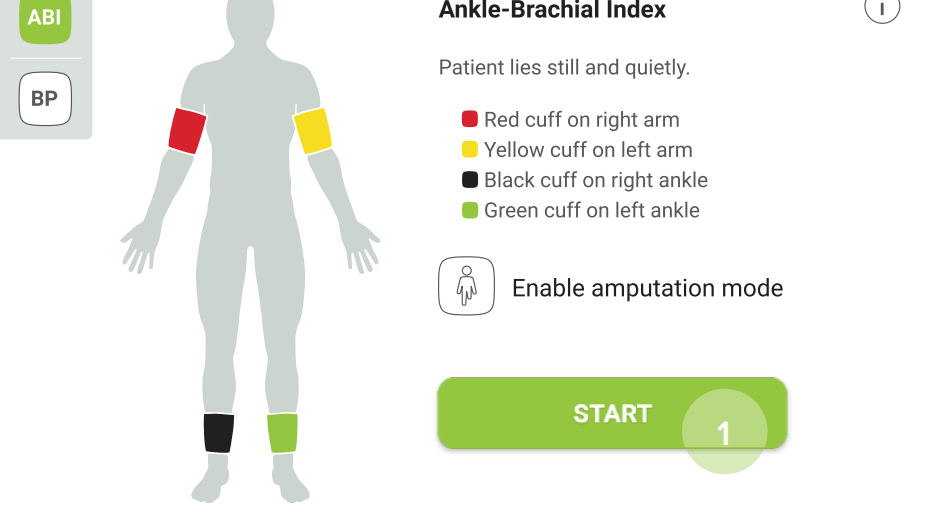
Step 1 Choosing the right colour of the cuff
Select the appropriate cuff, depending on the description and the colour of the cuff:
Choosing the right colour of the cuff | POSITION | DESCRIPTION on the cuff | COLOR on the cuff |
|---|
| Right arm | RIGHT ARM | RED |
| Left arm | LEFT ARM | YELLOW |
| Right ankle | RIGHT ANKLE | BLACK |
| Left ankle | LEFT ANKLE | GREEN |
Step 2 Place the cuffs to the appropriate arm/leg
ARM:
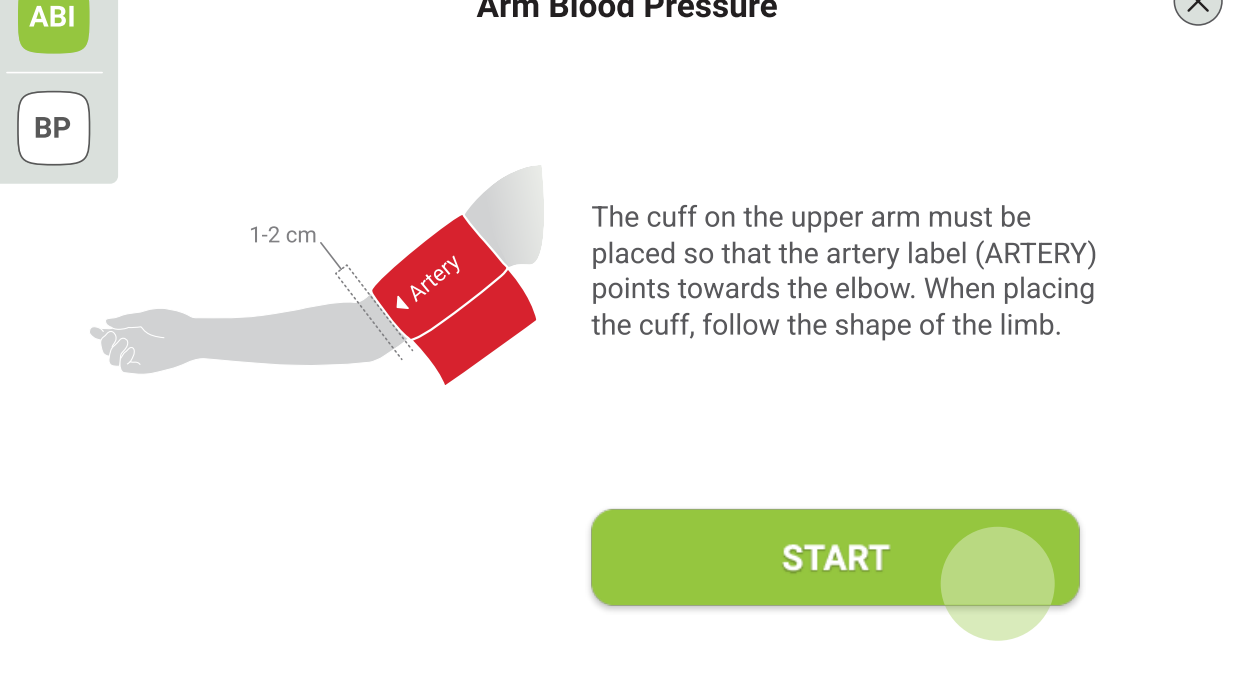
Position the cuff 1-2 cm above the elbow joint. Align the ‘ARTERY’ label with the artery on the inner side of the arm.
Place the cuff so that there is two fingers’ width of room between the limb and the cuff.
Check that you have chosen the correct size using the INDEX marking and the OK area of the cuff.
ANKLE:
Position the cuff 2-3 cm above the ankle. Make sure that the ’MEDIAL ANKLE’ label points towards the inner side of the ankle.
Place the cuff so that there is two fingers’ width of room between the limb and the cuff.
Check that you have chosen the correct size using the INDEX marking and the OK area on the cuff.
Step 1
Amputation option: If a patient has an amputated limb or is not compliant for ABI measurement due to severe and/or painful wounds, the ABI can be measured only on the patient’s existing limbs. Before the measurement, you can disable a selected cuff by clicking on the button and selecting the limb that is not compliant for the measurement.

Step 2
Observe the position indication on the cuffs and place them on the appropriate arm or leg. Then press START (1) and wait until the measurement is completed.
MESI ABPI MD measurementMESI ABPI MD measurement
MESI ABPI MD measurementMESI ABPI MD measurement
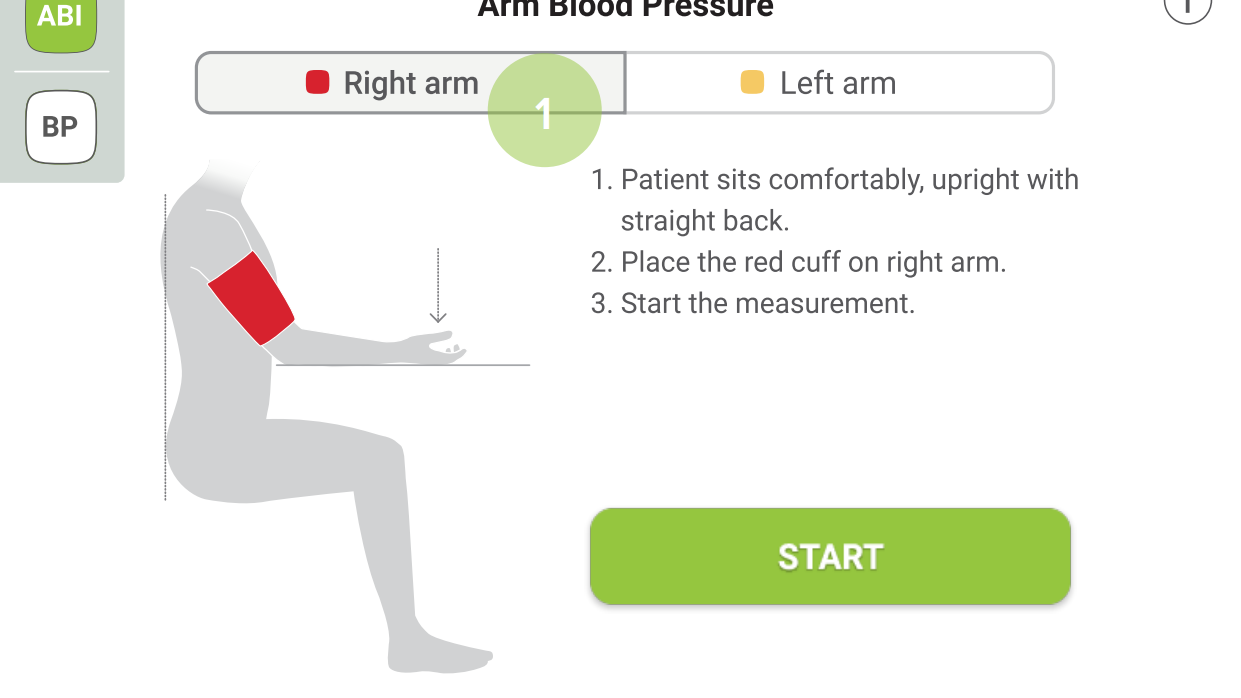
Step 1
Depending on the right (1) or left (2) arm, select and place the correct cuff (red or yellow).
MESI ABPI MD BP measurementMESI ABPI MD BP measurement

MESI ABPI MD BP measurementMESI ABPI MD BP measurement
Step 2
Observe the position indication on the cuff.
Then press START and wait until the measurement is completed.
MESI ABPI MD BP measurementMESI ABPI MD BP measurement
MESI ABPI MD BP measurementMESI ABPI MD BP measurement
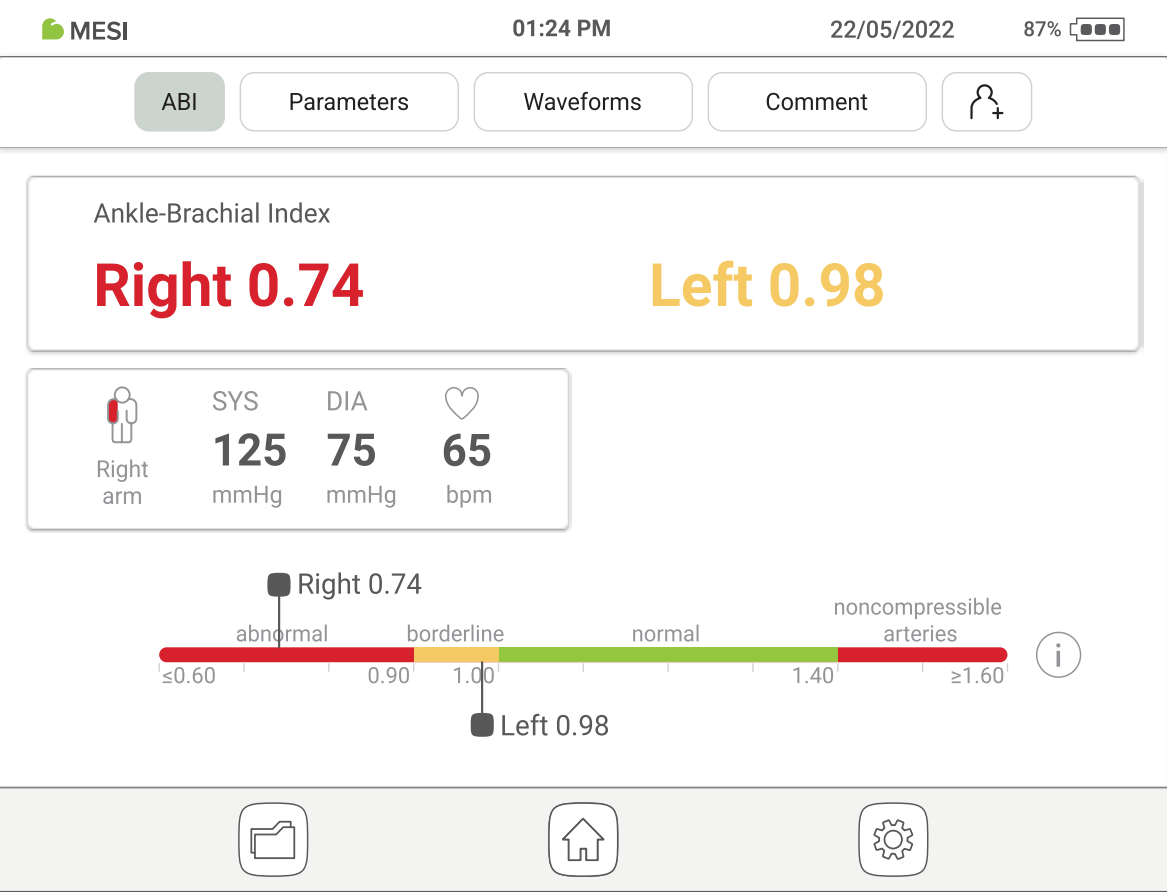
4.2 RESULTS
Once the measurement is done, the system automatically switches to the result page.
4.2.1 RESULTS OF ABI MEASUREMENT
On the top, the navigation menu provides the following actions:
Check the ABI results. For easier interpretation the results are colour-coded and a representative scale is given as a reference.
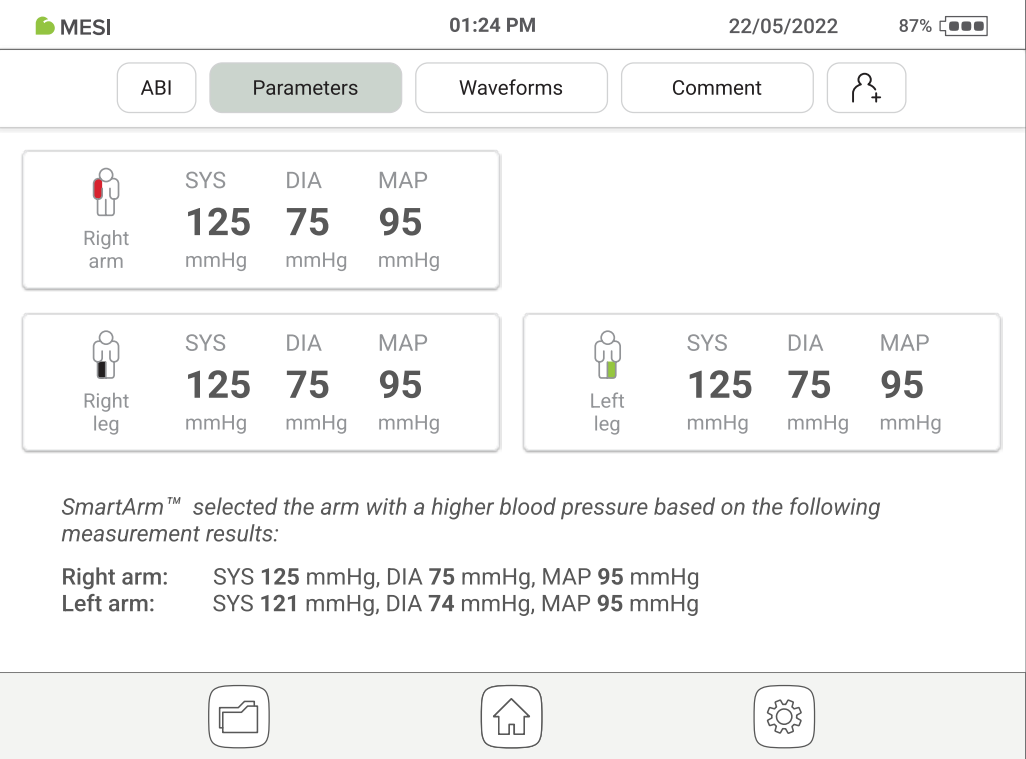
More detailed information is provided (heart rate, SYS, DIA and MAP on the arms and legs).
Visual representation of the oscillation and pulse waveform graphs.
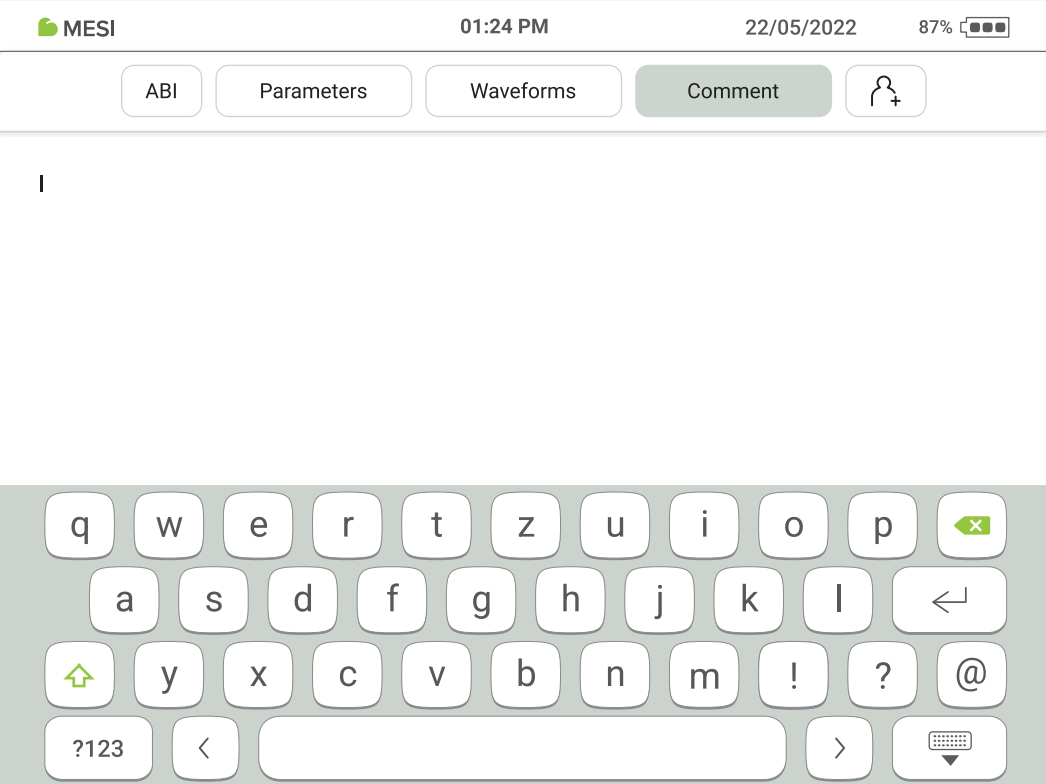
A comment can be added to every measurement. It will be stored and always available together with the recording report.
Optionally, the user may select an existing or create a new patient. This option is not required for a measurement to be performed
On the bottom the navigation menu provides the following actions:
Go to the Archive.
Go to the Home screen.
Repeat the measurement.
NOTE: For more information about the result screen, see Chapter 5.4 Reviewing ABI measurement.
4.2.2 RESULTS OF BLOOD PRESSURE MEASUREMENT
On the top, the navigation menu provides the following actions:
Check the blood pressure results. For easier interpretation, the results are colour-coded and a representative scale is given for a reference.
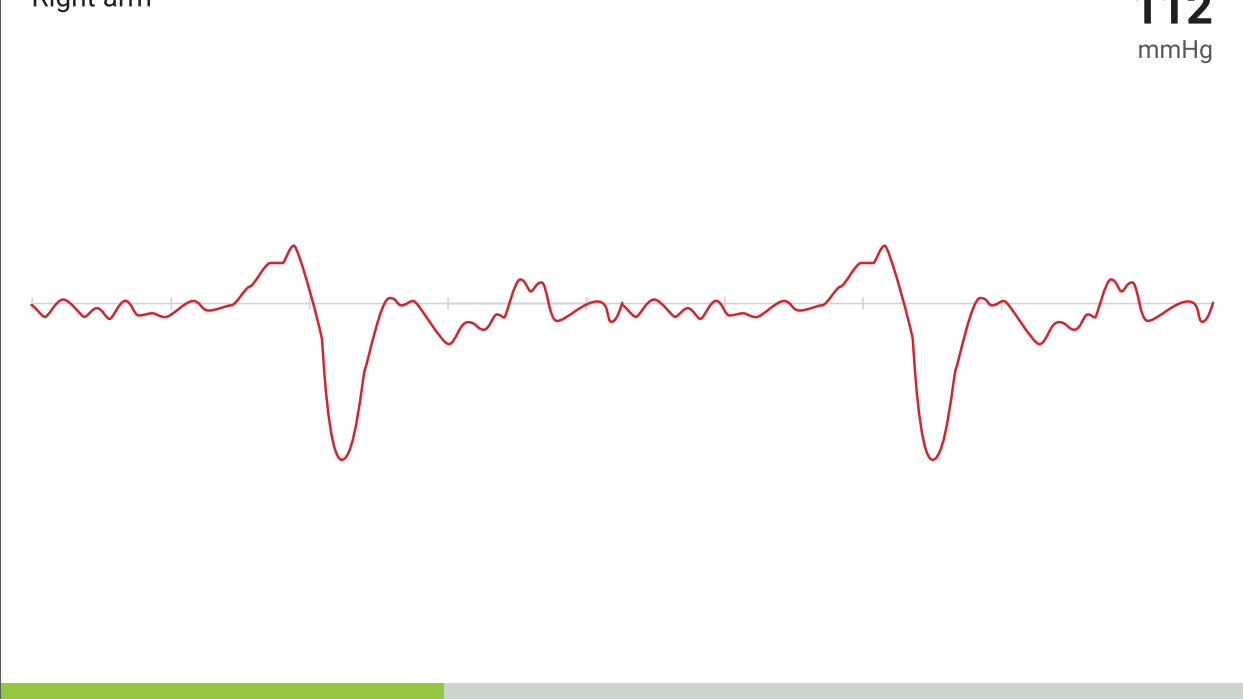
Visual representation of the oscillation and pulse waveform graphs.
A comment can be added to every measurement. It will be stored and always available together with the recording report.
Optionally, the user may select an existing or create a new patient. This option is not required for a measurement to be performed.
On the bottom, the navigation menu provides the following actions:
Go to the Archive.
Go to the Home screen.
Repeat the measurement.
Detailed instructions
This chapter contains all the information required by the users of the device for safe, correct and accurate measurement. It includes a detailed and complete description of all the functions of the device, all safety instructions and all the information required to understand the operation of the device.
5.1 FIRST TIME USE
5.1.1 BASIC FUNCTIONALITIES
The MESI ABPI MD package includes MESI ABPI MD device, set of colour-coded blood pressure cuffs (size M), AC/DC adaptor, USB cable, instructions for use, calibration report and declaration of conformity.
5.1.2 AC/DC POWER SUPPLY AND BATTERY
The MESI ABPI MD uses the following two power sources:
Connect the AC/DC adapter into a wall power socket. Connect the AC/DC adapter plug into the socket in the back side of the device.
⚠️Only use accessories and other parts recommended or supplied by MESI. Use of any other parts may result in injury, inaccurate measurements and/or damage to the unit. This product is not designed for sterile use.
The MESI ABPI MD can also function without the AC/DC power supply. When the device is not connected to the mains electricity, it is powered by a battery. The device is equipped with a high-capacity Li-Po battery to ensure complete portability of the measurement system. The battery is not replaceable.
NOTE: The battery may not be completely discharged in a new device and it may provide enough power to allow the device to start up. Nevertheless, the AC/ DC adapter must be connected when using the device for the first time.
The charging system works automatically. When the AC/DC adaptor is plugged in, the battery is charging and when charging, the battery charge indicator is animated.
The device does not need to be switched on to charge the battery. When the charging process is completed, it terminates automatically. The charge and battery indicators are shown in the title bar.
Battery level indication is given by a percentage and an icon, which are always displayed in the upper right corner of the display.
The table below explains the indicator lights.
Indicator lights| Column A | Column B |
|---|
| 🟩 Green | The device is turned on. |
| 🟩 Green | The charging has reached 100%. |
| 🟧 Orange | The device is turned on and it is charging. |
| 🟥 Red | The device is turned off and it is charging. |
5.1.3 CHANGING THE DEVICE SETTINGS
Turn on the device by pressing the ON/OFF button, on the back of the device. The display will show the initial screen with a greeting. To continue, select the desired settings.
Hold the ON/OFF button for 2 seconds to turn the device on or off.
Hold the ON/OFF button for 10 seconds to hard reset the device.
When using the MESI ABPI MD device for the first time, it is necessary to set the language, time and date. It is mandatory to set the exact time and date because of the effect of warnings and reminders which ensure the proper conduct or calibration of the MESI ABPI MD device.
Step 1 - Language settings
To select the operating language of the device, just click on one of the offered language options that are displayed on the screen.
Step 2 - Date settings
To set the date, format and separator type, click on the tab and choose among the provided alternatives.
Step 3 - Time settings
To select the time display of the device, select one of the offered alternatives regarding the time format (24-hour format or 12-hour format).
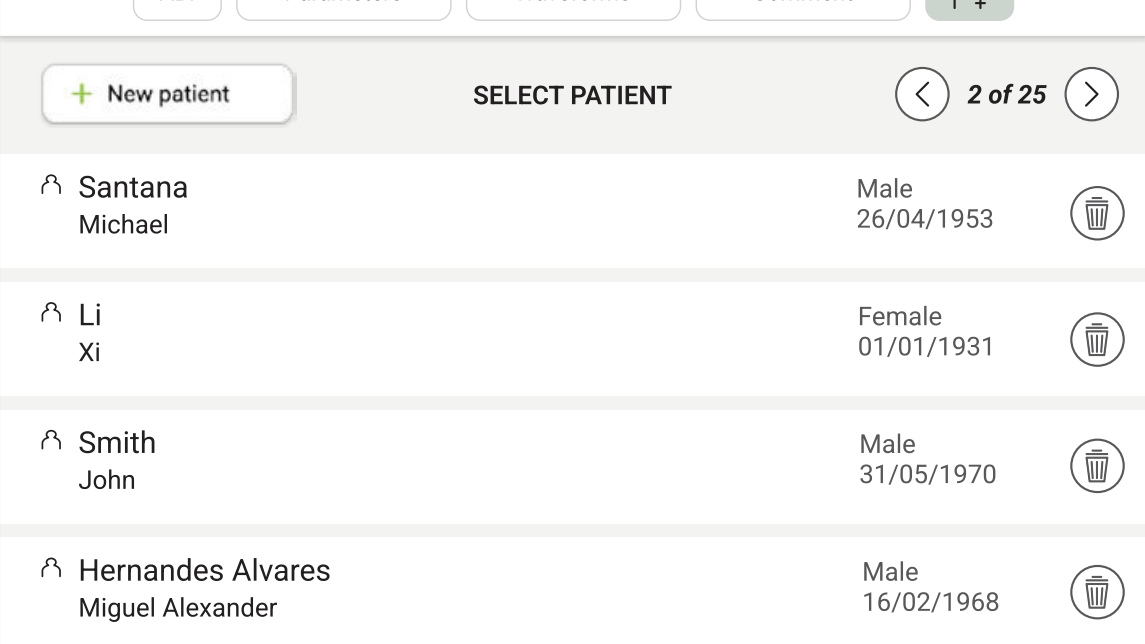
5.2 PATIENT PROFILE
After the measurement is done, the user has an option to assign the measurement to an existing patient or create a new patient’s profile. By clicking on the button, the device will offer both alternatives.
Adding patient is not required for a measurement to be performed.
The patient must be in a supine position, lie still and remain quiet.
NOTE: It is recommended that the patient sit still for at least 5 minutes before starting the measurement process.
NOTE: The person carrying out the measurement should always remain by the patient’s side and closely monitor the measurement process.
5.3.1. CUFF PLACEMENT
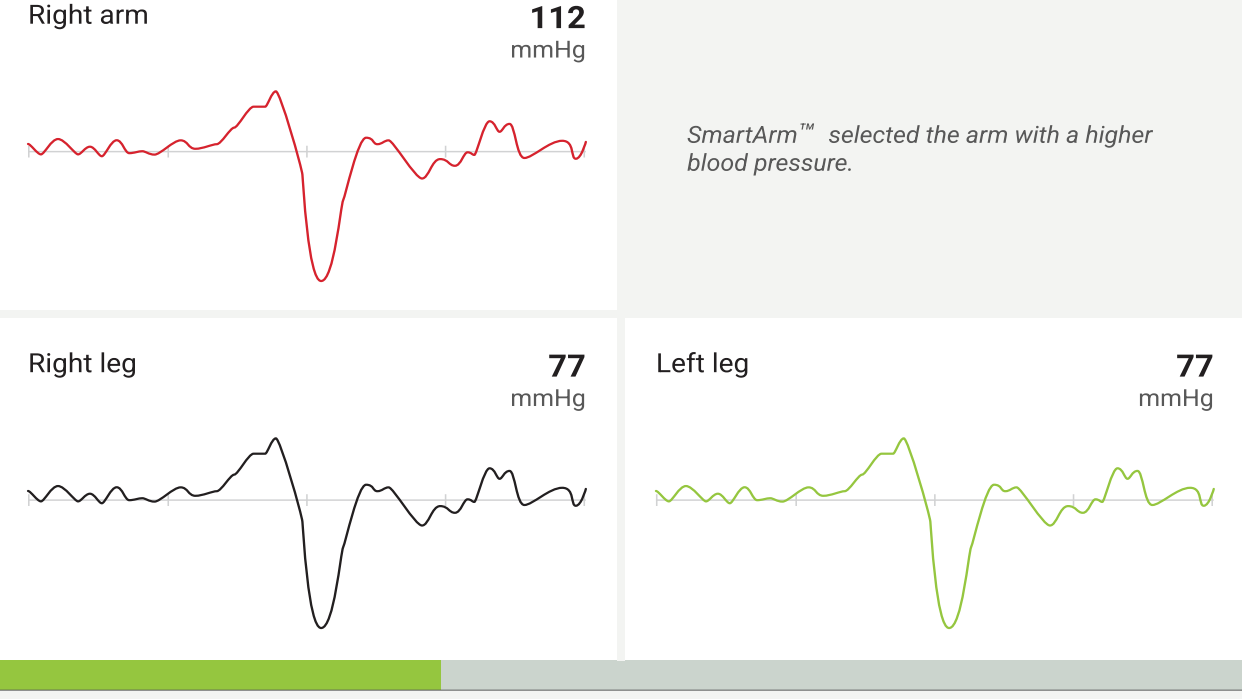
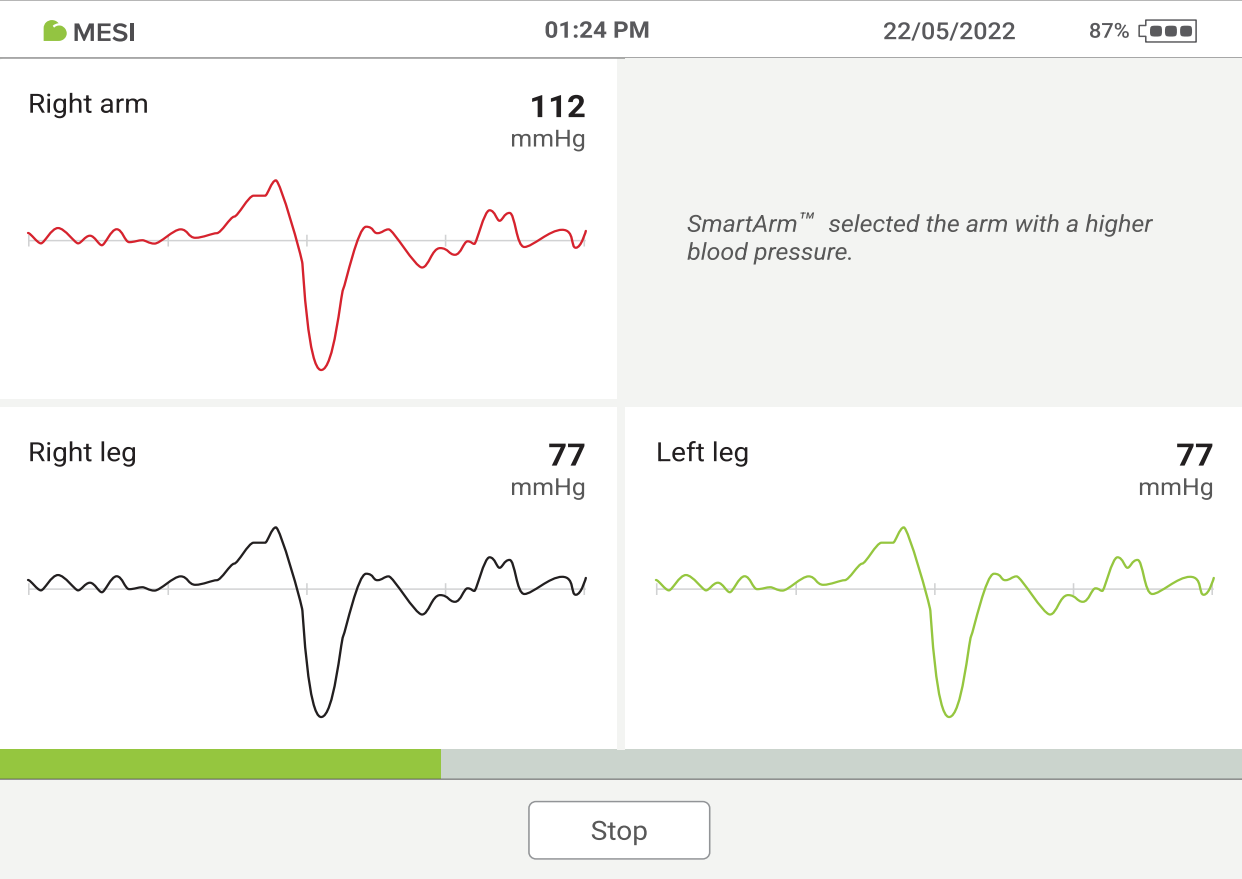
The MESI ABPI MD device comes with 4 cuffs for all limbs. The 5.3.1 ABI measurement can be operated with 4 or 3 cuffs. When using 4 cuffs, the MESI ABPI MD uses the SmartArm™ algorithm to identify the arm with higher systolic blood pressure, which will be used in the calculation of the ABI.
NOTE: The measurement of the Ankle-Brachial Index can be affected by the placement and physical condition of the cuffs as well as by the position of the patient. The functioning of the device can also be affected high temperature, humidity and altitudes.
Option 1: ABI measurement with 4 cuffs
When using only 3 cuffs, the user needs to identify the arm with the higher systolic blood pressure manually or perform the ABI measurement with both arms to obtain an accurate result.
Option 2.1: ABI measurement with 3 cuffs (right arm)
Option 2.2: ABI measurement with 3 cuffs (left arm)
ARM CUFF
Place the appropriate cuff on the left/right arm and position the cuff 1-2 cm above the elbow joint. Make sure that the arrow-shaped ARTERY marking is in line with the brachial artery.
Place the cuff so that there is two fingers’ width of room between the limb and the cuff. Make sure that you have chosen the correct size by referring to the SIZE marking and the OK area of the cuff.
ANKLE CUFF
Place the appropriate cuff on the left/right leg and position the cuff 2-3 cm above the ankle. Make sure that the arrow-shaped MEDIAL ANKLE marking points towards the inner side of the ankle.
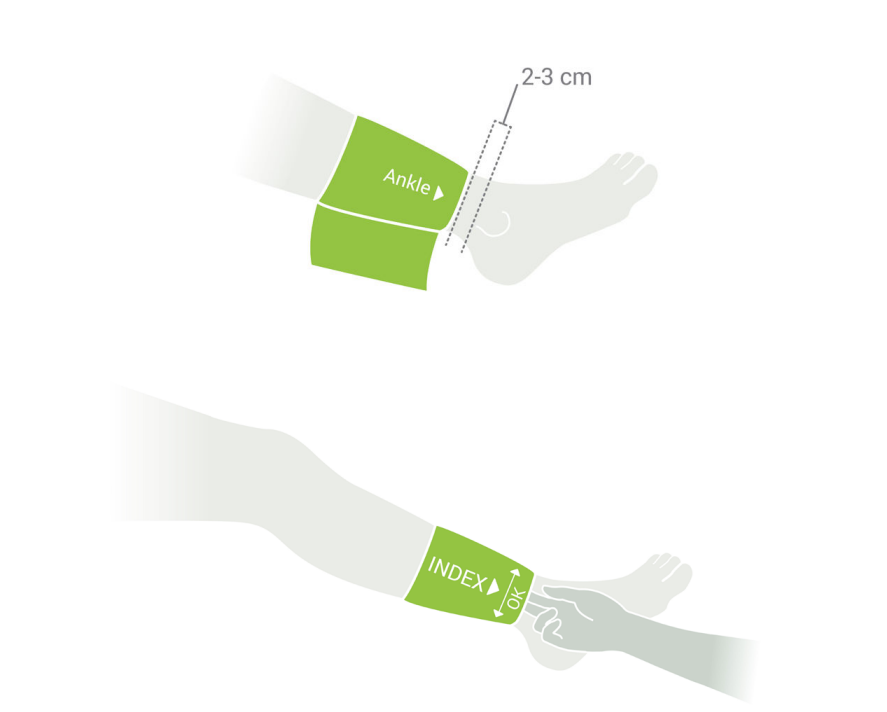
Place the cuff so that there is two fingers’ width of room between the limb and the cuff. Make sure that you have chosen the correct size by referring to the SIZE marking and the OK area of the cuff.
Step 1
Turn on the device by holding the ON/ OFF button for 2 seconds.
Step 2
Amputation option: If a patient has an amputated limb or is not compliant for ABI measurement due to severe and/or painful wounds, the ABI can be measured only on patient’s existing limbs. Before the measurement, the user can disable the selected cuff by clicking the button and selecting the limb that is not compliant for the measurement.
Step 3
Apply the cuffs to the appropriate locations (arms/legs) according to Chapter 5.3.1 Cuff placement and follow the onscreen instructions. The patient should be in a supine position, lie still and remain quiet. Press the START button to begin the measurement.
Step 4
During the measurement, the pressure waveforms show the pressure oscillation for each limb while the display next to the oscillation shows the current pressure in the corresponding cuff.
Progress bar: The progress bar shows the timeline of the ABI measurement. When the bar comes to an end, the measurement of all blood pressure ends and all the cuffs deflate. The result screen follows.
STOP button – for cancelling the measurement.
5.4 REVIEWING AN ABI MEASUREMENT
5.4.1 RESULT SCREEN
When the measurement process is completed, result will be displayed on the screen. This consists of 5 different areas: ABI values, Parameters, Waveforms, Comment, Add patient.
NOTE: If the results of the Ankle-Brachial Index measurement are very unusual, repeat the measurement three times.
5.4.1.1 ABI values
This section shows the left and right Ankle-Brachial Index results along with the systolic and diastolic blood pressures of the arm that was used for the calculation.
5.4.1.2 Parameters
This section displays detailed information about the pulse rate, systolic, diastolic and mean arterial blood pressure (mmHg) on the arms and legs.
In this section, a detailed view of the measured oscillation and pulse waveform graphs is provided.
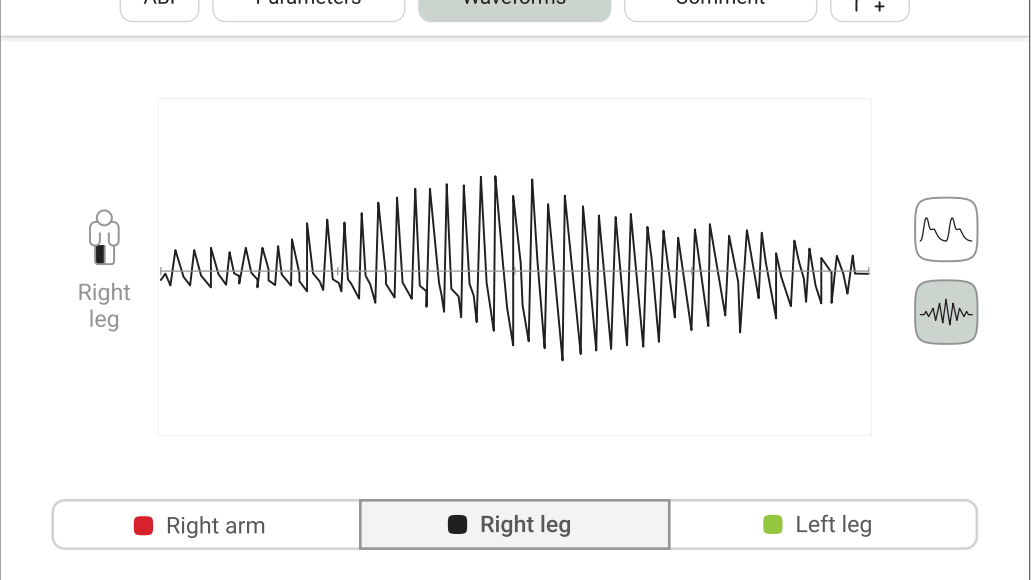
MESI ABPI MD waveformsMESI ABPI MD waveforms

MESI ABPI MD waveformsMESI ABPI MD waveforms
A comment can be added to every measurement. It will be stored and always available together with the recording report.
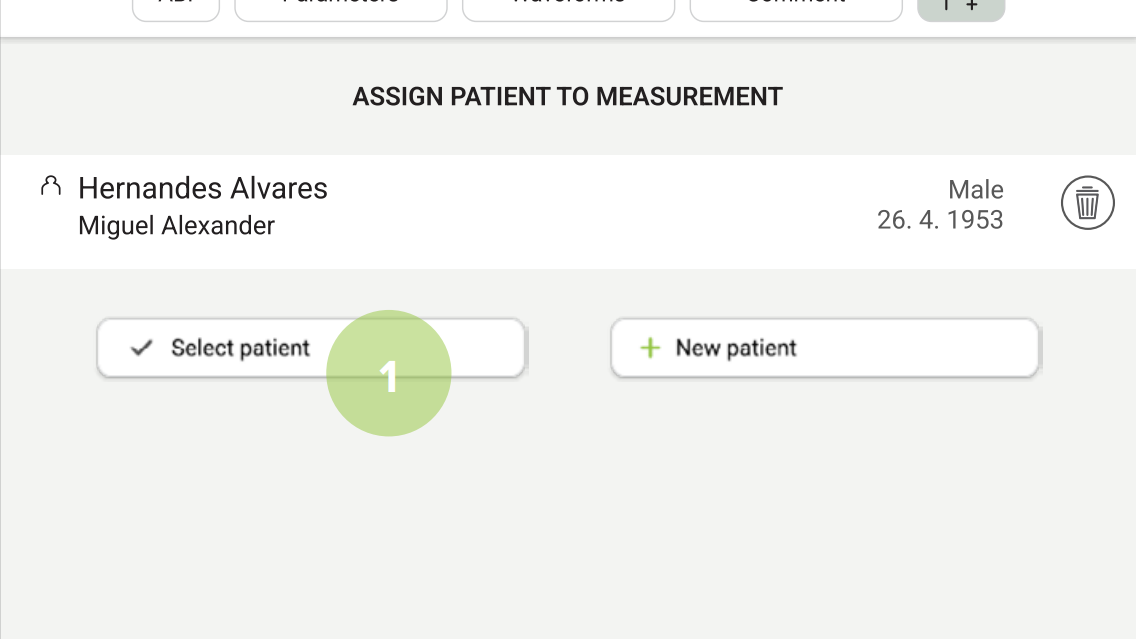
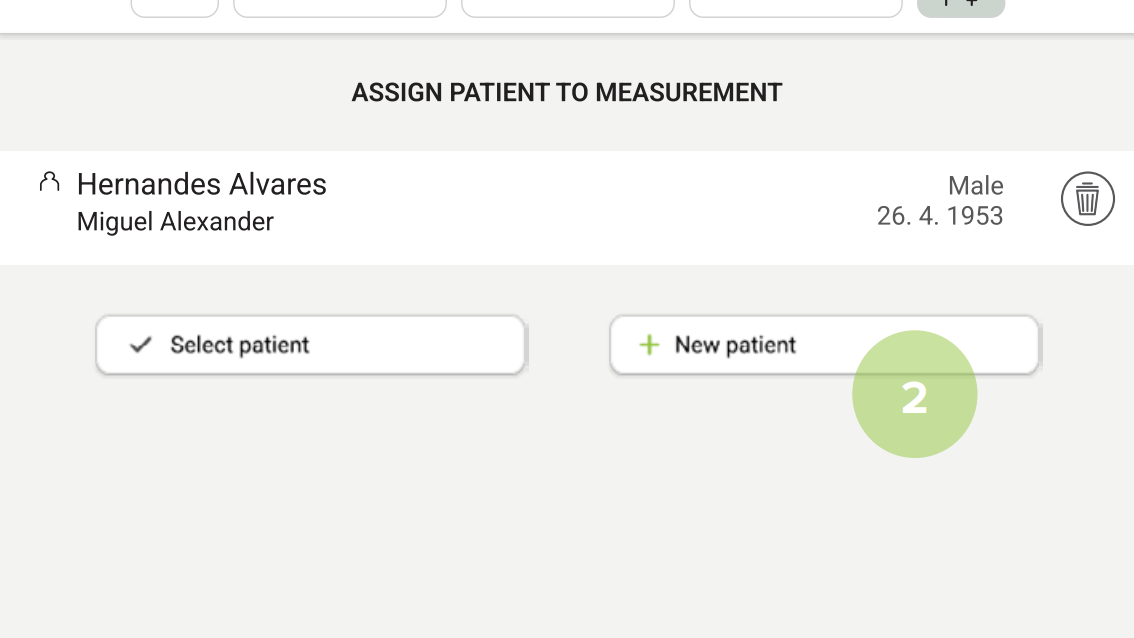
5.4.1.5 Adding patient
As an option, the device allows to assign the measurement to an existing patient (1) or create a new patient’s profile (2). This option is not required for a measurement to be performed.
MESI ABPI MD adding a patientMESI ABPI MD adding a patient
MESI ABPI MD adding a patientMESI ABPI MD adding a patient
MESI ABPI MD adding a patientMESI ABPI MD adding a patient

MESI ABPI MD adding a patientMESI ABPI MD adding a patient
5.5 INTERPRETATION OF AN ABI RESULT
5.5.1 DETECTION OF SEVERE PAD AND INCOMPRESSIBLE ARTERIES
When the result ‘Abnormally weak pulse’ is displayed, there is a high probability of severe Peripheral Arterial Disease (PAD) or incompressible arteries (Medial Calcinosis).
NOTE: The majority of the ‘Abnormally weak pulse’ results describe patients with an ABI around or lower than 0.5.
NOTE: In the case of Medial Calcinosis, the arteries cannot be compressed due to stiff arterial walls. The measurement of blood pressure with cuffs is not possible, making the ABI result unreliable. The patient should be referred for a Toe-Brachial Index (TBI) measurement.
The MESI ABPI MD uses the PADsense™ pattern recognition algorithm to automatically interpret the acquired pulse waveform and calculate the ABI with the result. However, to help the user better understand the performed ABI measurement, this pulse waveform is available on the result screen. Combining both the ABI result and pulse waveform represents the best practice in evaluating the presence and severity of Peripheral Arterial Disease (PAD).
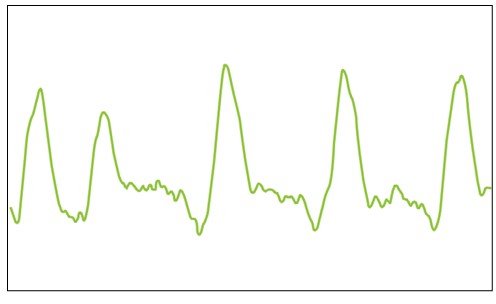
Normal pulse waveform will display:
(1) a rapid rise in the upstroke during systole,
(2) a very sharp peak,
(3) a gradual downstroke,
(4) the presence of the dicrotic notch.
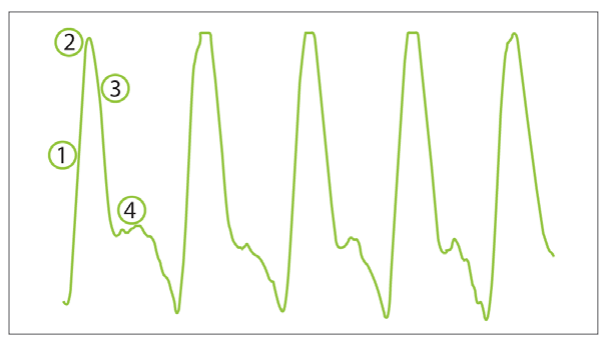
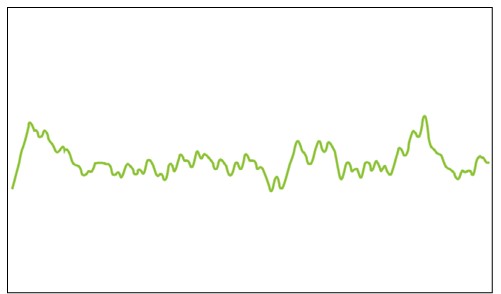
An absence of the dicrotic notch, a smaller amplitude, a decreased slope and a rounding of the systolic peak are the initial signs of a possible abnormality – the measured ABI value is lower than the one with normal pulse waveform.
A flattened PVR waveform or a PVR without the typical shape is an indicator of severe PAD. The absence of the pulsations caused by occlusions in the artery makes it impossible to calculate the ankle pressures. Instead of the ABI value, the device will display a ‘PAD’ result, indicating severe disease. The result is confirmed with a non-typical, flattened PVR waveform similar to the one below.
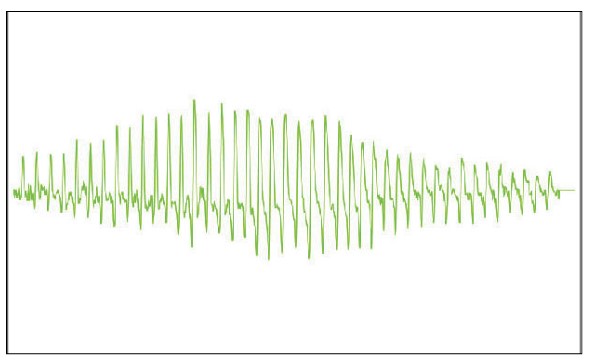
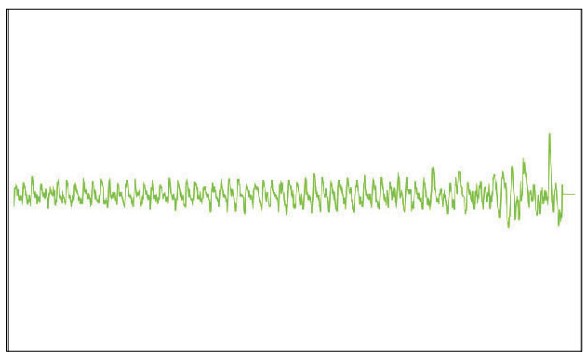
5.5.3 OSCILATION GRAPH
As with the pulse waveform, the MESI ABPI MD result page also 5.5.3 displays oscillation graphs, which provide the user with pulse waveform analysis throughout the ABI measurement. Below are a couple of examples of different oscillation graphs:
Normal oscilation graph
Severe PAD oscilation graph
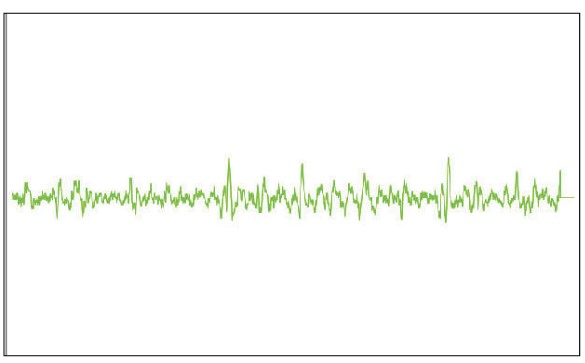
Incompressible arteries oscillation graph
Maintenance
6.1 CHARGING THE BATTERY
If battery operation is desired, the battery should be charged on a regular basis. The battery capacity is about 100 completed measurement cycles.
If the battery capacity is significantly decreased after a certain period of intensive use, the battery is most likely spent and should be replaced. As the device does not contain any parts that can be replaced by the user, contact your local distributor or the manufacturer about battery replacement.
6.2 CLEANING INSTRUCTIONS
⚠️Read and follow cleaning instructions carefully.
The MESI ABPI MD device and cuffs must be carefully cleaned and disinfected after every use and before use with a different patient. The cuffs can be reused on the same patient. If the cuff is covered with dust and dirt, this can affect the performance of the device. Do not use aggressive cleaning agents, volatile liquids or excessive force when cleaning the device. Don’t dip the cuff in liquids or cleaning agents.
Cleaning – MESI ABPI MD device:
Before cleaning the MESI ABPI MD device, disconnect the cuffs from the device.
Use a soft lint-free cloth dampened with a proper cleaning agent to clean and disinfect the exterior of the MESI ABPI MD device.
Wipe off all residues of the cleaning solution with a dry cloth.
Dry the equipment before next use.
Recommended cleaning agents: Cleaning – MESI ABPI MD device:
Cleaning – cuff:
Clean the cuff surface by wiping it with a damp cloth with mild soap water or with wipes.
Do not wash the cuff or immerse it in water. Do not use petrol, thinners or similar solvents to clean the cuffs.
⚠️Do not sterilise cuffs. Do not use bleach.
⚠️Wash and rinse temperatures should not exceed 40°C.
NOTE: Do not wash the cuffs in a washing machine or iron them.
NOTE: The device must be calibrated in the event of mechanical stress!
6.3 DISINFECTION
Disinfection – MESI TUBELESS CUFF UNIT:
For disinfection, use commercially available disinfectants intended for the professional healthcare environment. Refer to the Instructions for Use of the producer.
Approved disinfectants:
Isopropyl alcohol 70%
Propanol (70-80%)
Ethyl hexanal
Aldehyde (2-4%)
Ethanol (70-80%)
Non-approved disinfectants:
Disinfection – cuff:
Can be disinfected with medical-grade alcohol 70%.
After disinfection, the cuff cover should be left air dry.
6.4 PRODUCT LIFE AND STORAGE
If correctly used and maintained the device will have a minimum service life of 5 years. It is possible to store the device in suitable conditions for a maximum of 5 years. When using the device after storage, we recommend subjecting the device to a thorough maintenance check.
The device should be inspected by a qualified service engineer at least every 12 months for the following safety checks:
Any mechanical or functional damage on the device and accessories,
Performance of device in accordance to instructions for use,
The warning label’s legibility, and
The battery cycle count.
General warning
⚠️ Before using the device for the first time, read the Instructions for Use carefully and follow the recommendations.
⚠️ The MESI ABPI MD users must be adequately educated to use the device. The education must be performed by the trained MESI representative. Before the first use of the device, users must read the entire instructions for use carefully and follow the instructions for the use of the connected equipment.
7.1 PATIENT INJURY PREVENTION
⚠️Do not place the cuffs on wounds, as this may cause additional injury. Only place the cuffs on the upper arms and lower legs.
⚠️In case of the presence of intravenous cannulas or arteriovenous (AV) fistulas in the limbs, the cuffs and measurement can cause injury to the limb.
⚠️If the patient has had breast surgery, do not place the arm cuff on the side which has been operated on.
⚠️Do not use the device on a patient while they are connected to a vital sign monitor. Pressurization of the cuff can temporarily cause loss of function of simultaneously used monitoring ME equipment on the same limb.
⚠️Check the pressure in the cuff several times during measurement. If the cuff puts pressure on the limb for too long, it can impair the blood flow.
⚠️Consecutively carrying out too many measurements may result in injury to the patient.
⚠️A twisted or bent tube can cause high pressure in the cuff, which may result in injury to the patient.
7.2 MEASUREMENT PROCEDURE
⚠️The MESI ABPI MD is intended for Ankle-Brachial Pressure Index measurement. Upper arm blood pressure measurements are for information purposes only.
⚠️Do not use the device when it is wet. After cleaning the device with a damp cloth, wait for it to dry. Only use the device when it is completely dry.
⚠️The MESI ABPI MD is not intended for use in conjunction with high frequency surgical equipment.
⚠️The AC/DC power supply must be connected to an easily accessible socket (the AC/DC power supply also serves for galvanic isolation).
⚠️Use of accessories and cables other than those specified or provided by the manufacturer of this equipment could result in increased electromagnetic emissions or decreased electromagnetic immunity of this equipment and result in improper operation.
⚠️The MESI ABPI MD must not be used in an oxygen-rich environment.
⚠️Use of this equipment adjacent to or stacked with other equipment should be avoided because it could result in improper operation. If such use is necessary, this equipment should be observed to verify that they are operating normally.
⚠️Portable RF communications equipment including peripherals such as antenna cables and external antennas should be used no closer than 30 cm (12 inches) to any part of the device including cables specified by the manufacturer. Otherwise degradation of the performance of this equipment could result.
⚠️When repeating the Ankle-Brachial Pressure Index measurement or Blood Pressure measurement for several times a slight pain may appear at the measurement location. Other effects are excluded.
⚠️The cables and accessories may negatively affect the EMC performance. The device while operated should not be stacked closer than cm from another medical device.
⚠️Important information on electromagnetic compatibility (EMC). As the number of electronic devices such as computers and mobile phones in the room increases, medical devices can become sensitive to the electromagnetic influences of other devices. Electromagnetic interference can cause medical devices to malfunction, which can potentially lead to dangerous situations. Furthermore, medical devices must not interfere with other devices. The IEC/EN 60601-1-2 standard was introduced due to the necessity to establish electromagnetic compatibility (EMC) requirements for the prevention of dangerous situations in the use of medical devices. The standard defines the level of resistance to electromagnetic interference for medical devices. This medical device is compliant with the IEC/EN 60601-1-2 standard in terms of resistance to electromagnetic interference and electromagnetic emissions. Nevertheless, do not use mobile phones and similar devices which create strong electromagnetic fields in the vicinity of the device. This can cause the device to malfunction, which can potentially cause a dangerous situation.
7.3 MAINTENANCE
⚠️Do not dispose the device as unsorted municipal waste. Prepare it for recycling or separate waste collection in accordance with Directive 2002/96/EC on scrap electrical and electronic equipment (WEEE).
⚠️To prevent electric shock hazard due to leakage current, only use AC/DC power supplies which are compliant with the technical specifications of the device.
⚠️Only use non-aggressive cleaning agents to clean the device. The device may be wiped with a damp cloth.
⚠️Be careful when wrapping the cuffs. Do not wrap them too tightly.
⚠️Make sure that the device does not come into contact with an electrical current while it is being cleaned.
⚠️Do not open the device. The device does not contain any parts which can be replaced by a user. Do not alter or adapt the device.
⚠️Protect the device from moisture and liquids and extremely high/low temperatures. Also protect the device from mechanical stress and do not expose it to direct sunlight, as this can cause the device to not function properly.
⚠️If the device is used or stored outside the specific temperature range and air humidity, the accuracy specified within the technical specifications of the device is not guaranteed.
⚠️When moving the MESI ABPI MD stand, be sure to push the trolley and not the device.
⚠️Never carry out repairs of any kind yourself. If a defect occurs, consult your dealer or distributor
7.4 FUNCTIONING OF THE DEVICE
⚠️It is mandatory to have the device calibrated once per year to ensure the correct functioning and accuracy. Contact your dealer or the manufacturer about calibrating the device.
⚠️The device may only be used by professional medical personnel. The device is class A equipment and can cause radio interference or even cause nearby devices to cease to function. It may be necessary to reposition the MESI ABPI MD device or protect the room containing the device from electromagnetic radiation.
NOTE: The EMISSIONS characteristics of this equipment make it suitable for use in industrial areas and hospitals (CISPR 11 class A). If it is used in a residential environment (for which CISPR 11 class B is normally required) this equipment might not offer adequate protection to radio-frequency communication services. The user might need to take mitigation measures, such as relocating or re-orienting the equipment
Errors
Errors| Error | Description | Solution |
|---|
| PAD: Abnormally weak pulse detected. Possibility of severe PAD or incompressible arteries. Please check the cuff position and repeat the measurement. | The pulse was too weak. Reposition and repeat the measurement. | Check the position of the cuff and repeat the measurement. Follow Chapter 5.3.1 Cuff
placement. |
| E2: An anomaly has been detected. The patient may have moved during the measurement process. | The pulse was too weak. Reposition and repeat the measurement. | Remind the patient to remain still during measurement and repeat the measurement. |
| E3: Inflation insufficiency. Check the placement of the cuffs and repeat the measurement. | Inflation insufficiency. | Check the placement of the cuffs and repeat the measurement. |
| E4: An error occurred during heart rate calculation. | An error occurred during heart rate calculation. | Repeat the measurement. If the error persists, the measured value is outside the measurement range of the device. |
| E5: An error occurred during ankle brachial pressure index calculation. | An error occurred during ankle brachial calculation. | Repeat the measurement. If the error persists, the measured value is outside the measurement range of the device. |
| E6: Inflation error. Check the placement of the cuffs and repeat the measurement. | An error occurred during inflation of the cuff. | Check the placement of the cuffs and repeat the measurement. |
| E7: Deflation too fast. The cuff is not attached or is not attached correctly. Place the cuff correctly and repeat the measure�ment. | The cuff was insufficiently deflated. | The cuff is not attached or is not attached correctly. Attach the cuff correctly and repeat the measurement. |
| E8: An error occurred during systolic pressure calculation. | An error occurred during systolic pressure calculation. | Repeat the measurement. if the error is repeated, the measured value is outside the measurement range of the device. |
| E9: An error occurred during diastolic pressure calculation. | An error occurred during diastolic pressure calculation. | Repeat the measurement. if the error is repeated, the measured value is outside the measurement range of the device. |
| E10: An error occurred during mean pressure calculation. | An error occurred during mean pressure calculation. | Repeat the measurement. if the error is repeated, the measured value is outside the measurement range of the device. |
| E11: A large pressure fluctuation was detected. The patient may have moved. | A large pressure fluctuation was detected. The patient may have moved. | The result may be incorrect. Repeat the measurement. |
Troubleshooting
Troubleshooting| Name | Description | Instructions |
|---|
| Unexpected result. | Incorrect cuff placement. | Reread the instructions for use and place the cuffs correctly. |
| Unexpected result. | Patient moving during measurement. | Repeat the measurement process. |
| Unexpected result. | Wrong cuff size used. | Use cuffs of the correct size. |
| Unexpected result. | Possible air leakage. | Check the cuffs, the air tubes and the connectors and replace them if necessary. If you cannot fix the issue yourself, consult your dealer or the manufacturer. |
| Audible stretching of the fastening tape | Incorrect cuff placement. | Reread the instructions for use and place the cuffs correctly. |
| Audible stretching of the fastening tape | Wrong cuff size used. | Use cuffs of the correct size. |
| The cuffs do not inflate.
Hissing noises. Unexpected result. | Possible air leakage. | Check the cuffs, the air tubes and the connectors, and replace them if necessary.
If you cannot fix the issue
yourself, consult your dealer or the manufacturer. |
| Device not
responding. | Possible EMC disturbances. | Press and hold the ON/OFF
button for at least 10 seconds. |
NOTE: If the problem continues, contact the manufacturer or the local distributor for further assistance.
Warranty information
A warranty period applies to the device, starting from the date of purchase (delivery date shown on the invoice). Warranty claims will only be valid, if accompanied by the purchase receipt. More details about the warranty can be found in the warranty booklet attached to the given instructions for use.
Standard compliance
The provisions of the Council Directive 93/42/EEC concerning medical devices were complied with. The standards in the table below were complied with.
Standard compliance| Reference number | Description |
|---|
| EN 60601-1:2006/ A1:2013 | Medical electrical equipment - Part 1: General requirements for basic safety and essential performance |
| EN 60601-1-2:2015+A1:2021 | Medical electrical equipment - Part 1-2: General requirements for basic safety and essential performance - Collateral Standard: Electromagnetic disturbances - Requirements and tests |
| EN 60601-1-6:2010/ A1:2015 | Medical electrical equipment - Part 1-6: General requirements for basic safety and essential performance - Collateral standard: Usability |
| EN 80601-2-30:2010+A1:2015 | Medical electrical equipment - Part 2-30: Particular requirements for the basic safety and essential performance of automated non-invasive sphygmomanometers |
| EN ISO 81060-1:2012 | Non-invasive sphygmomanometers. Part 1: General requirements |
| EN 1060-3:2000+A2:2010 | Non-invasive sphygmomanometers – Part 3:
Supplementary requirements for electromechanical blood pressure measuring systems |
| EN 1060-4:2004 | Non-invasive sphygmomanometers. Test procedures to determine the overall system accuracy of automated noninvasive sphygmomanometers |
| EN ISO 14971:2012 | Medical devices – Application of risk management to medical devices |
| EN ISO 109931:2009/AC:2010 | Biological evaluation of medical devices – Part 1: Evaluation and testing within a risk management process |
| ISO 15223-1:2021 | Medical devices - Symbols to be used with medical device labels, labelling and information to be supplied - Part 1: General requirements |
| EN ISO 13485:2016 | Medical devices – Quality management systems – Requirements for regulatory purposes |
| EN 62304:2006/ A1:2015 | Medical device software - Software lifecycle processes |
| EN ISO 13485:2016 | Medical devices - Application of usability engineering to medical devices |
| EN 301 489-1 V2.2.2 | Electromagnetic Compatibility (EMC) standard for radio equipment and services. Part 1: Common technical requirements.
Harmonized Standard for Electromagnetic Compatibilit |
| EN 301 489-17 V3.1.1 | Electromagnetic Compatibility (EMC) standard for radio equipment and services; Part 17: Specific conditions for Broadband Data Transmission Systems; Harmonized Standard covering the essential requirements of article 3.1(b) of Directive 2014/53/EU |
11.1. MANUFACTURER DECLARATION ON EMC
MESI ABPI MD is intended for use in the electromagnetic environment specified below. The customer or the user of the above listed models should assure that they are used in such an environment.
Manufacturer declaration on EMC| Emissions test | Compliance | Electromagnetic environment - guidance |
|---|
| RF emissions CISPR 11 | Group 1 | The above listed models use RF energy only for its internal function. Therefore, its RF emissions are very low and are not likely to cause any interference in nearby electronic equipment. |
| RF emissions CISPR 11 | Class B | MESI ABPI MD is suitable for use in all establishments, including domestic establishments and those directly connected to the public low-voltage power supply network that supplies buildings used for domestic purposes. |
| Harmonic emissions IEC 61000-3-2 | N/A | MESI ABPI MD is suitable for use in all establishments, including domestic establishments and those directly connected to the public low-voltage power supply network that supplies buildings used for domestic purposes. |
| Voltage fluctuations / flicker emissions IEC 61000-3-3 | Complies | MESI ABPI MD is suitable for use in all establishments, including domestic establishments and those directly connected to the public low-voltage power supply network that supplies buildings used for domestic purposes. |
Enclosure Port
Enclosure Port| Phenomenon | Professional healthcare facility environment | Home healthcare environment |
|---|
| Electronic discharge
IEC 61000-4-2 | ±,8 kV Contact
± 2, 4, 8, 15 kV Air | ±,8 kV Contact
± 2, 4, 8, 15 kV Air |
| Radiated RF EM fields
a) IEC 61000-4-3 | 3 V/m f)
80 MHz – 2,7 GHz b)
80% AM 1 kHz c) | 3 V/m f)
80 MHz – 2,7 GHz b)
80% AM 1 kHz c) |
Enclosure Port - All environments| Phenomenon | Test frequency (MHz) | Modulation Test level (V/m) |
|---|
| Proximity fields from RF wireless communications equipment IEC 61000-4-3
Rated power frequency magnetic fields d) e) IEC 610004-8 | 385 MHz (18 Hz Pulse Modulation) b) | 27 V/m |
| Proximity fields from RF wireless communications equipment IEC 61000-4-3
Rated power frequency magnetic fields d) e) IEC 610004-8 | 450 MHz (FM+/-5 KHz deviation 1 kHz sine) c) | 28 V/m |
| Proximity fields from RF wireless communications equipment IEC 61000-4-3
Rated power frequency magnetic fields d) e) IEC 610004-8 | 710 MHz (217 Hz PM) b) | 9 V/m |
| Proximity fields from RF wireless communications equipment IEC 61000-4-3
Rated power frequency magnetic fields d) e) IEC 610004-8 | 745 MHz (217 Hz PM) b) | 9 V/m |
| Proximity fields from RF wireless communications equipment IEC 61000-4-3
Rated power frequency magnetic fields d) e) IEC 610004-8 | 780 MHz (217 Hz PM) b) | 9 V/m |
| Proximity fields from RF wireless communications equipment IEC 61000-4-3
Rated power frequency magnetic fields d) e) IEC 610004-8 | 810 MHz (18 Hz PM) b) | 28 V/m |
| Proximity fields from RF wireless communications equipment IEC 61000-4-3
Rated power frequency magnetic fields d) e) IEC 610004-8 | 870 MHz (18 Hz PM) b) | 28 V/m |
| Proximity fields from RF wireless communications equipment IEC 61000-4-3
Rated power frequency magnetic fields d) e) IEC 610004-8 | 1720 MHz (217 Hz PM) b) | 28 V/m |
| Proximity fields from RF wireless communications equipment IEC 61000-4-3
Rated power frequency magnetic fields d) e) IEC 610004-8 | 1720 MHz (217 Hz PM) b) | 28 V/m |
| Proximity fields from RF wireless communications equipment IEC 61000-4-3
Rated power frequency magnetic fields d) e) IEC 610004-8 | 1845 MHz (217 Hz PM) b) | 28 V/m |
| Proximity fields from RF wireless communications equipment IEC 61000-4-3
Rated power frequency magnetic fields d) e) IEC 610004-8 | 1970 MHz (217 Hz PM) b) | 28 V/m |
| Proximity fields from RF wireless communications equipment IEC 61000-4-3
Rated power frequency magnetic fields d) e) IEC 610004-8 | 2450 MHz (217 Hz PM) b) | 28 V/m |
| Proximity fields from RF wireless communications equipment IEC 61000-4-3
Rated power frequency magnetic fields d) e) IEC 610004-8 | 5240 MHz (217 Hz PM) b) | 9 V/m |
| Proximity fields from RF wireless communications equipment IEC 61000-4-3
Rated power frequency magnetic fields d) e) IEC 610004-8 | 5500 MHz (217 Hz PM) b) | 9 V/m |
| Proximity fields from RF wireless communications equipment IEC 61000-4-3
Rated power frequency magnetic fields d) e) IEC 610004-8 | 5785 MHz (217 Hz PM) b) | 9 V/m |
NOTE: If necessary to achieve the IMMUNITY TEST LEVEL, the distance between the transmitting antenna and the ME EQUIPMENT or ME SYSTEM may be reduced to 1 m. The 1 m test distance is permitted by IEC 61000-4-3. b) The carrier shall be modulated using a 50 % duty cycle square wave signal. c) As an alternative to FM modulation, 50 % pulse modulation at 18 Hz may be used because while it does not represent actual modulation, it would be worst case.
Enclosure Port - All environments| Phenomenon | Test frequency | Modulation | Immunity test level (A/m) |
|---|
| Rated power frequency magnetic fields d) e) IEC 610004-8 | 30 A/m g)
50 Hz or 60 Hz | | |
| Proximity magnetic fields
IEC 61000-4-39 | 30 kHz a) | CW | 8 |
| Proximity magnetic fields
IEC 61000-4-39 | 134,2 kHz | PM b)
2,1 kHz | 65 c) |
| Proximity magnetic fields
IEC 61000-4-39 | 13,56 MHz | PM b)
50 Hz | 7,5 c) |
a) This test is applicable only to ME EQUIPMENT and ME SYSTEMS intended for use in the HOME HEALTHCARE ENVIRONMENT.
b) The carrier shall be modulated using a 50 % duty cycle square wave signal.
c) r.m.s., before modulation is applied.
Comment:
a) The interface between the PATIENT physiological signal simulation, if used, and the ME EQUIPMENT or ME SYSTEM shall be located within 0,1 m of the vertical plane of the uniform field area in one orientation of the ME EQUIPMENT or ME SYSTEM.
b) ME EQUIPMENT and ME SYSTEMS that intentionally receive RF electromagnetic energy for the purpose of their operation shall be tested at the frequency of reception. Testing may be performed at other modulation frequencies identified by the RISK MANAGEMENT PROCESS. This test assesses the BASIC SAFETY and ESSENTIAL PERFORMANCE of an intentional receiver when an ambient signal is in the passband. It is understood that the receiver might not achieve normal reception during the test.
c) Testing may be performed at other modulation frequencies identified by the RISK MANAGEMENT PROCESS.
d) Applies only to ME EQUIPMENT and ME SYSTEMS with magnetically sensitive components or circuitry.
e) Void.
f) Before modulation is applied.
Input a.c. power PORT
Input d.c. power port| Phenomenon | Professional healthcare facility environment | Home healthcare environment |
|---|
| Electrical fast transient/bursts
IEC 610004-4 (a, g) | ± 2 kV
100 kHz Repetition frequency | |
| Surges (a, b, g)
IEC 61000-4-5 | ± 0,5 kV, ± 1 kV line to line
± 0,5 kV, ± 1 kV, ± 2 kV line to ground | |
| Conducted disturbances induced by RF fields a) c) d) i)
IEC 61000-4-6 | 3 V (h)
150 kHz - 80 MHz
6 V(h) in ISM bands between 150
kHz - 80 MHz c)
80% AM 1 kHz c) | 3 V (h)
150 kHz - 80 MHz
6 V(h) in ISM and amateur radio
bands between 150 kHz - 80 MHz c)
80% AM 1 kHz c) |
| Electrical transient
Conduction along supply lines f)
ISO 7637-2 | Not applicable | As specified in ISO 7637-2 |
Comment:
a) The test is applicable to all d.c. power PORTS intended to be connected permanently to cables longer than 3 m.
b) All ME EQUIPMENT and ME SYSTEM cables shall be attached during the test.
c) INTERNALLY POWERED ME EQUIPMENT is exempt from this test if it cannot be used during battery charging, is of less than 0,4 m maximum dimension including the maximum length of all cables specified and has no connection to earth, telecommunications systems, any other equipment or a PATIENT.
d) The test may be performed with the ME EQUIPMENT or ME SYSTEM powered at any one of its NOMINAL input voltages.
e) Testing may be performed at other modulation frequencies identified by the RISK MANAGEMENT PROCESS.
f) For ME EQUIPMENT and ME SYSTEMS intended to be installed in passenger cars and light commercial vehicles including ambulances fitted with 12 V electrical systems or commercial vehicles including ambulances fitted with 24 V electrical systems.
g) Direct coupling shall be used.
h) r.m.s., before modulation is applied.
i) If the frequency stepping skips over an ISM or amateur radio band, as applicable, an additional test frequency shall be used in the ISM or amateur radio band. This applies to each ISM and amateur radio band within the specified frequency range.
j) The ISM (industrial, scientific and medical) bands between 0,15 MHz and 80 MHz are 6,765 MHz to 6,795 MHz; 13,553 MHz to 13,567 MHz; 26,957 MHz to 27,283 MHz; and 40,66 MHz to 40,70 MHz. The amateur radio bands between 0,15 MHz and 80 MHz are 1,8 MHz to 2,0 MHz, 3,5 MHz to 4,0 MHz, 5,3 MHz to 5,4 MHz, 7 MHz to 7,3 MHz, 10,1 MHz to 10,15 MHz, 14 MHz to 14,2 MHz, 18,07 MHz to 18,17 MHz, 21,0 MHz to 21,4 MHz, 24,89 MHz to 24,99 MHz, 28,0 MHz to 29,7 MHz and 50,0 MHz to 54,0 MHz.
Signal input/output parts PORT
Signal input/output parts PORT| Phenomenon | Professional healthcare facility environment | Home healthcare environment |
|---|
| Electrostatic discharge (ESD)
IEC 61000-4-2 e) | ± 8 kV Contact
± 2, 4, 8, 15 kV Air | |
| Electrical fast transient/bursts
IEC 610004-4 b, f) | ± 1 kV
100 kHz Repetition frequency | |
| Surges
Line-to ground a)
IEC 61000-4-5 | ± 2 kV (not applicable) | 3 V (h)
150 kHz - 80 MHz
6 V(h) in ISM and amateur radio bands between 150 kHz - 80 MHz c)
80% AM 1 kHz c) |
| Conducted distur�bances induced
by RF fields
IEC 61000-4-6
b) d) g) | 3 V (h)
150 kHz - 80 MHz
6 V(h) in ISM bands between 150 kHz - 80 MHz c)
80% AM 1 kHz c) | |
Comment:
a) This test applies only to output lines intended to connect directly to outdoor cables.
b) SIP/SOPS whose maximum cable length is less than 3 m in length are excluded.
c) Testing may be performed at other modulation frequencies identified by the RISK MANAGEMENT PROCESS.
d) Calibration for current injection clamps shall be performed in a 150 Ω system.
e) Connectors shall be tested per 8.3.2 and Table 4 of IEC 61000-4-2:2008. For insulated connector shells, perform air discharge testing to the connector shell and the pins using the rounded tip finger of the ESD generator, with the exception that the only connector pins that are tested are those that can be contacted or touched, under conditions of INTENDED USE, by the standard test finger shown in Figure 6 of the general standard, applied in a bent or straight position.
f) Capacitive coupling shall be used.
g) If the frequency stepping skips over an ISM or amateur radio band, as applicable, an additional test frequency shall be used in the ISM or amateur radio band. This applies to each ISM and amateur radio band within the specified frequency range.
h) r.m.s., before modulation is applied.
i) The ISM (industrial, scientific and medical) bands between 150 kHz and 80 MHz are 6,765 MHz to 6,795 MHz; 13,553 MHz to 13,567 MHz; 26,957 MHz to 27,283 MHz; and 40,66 MHz to 40,70 MHz. The amateur radio bands between 0,15 MHz and 80 MHz are 1,8 MHz to 2,0 MHz, 3,5 MHz to 4,0 MHz, 5,3 MHz to 5,4 MHz, 7 MHz to 7,3 MHz, 10,1 MHz to 10,15 MHz, 14 MHz to 14,2 MHz, 18,07 MHz to 18,17 MHz, 21,0 MHz to 21,4 MHz, 24,89 MHz to 24,99 MHz, 28,0 MHz to 29,7 MHz and 50,0 MHz to 54,0 MHz.
The MESI ABPI MD’s essential performance is performing an ABI measurement under specified operating conditions. The measurement is defined as the measurement process on and data storage to the MESI ABPI MD device. Due its high sensitivity, intended use and operating modes, the device is susceptible to EM interferences. If the essential performance of the device is decreased, the device will notify the user with error messages on any issues while the cuffs (if in use during the adverse event) will deflate and cause no harm to the patient.
Important labels
ABPI important labelsABPI important labels
ABPI important labelsABPI important labels
04-2026 / V. 2.1